Chapter 28: AWS Production Deployment

Taking Your Application From Laptop to Cloud

1. Introduction

Your News Aggregator API works perfectly. You can show it to a friend, if they sit next to you. You can demo it to a recruiter, if you schedule a call and hope your WiFi holds. You can handle user traffic, if users only visit when your laptop is awake. Production-ready code trapped in a local environment isn't production-ready at all.

Local vs. Production Environments

Running code locally and running it in production are fundamentally different challenges. Local development means one user, predictable load, direct access to logs, and manual restarts when things break. Production means thousands of concurrent users, unpredictable traffic spikes, servers in data centers you'll never see, and systems that must recover automatically when failures occur.

Your laptop isn't a server

Your laptop goes to sleep when you close the lid. It has no redundancy when the hard drive fails. It has one public IP address that changes when you switch networks. It can't handle 1,000 requests per second. Professional applications run on infrastructure designed for reliability, scalability, and availability. That infrastructure lives in the cloud.

Production requires supporting services

Your News API needs a database. In production, that database needs automated backups, failover to standby instances when the primary fails, and the ability to scale storage without downtime. Your API needs SSL certificates for HTTPS. It needs load balancing so traffic distributes across multiple containers. It needs monitoring to detect problems before users notice them. These supporting services require infrastructure expertise.

Manual deployment doesn't scale

SSH into a server, copy files, restart services, and pray everything works. That process breaks down with multiple servers, multiple deployments per day, and team members who need to deploy safely. Professional applications run on cloud infrastructure designed for reliability and scale: managed databases, serverless containers, load balancers, and centralized logging. This chapter builds that production infrastructure.

The Solution: AWS

Chapter 27 solved one problem: containerization. Your application runs identically on any machine with Docker installed. One command starts your entire stack: FastAPI, PostgreSQL, Redis. No more "works on my machine" debugging. No more missing dependencies. The containers work perfectly, but they only run where you run them.

This chapter solves the deployment problem: You'll deploy your containerized News API to AWS with professional infrastructure: serverless containers on ECS Fargate, managed databases with RDS PostgreSQL and ElastiCache Redis, and public HTTPS access through an Application Load Balancer. You'll learn to view container logs in CloudWatch for troubleshooting. This isn't a proof-of-concept deployment like Railway in Chapter 26. This is production-grade infrastructure demonstrating senior-level skills.

What is AWS?

AWS (Amazon Web Services) is the world's largest cloud computing platform, providing over 200 services for running applications in the cloud. Instead of buying and maintaining your own servers, you rent computing resources from AWS—servers, storage, databases, networking—and pay only for what you use. This chapter uses AWS because it's the industry standard: learning AWS means learning infrastructure patterns that transfer to any cloud platform and any scale of application.

Diagram showing AWS as a global cloud platform. Left side shows physical servers crossed out with 'BUY & MAINTAIN' label. Center shows AWS cloud with four service categories: Compute (Servers), Storage (Databases), Networking, and Over 200 Services. Right side shows pay-as-you-go model with various application icons. Bottom banner reads: 'INDUSTRY STANDARD: Learn transferable infrastructure patterns for any scale.'
AWS replaces capital-intensive physical infrastructure with pay-as-you-go cloud services, enabling elastic capacity that scales with demand.
The AWS Services You'll Use

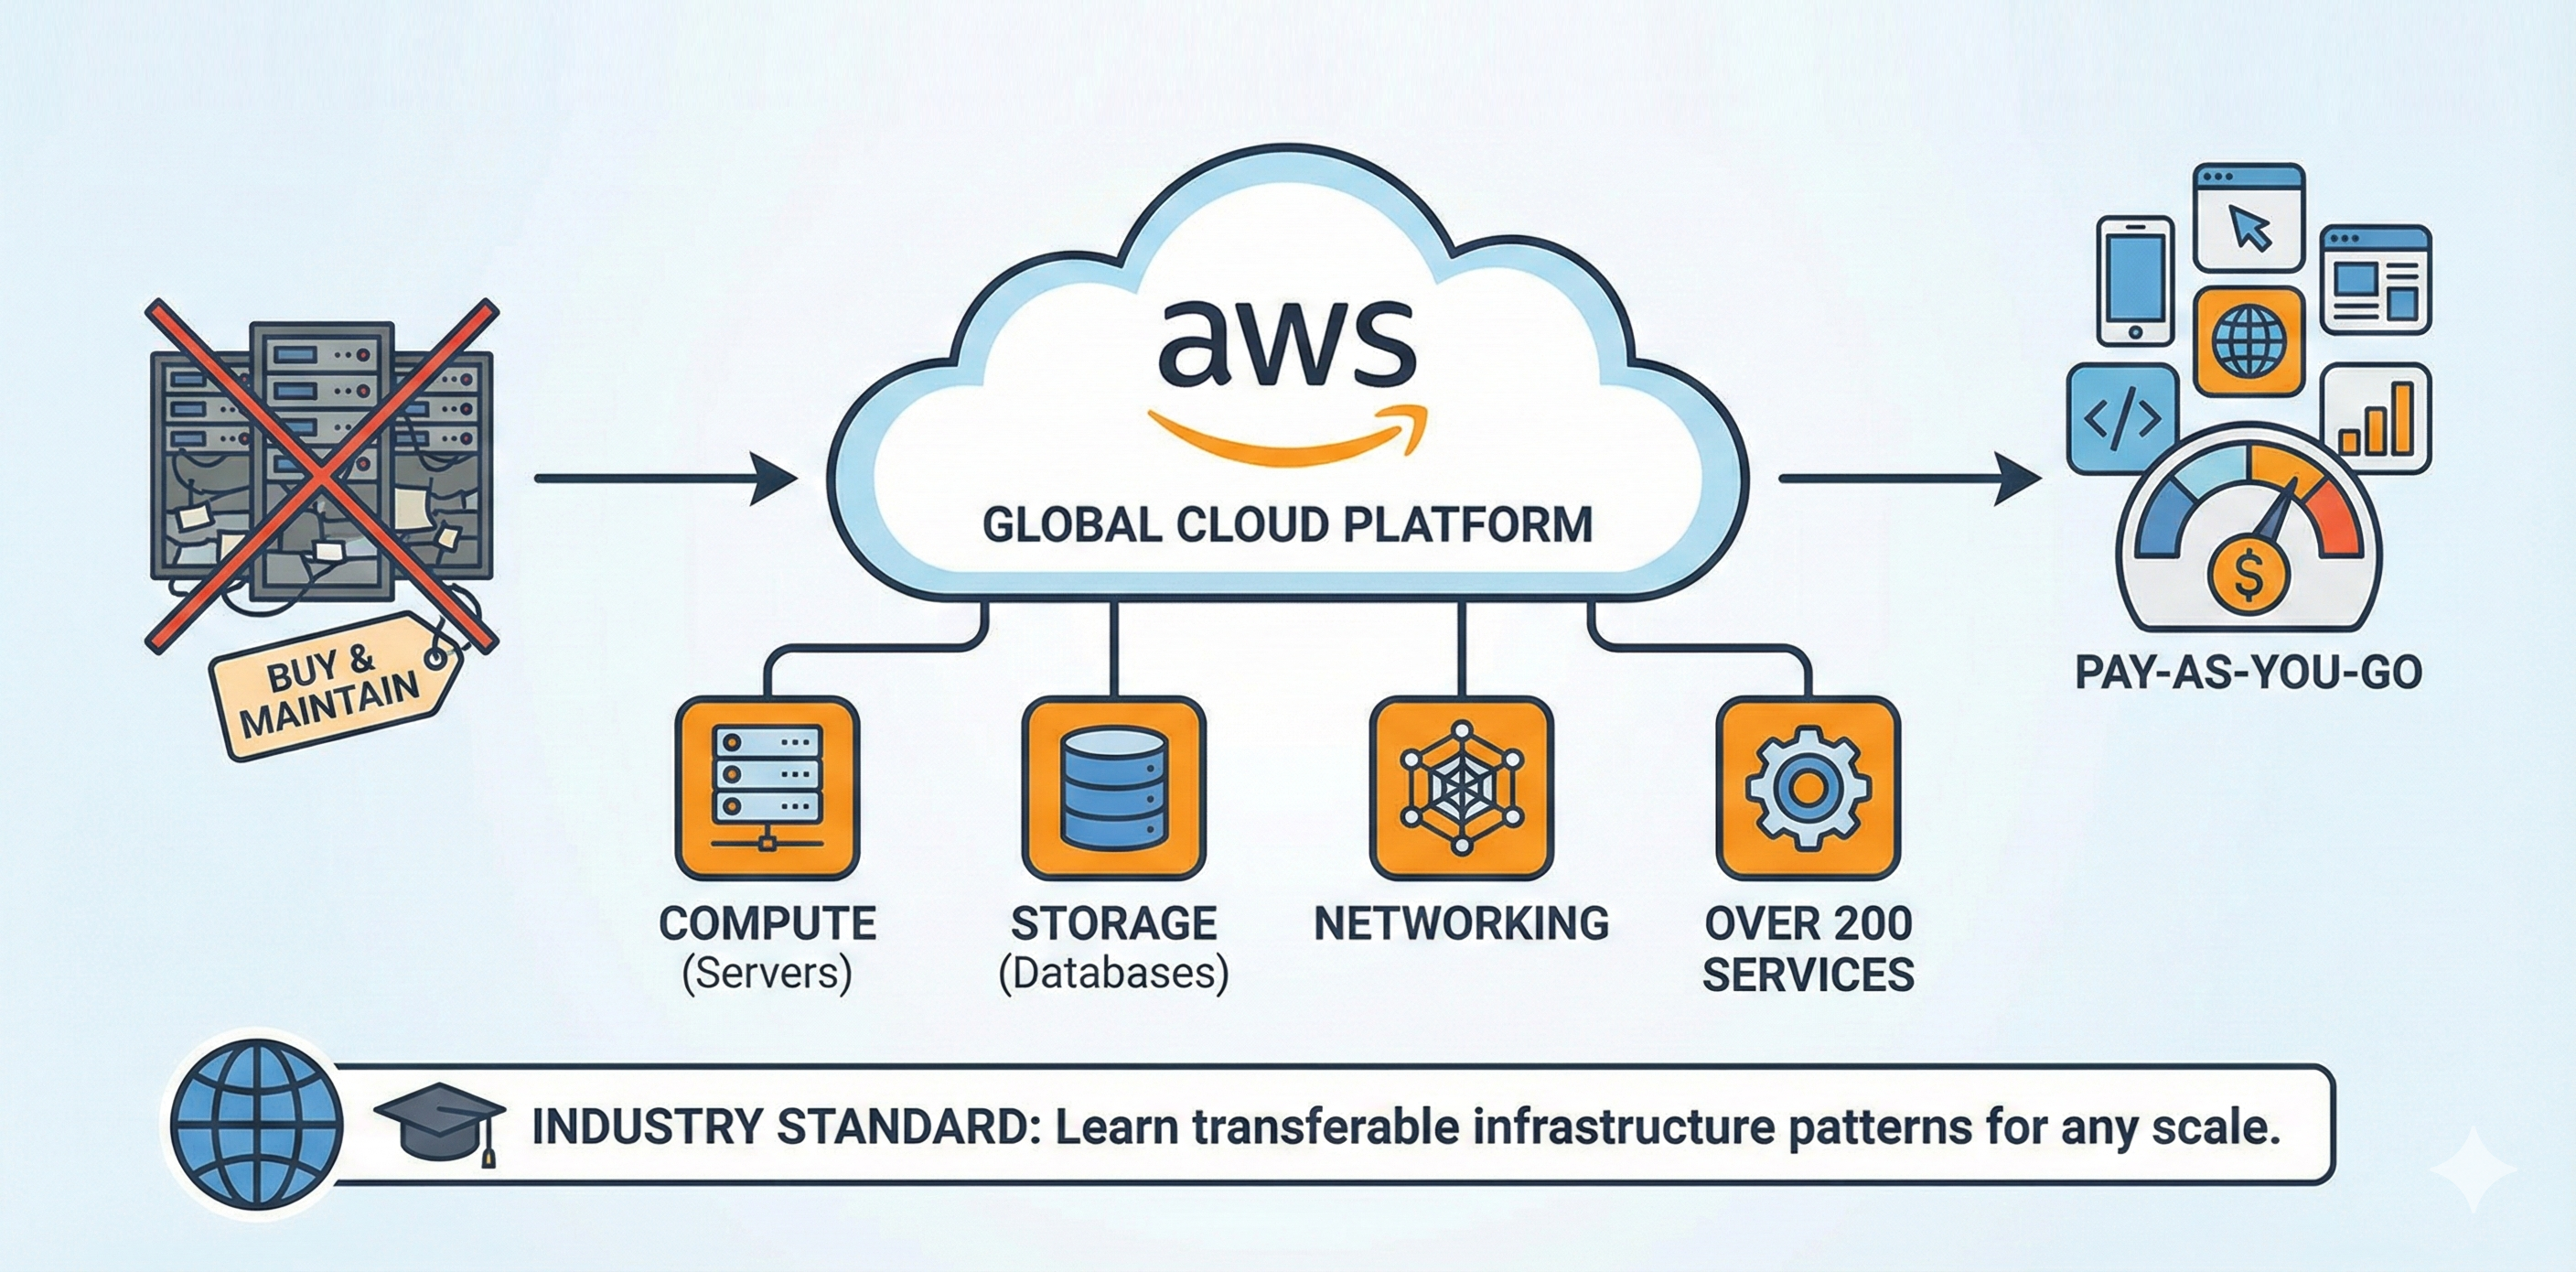
You'll use six core AWS services in this chapter: ECR (stores Docker images), ECS Fargate (runs containers), RDS (managed PostgreSQL), ElastiCache (managed Redis), ALB (load balancing), and CloudWatch (logging). Section 2 explains cloud computing fundamentals and why AWS is the right choice for learning production infrastructure. For now, just know that AWS provides the infrastructure layer that makes your containers accessible globally.

By the end, you'll have a live API at a public URL, complete with automatic documentation. You'll understand how to deploy containerized applications to production, configure managed databases, set up load balancing, and view application logs. When you share this with recruiters, you're showing them: "I understand how to deploy systems to the cloud using industry-standard infrastructure patterns." That's the career transformation this chapter enables.

Why Pick AWS for This Chapter?

AWS is the largest cloud provider with the deepest service catalog. Learning AWS means learning infrastructure patterns that transfer to any cloud platform. ECS Fargate teaches container orchestration concepts that apply to Kubernetes. RDS teaches managed database patterns that apply to any cloud. CloudWatch teaches observability principles that apply everywhere.

You could deploy to Railway, Heroku, or Fly.io with less configuration. But those platforms abstract away infrastructure decisions. You don't learn how load balancers work, how databases are managed in the cloud, or how to troubleshoot production issues. AWS requires more setup, but that setup is the education. You're learning the infrastructure layer that powers modern applications. These skills separate junior developers from senior engineers.

Chapter Roadmap

This chapter takes you from a containerized application running on your laptop to a fully deployed production system on AWS. You'll progress through cloud fundamentals, account security, and then build each infrastructure layer one service at a time until your News API is live at a public URL.

1

Cloud Foundations and AWS Account Setup

Sections 2–3 • Foundation Phase

Understand cloud computing fundamentals and the six AWS services you'll use. Create a secure AWS account with IAM users, billing alerts, and MFA protection, then configure the AWS CLI on your local machine for command-line access to all services.

Cloud Computing IAM Security AWS CLI Billing Alerts
2

Container Registry with ECR

Section 4 • Image Management Phase

Push your News API Docker image to Amazon ECR, AWS's container registry. You'll authenticate Docker with ECR, tag images for version tracking, and establish the image pipeline that ECS pulls from during deployment.

ECR Docker Push Image Tagging
3

Managed Databases: RDS and ElastiCache

Section 5 • Data Layer Phase

Replace local PostgreSQL and Redis containers with fully managed AWS services. Create an RDS PostgreSQL instance with automated backups and an ElastiCache Redis cluster for caching, then configure security groups for least-privilege database access.

RDS PostgreSQL ElastiCache Redis Security Groups Data Migration
4

Deploying Containers with ECS Fargate

Section 6 • Compute Phase

Deploy your containerized News API on ECS Fargate, AWS's serverless container platform. Create clusters, task definitions specifying CPU, memory, and environment variables, then launch an ECS service that maintains your desired container count with automatic restarts.

ECS Fargate Task Definitions CloudWatch Logs
5

Load Balancer, HTTPS, and Going Live

Section 7 • Networking Phase

Create an Application Load Balancer that gives your API a stable public URL. Configure target groups, health checks, and listeners to distribute traffic across containers. Test your live API at the ALB endpoint and optionally add HTTPS with SSL certificates.

ALB Health Checks HTTPS Public URL

What You'll Build: Production AWS Infrastructure

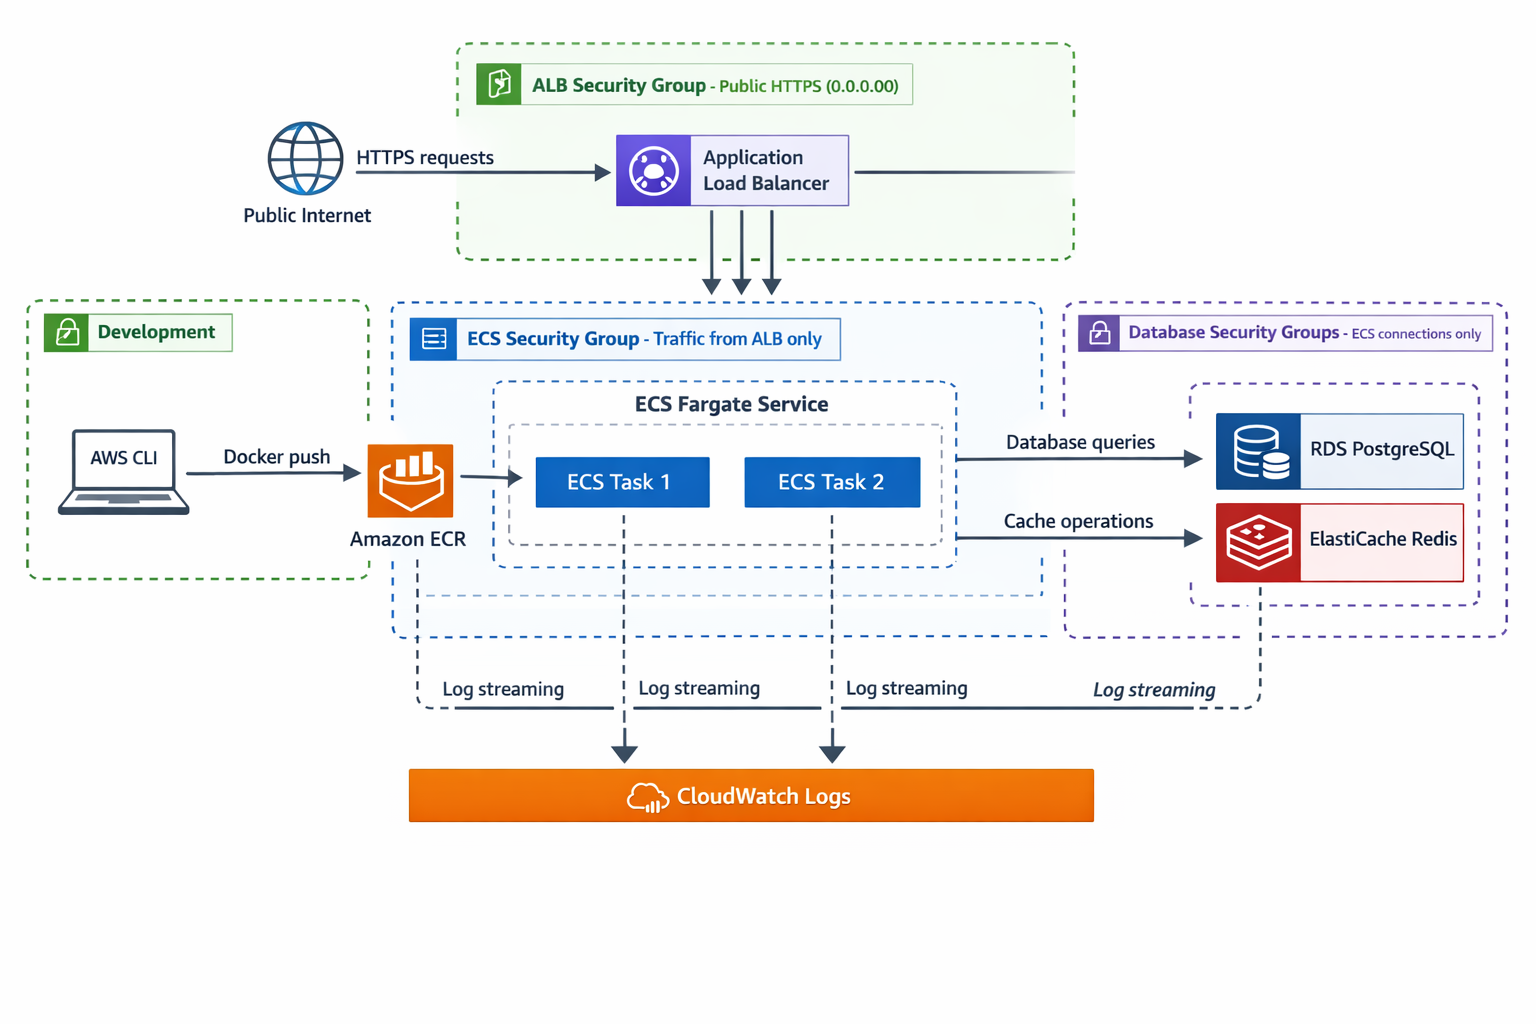
You're deploying the exact News API from Chapter 27 with no code changes. Containerization makes that possible. What changes is where your containers run and how they're supported. You'll build complete production infrastructure across multiple AWS services.

1.

Container Registry (ECR)

AWS Elastic Container Registry stores every Docker image you build. You'll push your News API image to ECR, tag it properly for version tracking, and configure ECS to pull from this registry. This centralized image storage enables consistent deployments: the same image runs in development, staging, and production.

2.

Managed Databases (RDS + ElastiCache)

Your local PostgreSQL and Redis containers become fully managed services. RDS PostgreSQL provides automated backups, point-in-time recovery, and multi-availability-zone failover. ElastiCache Redis offers managed caching with automatic failover. You'll migrate your database configuration from localhost to managed endpoints, gaining production-grade reliability without operational overhead.

3.

Serverless Containers (ECS Fargate)

Your News API runs on ECS Fargate: a serverless container platform where you don't manage EC2 instances. You define what containers to run and how much CPU/memory they need. AWS handles the rest: provisioning servers, networking, health checks, and automatic restarts when containers fail. You'll create task definitions specifying your container configuration and ECS services maintaining your desired container count.

4.

Load Balancer (ALB)

The Application Load Balancer provides your public HTTPS endpoint. It distributes incoming requests across multiple containers, performs health checks to remove failing containers from rotation, and handles SSL/TLS termination for HTTPS. The ALB DNS name becomes your stable public URL that never changes, even as containers start, stop, and restart behind it.

5.

CloudWatch Logging

All container logs stream to CloudWatch Logs automatically. You'll configure ECS to send application logs to centralized log groups, then learn to view and query these logs for troubleshooting. When containers fail or APIs return errors, CloudWatch Logs show you exactly what happened. This basic logging foundation prepares you for the comprehensive monitoring you'll add in Chapter 29.

The Complete System: Architecture Overview

The final infrastructure connects like this: You push Docker images to ECR manually using the AWS CLI. ECS Fargate runs multiple containers pulled from ECR, configured through task definitions. Those containers connect to RDS PostgreSQL for article storage and ElastiCache Redis for caching. An Application Load Balancer distributes incoming HTTPS requests across containers. CloudWatch collects logs from all services, giving you visibility into application behavior.

This architecture handles thousands of requests per second, survives individual container failures, and provides complete visibility into system behavior through logging. It's the infrastructure pattern companies use in production. Building it yourself, from scratch, proves you understand modern cloud deployments at a professional level. In Chapter 29, you'll add automation (CI/CD), comprehensive monitoring (CloudWatch dashboards and alarms), and elastic scaling (auto-scaling policies) to transform this deployment into full production operations.

Complete AWS infrastructure architecture diagram. Developer laptop with AWS CLI pushes Docker images to Amazon ECR. ECR feeds ECS Fargate service running two tasks behind an Application Load Balancer (ALB). The ALB receives HTTPS traffic from the public internet and distributes it across ECS tasks. ECS tasks connect to RDS PostgreSQL for data persistence and ElastiCache Redis for caching. All components send logs to CloudWatch Logs. Security group boundaries are shown: ALB security group allows public HTTPS, ECS security group allows traffic from ALB only, and database security groups allow connections from ECS only. Components are connected with labeled arrows showing data flow: Docker push, image pull, HTTPS requests, database queries, cache operations, and log streaming.
Your complete Chapter 28 infrastructure: containerized application deployed to ECS Fargate with managed databases, load balancing, and logging. Chapter 29 will add CI/CD automation, monitoring dashboards, and auto-scaling to this foundation.

Learning Objectives

What You'll Master in This Chapter

By the end of this chapter, you'll be able to:

  • Explain cloud computing fundamentals and when to use AWS versus PaaS alternatives
  • Set up AWS accounts securely with IAM users, billing alerts, and MFA protection
  • Push Docker images to AWS ECR and manage container registry versioning
  • Deploy containerized applications using ECS Fargate with proper task definitions and service configuration
  • Migrate from local databases to managed RDS PostgreSQL and ElastiCache Redis
  • Configure Application Load Balancers with health checks for high availability
  • Set up CloudWatch Logs to capture and view container output for troubleshooting
  • Configure security groups implementing least-privilege network access control
  • Test deployed APIs through load balancer URLs and verify production functionality
  • Optimize AWS costs using Free Tier resources and right-sizing strategies

The Professional Payoff

Infrastructure skills separate good developers from great ones. Anyone can write code that works locally. Professional developers write code that works reliably in production, scales under load, recovers from failures automatically, and provides visibility into system behavior. Those skills require infrastructure knowledge.

This chapter teaches production deployment patterns used by companies of all sizes. The specific services change—AWS versus Azure versus Google Cloud—but the patterns remain constant: containerize applications, use managed databases, distribute traffic through load balancers, centralize logging. Learning these patterns with AWS means understanding infrastructure at a fundamental level that transfers to any cloud platform.

When you complete this chapter, you'll have a live News API accessible at a public URL. You'll understand how containers run in the cloud, how databases are managed at scale, how load balancing enables reliability, and how logging provides visibility. These skills demonstrate infrastructure competency that most developers lack. In technical interviews, you can discuss production deployments confidently because you've built one yourself. That competency opens doors to senior engineering roles where infrastructure expertise is expected.

The journey from "works on my laptop" to "deployed on AWS" is transformative. You'll understand not just how to write code, but how to deploy it professionally. That's the difference between completing tutorials and building systems that serve real users. This chapter bridges that gap.

2. AWS Services Overview

AWS is the world's largest cloud computing platform, offering over 200 services for running applications in the cloud. Instead of buying and maintaining your own servers, you rent computing resources from AWS and pay only for what you use. This chapter uses AWS because it's the industry standard:learning AWS means learning infrastructure patterns that transfer to any cloud platform and any scale of application.

You'll use six core AWS services to deploy your News API. Each service solves a specific production problem: storing Docker images, running containers, managing databases, distributing traffic, and monitoring system health. These six services form the foundation of production deployments at companies of all sizes.

1.

ECR (Elastic Container Registry)

Stores your Docker images in AWS. Think of it as Docker Hub but integrated with AWS services, with better security and faster pulls from ECS.

2.

ECS (Elastic Container Service) with Fargate

Runs your containerized applications without managing servers. You define what containers to run and how much CPU/memory they need. AWS handles the rest.

3.

RDS (Relational Database Service)

Provides managed PostgreSQL databases. AWS handles backups, updates, failover, and monitoring. You connect to it like any PostgreSQL database.

4.

ElastiCache

Provides managed Redis instances for caching. Same benefits as RDS: AWS manages infrastructure, you use Redis like normal.

5.

ALB (Application Load Balancer)

Distributes incoming HTTP/HTTPS traffic across your ECS containers. Handles SSL termination, health checks, and traffic routing.

6.

CloudWatch

Centralized logging and monitoring. All your services send logs and metrics to CloudWatch. You create dashboards, set alarms, and query logs to debug issues.

These six services form the core of a production deployment. Additional services support them (IAM for security, VPC for networking, Secrets Manager for credentials) but these six do the heavy lifting. Learn these patterns and you'll understand 80% of typical AWS deployments.

The AWS Learning Curve

AWS has a reputation for complexity. This reputation is earned:the console has hundreds of options, documentation uses unfamiliar terminology, and seemingly simple tasks require understanding multiple interconnected services. This complexity exists for a reason: AWS supports use cases from simple web apps to planet-scale infrastructure running Netflix and Airbnb.

The good news: you don't need to understand all of AWS to deploy production applications. This chapter teaches the essential patterns: containers, databases, load balancing, monitoring. These patterns repeat across cloud platforms. The specific AWS service names change but the concepts remain constant. Learn the fundamentals here and everything else becomes incremental learning as you need it.

Checkpoint Quiz

Test your understanding of AWS services and their roles in production infrastructure. If you can answer confidently, you've mastered the material:

Select question to reveal the answer:
What's the difference between ECR and ECS, and why do you need both?

ECR (Elastic Container Registry) stores your Docker images. Think of it as "GitHub for containers." ECS (Elastic Container Service) runs those images as actual containers. You need both because ECS pulls images from ECR when starting tasks. Without ECR, ECS wouldn't know where to get your container images. Without ECS, your images would sit in storage but never run.

Why use managed databases (RDS and ElastiCache) instead of running PostgreSQL and Redis in containers?

Managed databases handle operational complexity automatically: automated backups, failover to standby instances, online storage scaling, and security patches. Running databases in containers means you implement all of this yourself. For production applications where data loss isn't acceptable, the operational simplicity and reliability of managed databases justify the slightly higher cost.

What problem does the Application Load Balancer solve that ECS containers alone can't?

ALBs provide a stable public endpoint (DNS name) that never changes, even as container IP addresses change when tasks restart. ALBs also distribute traffic across multiple containers, remove unhealthy containers from rotation automatically, and handle SSL/TLS termination for HTTPS. Without an ALB, you'd need to manually track changing container IPs and couldn't provide a reliable public URL.

3. AWS Account Setup and IAM Security

Before deploying any infrastructure, you need an AWS account configured securely. This isn't bureaucratic overhead:it's essential risk management. AWS accounts with weak security configurations become targets for cryptocurrency mining attacks, data exfiltration, and resource abuse. Students have received $15,000 bills from attackers who compromised root credentials and launched hundreds of EC2 instances for cryptocurrency mining. Proper account setup prevents these disasters.

This section establishes three critical security practices: root account protection, IAM users for daily work, and billing alerts to catch runaway costs. These practices take 30 minutes to implement and prevent catastrophic failures. Every professional AWS deployment starts here.

Creating Your AWS Account

AWS requires a credit card for account creation but provides a Free Tier covering many services during your first 12 months. The Free Tier includes 750 hours per month of EC2 compute (enough for one instance running continuously), RDS database instances, limited ElastiCache usage, and more. Staying within Free Tier limits means minimal costs.

Make: Create an AWS account by visiting aws.amazon.com and clicking "Create an AWS Account." You'll need:

  • Email address: Use a personal email you control long-term, not a school or employer address that might expire
  • Account name: Choose something descriptive like "Personal Development" or "Portfolio Projects"
  • Payment information: AWS requires a credit card even for Free Tier usage to prevent abuse
  • Identity verification: AWS will call or text to verify your account, this is normal

Check: After creating your account, sign in to the AWS Management Console at console.aws.amazon.com. You'll see the AWS console dashboard with links to all services. This is your root account:it has complete administrative access to everything in your AWS account.

Never Use Your Root Account for Daily Work

The root account has unlimited permissions. It can delete all resources, modify billing settings, close the account, and make any changes without restriction. If someone obtains your root credentials, they control your AWS account completely. Professional AWS usage follows one absolute rule: secure your root account immediately and never use it again except for specific administrative tasks that absolutely require it.

Securing Your Root Account

Root account security has three components: strong password, multi-factor authentication (MFA), and restricted usage. These protections stack to prevent unauthorized access.

Step 1: Enable MFA for root account

MFA requires both your password and a time-based code from an authenticator app to sign in. Even if someone obtains your password, they can't access your account without your phone. This single change prevents most account compromises.

Make: Enable MFA on your root account:

  1. In the AWS console, click your account name in the top-right corner
  2. Select "Security Credentials"
  3. Under "Multi-factor authentication (MFA)", click "Assign MFA device"
  4. Choose "Authenticator app" (recommended over hardware tokens for cost and convenience)
  5. Scan the QR code with an authenticator app like Google Authenticator, Authy, or 1Password
  6. Enter two consecutive MFA codes to verify the device works

Check: Sign out of AWS and sign back in. You'll be prompted for your MFA code in addition to your password. This two-factor authentication now protects your root account.

When to Use the Root Account

After initial setup, use your root account only for tasks that explicitly require root access: changing account name, closing your account, restoring IAM admin access if locked out, or modifying billing contact information. These tasks are rare. Most teams go months or years without touching the root account.

For all other work:including everything in this chapter:use IAM users with appropriate permissions. This limits blast radius: if your IAM credentials are compromised, the attacker has limited access. If your root credentials are compromised, they control everything.

Setting Up Billing Alerts

Billing alerts notify you when AWS charges exceed specified thresholds. Without alerts, you won't discover runaway costs until the credit card bill arrives. A compromised account or misconfigured auto-scaling policy can generate thousands of dollars in charges overnight. Billing alerts provide early warning.

Make: Configure billing alerts through AWS Budgets:

  1. In the AWS Console, search for "Billing" in the top search bar
  2. Click "Billing" to open the Billing dashboard
  3. In the left sidebar, select "Budgets"
  4. Click "Create budget"
  5. Choose "Cost budget" template
  6. Set budget amount to $25 (or your preferred threshold)
  7. Configure alerts at 80% ($20) and 100% ($25) of budget
  8. Enter your email address for notifications
  9. Review and create the budget

Check: You'll receive a confirmation email for the budget alerts. Click the confirmation link to activate notifications. Now you'll get emails when AWS spending approaches or exceeds your threshold.

Cost strategy for this chapter: Most services in this chapter qualify for AWS Free Tier during your first 12 months. Expected costs staying within Free Tier: $5-15 per month for Application Load Balancer hours and data transfer. Setting a $25 budget provides room for experimentation while alerting you if costs spike unexpectedly.

Additional Cost Controls

Beyond billing alerts, enable "Receive Free Tier Usage Alerts" in your billing preferences. AWS will email you when Free Tier usage approaches limits. This dual notification system (budgets + Free Tier alerts) provides comprehensive cost protection. You can also use AWS Cost Explorer to analyze spending patterns and identify optimization opportunities after your infrastructure is running.

Creating IAM Users for Daily Work

IAM (Identity and Access Management) controls who can access your AWS account and what they can do. Instead of using your root account, you create IAM users with specific permissions. This follows the principle of least privilege: grant only the permissions necessary for the task at hand.

Make: Create an IAM user for deployment work:

  1. While still signed in as root, navigate to the IAM service in the AWS Console
  2. Click "Users" in the left sidebar, then "Add users"
  3. Set username to "deployment-user" (or your preferred name)
  4. Select "Programmatic access" (creates access keys for CLI/SDK)
  5. Select "AWS Management Console access" (allows web console login)
  6. Click "Next: Permissions"
  7. Select "Attach existing policies directly"
  8. Search for and attach: AdministratorAccess
  9. Click "Next: Tags" (skip), then "Next: Review", then "Create user"

Check: AWS displays your access credentials. You'll see:

  • Access Key ID: Like a username for programmatic access
  • Secret Access Key: Like a password, shown only once
  • Console sign-in link: URL for web console access

Critical: Download these credentials immediately. The Secret Access Key is shown only once. If you lose it, you'll need to generate new keys. Store credentials securely in a password manager.

About Administrator Access

For this learning chapter, we're using AdministratorAccess policy for simplicity: it grants full permissions to all AWS services. In production, you'd create custom policies with minimal required permissions. For learning and personal projects, AdministratorAccess is acceptable because it's your personal account. In team or production environments, always use least-privilege policies that grant only necessary permissions.

Configuring AWS CLI

The AWS CLI (Command Line Interface) lets you interact with AWS services from your terminal. You'll use it to push Docker images to ECR, deploy ECS tasks, and manage infrastructure. The CLI needs your IAM credentials to authenticate requests.

Make: Install and configure the AWS CLI:

Terminal - Install AWS CLI (macOS/Linux)
# macOS
brew install awscli

# Linux
curl "https://awscli.amazonaws.com/awscli-exe-linux-x86_64.zip" -o "awscliv2.zip"
unzip awscliv2.zip
sudo ./aws/install

# Verify installation
aws --version

Configure your credentials:

Terminal - Configure AWS CLI
aws configure

# You'll be prompted for:
AWS Access Key ID: [paste your Access Key ID]
AWS Secret Access Key: [paste your Secret Access Key]
Default region name: us-east-1
Default output format: json

Check: Verify AWS CLI access:

Terminal - Test AWS CLI
aws sts get-caller-identity

# Output shows your IAM user:
{
    "UserId": "AIDAI...",
    "Account": "123456789012",
    "Arn": "arn:aws:iam::123456789012:user/deployment-user"
}

Your AWS CLI is configured. Commands you run use your IAM user credentials, not root. This follows security best practices and provides an audit trail of actions performed programmatically.

4. Container Registry with ECR

Your News API Docker image currently exists only on your local machine. To deploy to AWS, ECS needs access to that image. Container registries solve this distribution problem. They store Docker images in the cloud, making them accessible to deployment infrastructure worldwide.

ECR (Elastic Container Registry) is AWS's container registry service. It integrates seamlessly with ECS, provides built-in scanning for vulnerabilities, and uses IAM for access control. While Docker Hub is free for public images, ECR offers better performance when pulling images to AWS services and includes private registries by default.

Creating Your ECR Repository

ECR organizes images into repositories. Each repository holds versions of one application. You'll create a repository for your News Aggregator API, then push your Docker image there.

Make: Create an ECR repository via AWS CLI:

Terminal - Create ECR Repository
aws ecr create-repository \
    --repository-name news-aggregator-api \
    --region us-east-1 \
    --image-scanning-configuration scanOnPush=true

# Output:
{
    "repository": {
        "repositoryArn": "arn:aws:ecr:us-east-1:123456789012:repository/news-aggregator-api",
        "registryId": "123456789012",
        "repositoryName": "news-aggregator-api",
        "repositoryUri": "123456789012.dkr.ecr.us-east-1.amazonaws.com/news-aggregator-api",
        "createdAt": "2024-12-10T10:30:00+00:00",
        "imageScanningConfiguration": {
            "scanOnPush": true
        }
    }
}

Key field: The repositoryUri is where you'll push images. Save this URI: you'll use it for tagging and pushing your Docker image.

What scanOnPush=true does: ECR automatically scans images for known security vulnerabilities (CVEs) when you push them. You'll get a report showing any security issues in your dependencies. This is free within the Free Tier scanning limits.

Check: Verify the repository exists:

Terminal - List ECR Repositories
aws ecr describe-repositories --region us-east-1

# Shows your news-aggregator-api repository

Authenticating Docker with ECR

ECR repositories are private by default. Before pushing images, Docker needs authentication credentials. The AWS CLI generates temporary credentials that expire after 12 hours. You'll authenticate each session before pushing images.

Make: Authenticate Docker with ECR:

Terminal - Docker Login to ECR
aws ecr get-login-password --region us-east-1 | \
    docker login --username AWS --password-stdin \
    123456789012.dkr.ecr.us-east-1.amazonaws.com

# Replace 123456789012 with your actual AWS account ID
# Get it from: aws sts get-caller-identity --query Account --output text

# Output on success:
Login Succeeded

What this does: The AWS CLI retrieves temporary Docker login credentials and pipes them to docker login. Docker stores these credentials locally until they expire. Now Docker can push and pull images from your ECR repository.

Credentials expire after 12 hours. If you get authentication errors later, rerun this command to refresh your Docker authentication with ECR.

Pushing Your News API Image to ECR

Before pushing to ECR, you need to tag your local Docker image with the ECR repository URI. Docker uses tags to map images to registries. The tag format is: repositoryUri:version.

Make: Tag and push your News API image:

Terminal - Tag and Push to ECR
# Get your ECR repository URI
ECR_URI=$(aws ecr describe-repositories \
    --repository-names news-aggregator-api \
    --query 'repositories[0].repositoryUri' \
    --output text)

echo "ECR URI: $ECR_URI"

# Tag your local image
# If your image is called "news-api:latest" from Chapter 27:
docker tag news-api:latest $ECR_URI:latest
docker tag news-api:latest $ECR_URI:v1.0.0

# Push both tags to ECR
docker push $ECR_URI:latest
docker push $ECR_URI:v1.0.0

Check: Verify images in ECR:

Terminal - List ECR Images
aws ecr list-images \
    --repository-name news-aggregator-api \
    --region us-east-1

# Output shows your images:
{
    "imageIds": [
        {
            "imageDigest": "sha256:abc123...",
            "imageTag": "latest"
        },
        {
            "imageDigest": "sha256:abc123...",
            "imageTag": "v1.0.0"
        }
    ]
}

Your Docker image is now in ECR, accessible to AWS services. ECS will pull from this registry when deploying containers. The image is private:only your AWS account can access it.

Image Tagging Strategies

Docker tags identify image versions. Professional deployments use multiple tagging strategies simultaneously for flexibility and traceability.

1.

latest Tag for Current Production

The latest tag always points to the most recent stable release. ECS task definitions can reference :latest for simple deployments. When you push a new image with :latest, the old latest becomes untagged. This tag provides convenience but limited traceability.

2.

Semantic Versioning for Release Management

Tags like v1.0.0, v1.1.0, v2.0.0 follow semantic versioning conventions. Major version changes indicate breaking changes. Minor versions add features. Patch versions fix bugs. This tagging provides clear version history and enables rollback to specific releases.

3.

Commit SHA for Complete Traceability

Tagging images with Git commit SHAs (e.g., sha-abc123d) provides exact traceability from deployed code to source repository. You know precisely what code is running in production. This is the gold standard for production deployments because you can always trace back to the exact code version running in any environment.

Recommended strategy: Tag with all three: latest for convenience, semantic version for release management, and commit SHA for traceability.

Example Multi-Tag Strategy
# Get current Git commit SHA
COMMIT_SHA=$(git rev-parse --short HEAD)

# Tag with all three strategies
docker tag news-api:latest $ECR_URI:latest
docker tag news-api:latest $ECR_URI:v1.2.3
docker tag news-api:latest $ECR_URI:sha-$COMMIT_SHA

# Push all tags
docker push $ECR_URI:latest
docker push $ECR_URI:v1.2.3
docker push $ECR_URI:sha-$COMMIT_SHA

5. Managed Databases: RDS and ElastiCache

Your News API currently connects to local PostgreSQL and Redis from Chapter 27. Those containerized databases work perfectly for development, but production requires different trade-offs. Databases hold your application's most valuable asset: data. Losing database data means losing user accounts, articles, rate limit tracking, and everything else your application depends on. Production databases need automated backups, failover when hardware fails, and professional monitoring.

Managed database services handle this operational complexity. AWS RDS manages PostgreSQL with automated daily backups, point-in-time recovery, and multi-availability-zone replication. AWS ElastiCache manages Redis with automatic failover and monitoring. You connect to them exactly like local databases, but AWS handles operations, maintenance, and disaster recovery. This is infrastructure you don't want to manage yourself.

Why Managed Databases Over Containerized Databases

You could run PostgreSQL and Redis in ECS containers alongside your application. Many teams start this way. But containerized databases create operational burden that managed services eliminate.

Backups require manual implementation. Containerized PostgreSQL means you're responsible for backup scripts, testing restore procedures, storing backups securely, and ensuring backups actually work when disaster strikes. RDS handles this automatically: daily snapshots, transaction logs for point-in-time recovery, and automated testing of backup integrity.

Scaling storage requires downtime. When your containerized database fills its disk, you need to stop the container, resize the volume, and restart. With RDS, you modify the storage size through the console. RDS scales storage online without downtime. Your application never notices.

High availability requires complex orchestration. To survive container failures, you need primary-replica setup, health checks, automatic failover, and data synchronization. RDS Multi-AZ handles this automatically. The primary fails, RDS promotes the replica, and updates the DNS endpoint. Your application connection string doesn't change. Failover happens in under 60 seconds without manual intervention.

Maintenance requires planning. PostgreSQL security patches, minor version updates, and configuration tuning all require careful timing and testing. RDS provides maintenance windows where AWS applies patches automatically during low-traffic periods you specify.

The cost trade-off favors managed services. Running PostgreSQL in ECS means paying for the container and managing operations yourself. RDS costs slightly more but includes backups, monitoring, and 24/7 AWS support. The operational time savings alone justify the cost difference.

When to Use Containerized Databases

Containerized databases make sense for development and testing environments where data isn't critical. Chapter 27's Docker Compose setup is perfect for local development: fast iteration, no AWS costs, complete control. Some companies containerize databases in production when they need custom configurations that RDS doesn't support, or when they have dedicated database operations teams who prefer managing infrastructure directly.

For most applications, especially those built by small teams, managed databases are the right choice. The operational simplicity and built-in reliability features outweigh the slightly higher cost.

Creating RDS PostgreSQL for the News API

Your News API needs PostgreSQL for storing articles, API keys, and rate limit tracking. You'll create an RDS PostgreSQL instance using the Free Tier eligible configuration: db.t3.micro (or db.t4g.micro) with 20GB storage. This provides enough capacity for hundreds of thousands of articles while staying within Free Tier limits during your first year.

Make: Create RDS PostgreSQL instance via AWS CLI:

Terminal - Create RDS PostgreSQL
aws rds create-db-instance \
    --db-instance-identifier news-api-db \
    --db-instance-class db.t3.micro \
    --engine postgres \
    --engine-version 15.4 \
    --master-username newsadmin \
    --master-user-password 'YourSecurePassword123!' \
    --allocated-storage 20 \
    --storage-type gp3 \
    --no-publicly-accessible \
    --backup-retention-period 7 \
    --preferred-backup-window "03:00-04:00" \
    --preferred-maintenance-window "sun:04:00-sun:05:00" \
    --region us-east-1

# This takes 5-10 minutes to provision
# Check status:
aws rds describe-db-instances \
    --db-instance-identifier news-api-db \
    --query 'DBInstances[0].DBInstanceStatus' \
    --output text

# Output: "creating" -> "available"

Important settings explained:

--no-publicly-accessible: The database isn't accessible from the internet. Only resources within your AWS VPC can connect. This is critical security: your database should never be exposed to public internet, even with strong passwords.

--backup-retention-period 7: RDS keeps daily backups for 7 days. You can restore to any point within the last week. Free Tier allows up to 7 days. Production systems often use 14-30 days.

--storage-type gp3: General Purpose SSD (gp3) provides good performance at reasonable cost. It's Free Tier eligible and suitable for most applications. You could use gp2 (older generation) or io1 (provisioned IOPS for high-performance needs), but gp3 is the sweet spot.

Check: Get your database endpoint:

Terminal - Get RDS Endpoint
aws rds describe-db-instances \
    --db-instance-identifier news-api-db \
    --query 'DBInstances[0].Endpoint.Address' \
    --output text

# Output (save this):
news-api-db.c9z8v7x2y3z4.us-east-1.rds.amazonaws.com

This endpoint address is your PostgreSQL connection string. It looks like a regular database hostname because that's exactly what it is. Your application will connect to news-api-db.c9z8v7x2y3z4.us-east-1.rds.amazonaws.com:5432 exactly like connecting to localhost:5432, just with the RDS endpoint instead.

Save Your Database Password

The master password you set during creation (YourSecurePassword123! in the example) is shown only during creation. RDS doesn't store it in plaintext. If you lose it, you'll need to reset the master password through AWS console or CLI. Store it securely in your password manager or in AWS Secrets Manager.

Configuring Security Groups for Database Access

RDS created your database with a default security group that blocks all inbound connections. This is correct security posture: deny everything by default, then explicitly allow only necessary traffic. You need to allow inbound connections from your ECS containers on port 5432 (PostgreSQL's default port).

Security groups act as virtual firewalls. Each security group has inbound rules (what traffic can reach your resource) and outbound rules (what traffic your resource can send). For RDS, you'll create an inbound rule allowing PostgreSQL traffic from ECS.

Make: First, get your RDS security group ID:

Terminal - Get RDS Security Group
RDS_SG=$(aws rds describe-db-instances \
    --db-instance-identifier news-api-db \
    --query 'DBInstances[0].VpcSecurityGroups[0].VpcSecurityGroupId' \
    --output text)

echo "RDS Security Group: $RDS_SG"

Now allow PostgreSQL traffic from ECS containers. For now, we'll allow traffic from anywhere within your VPC (we'll tighten this in Section 6 when we create the ECS security group):

Terminal - Allow PostgreSQL Traffic
# Get your default VPC CIDR (usually 172.31.0.0/16)
VPC_CIDR=$(aws ec2 describe-vpcs \
    --filters "Name=isDefault,Values=true" \
    --query 'Vpcs[0].CidrBlock' \
    --output text)

# Add inbound rule for PostgreSQL
aws ec2 authorize-security-group-ingress \
    --group-id $RDS_SG \
    --protocol tcp \
    --port 5432 \
    --cidr $VPC_CIDR

# Verify the rule exists
aws ec2 describe-security-groups \
    --group-ids $RDS_SG \
    --query 'SecurityGroups[0].IpPermissions'

What this means: Any resource within your VPC (including ECS containers we'll create in Section 6) can now connect to RDS PostgreSQL on port 5432. Resources outside your VPC still can't access the database because RDS has --no-publicly-accessible set.

Check: Test connection from your local machine (requires AWS VPN or bastion host, so we'll test from ECS in Section 6).

Creating ElastiCache Redis for Caching

Chapter 27 demonstrated Redis's performance impact: response times improved from 700ms to 5ms for cached articles. ElastiCache provides managed Redis with the same performance benefits plus automatic failover and monitoring. You'll create a cache.t3.micro instance (Free Tier eligible) for the News API's caching layer.

Make: Create ElastiCache Redis cluster:

Terminal - Create ElastiCache Redis
aws elasticache create-cache-cluster \
    --cache-cluster-id news-api-cache \
    --cache-node-type cache.t3.micro \
    --engine redis \
    --engine-version 7.0 \
    --num-cache-nodes 1 \
    --region us-east-1

# Takes 5-10 minutes
# Check status:
aws elasticache describe-cache-clusters \
    --cache-cluster-id news-api-cache \
    --query 'CacheClusters[0].CacheClusterStatus' \
    --output text

# Output: "creating" -> "available"

Get your Redis endpoint:

Terminal - Get Redis Endpoint
aws elasticache describe-cache-clusters \
    --cache-cluster-id news-api-cache \
    --show-cache-node-info \
    --query 'CacheClusters[0].CacheNodes[0].Endpoint' \
    --output json

# Output:
{
    "Address": "news-api-cache.abc123.0001.use1.cache.amazonaws.com",
    "Port": 6379
}

Save this endpoint. You'll use it in your ECS task definition environment variables: redis://news-api-cache.abc123.0001.use1.cache.amazonaws.com:6379.

Configure security group for Redis:

Terminal - Allow Redis Traffic
# Get ElastiCache security group
REDIS_SG=$(aws elasticache describe-cache-clusters \
    --cache-cluster-id news-api-cache \
    --show-cache-node-info \
    --query 'CacheClusters[0].SecurityGroups[0].SecurityGroupId' \
    --output text)

# Allow Redis traffic from VPC
aws ec2 authorize-security-group-ingress \
    --group-id $REDIS_SG \
    --protocol tcp \
    --port 6379 \
    --cidr $VPC_CIDR

Migrating Data from Local to RDS

Your local PostgreSQL database contains articles, API keys, and rate limit data from Chapter 26-27 testing. You can migrate this data to RDS for continuity, or start fresh in production. For learning purposes, starting fresh is simpler:your ECS application will create tables automatically using SQLAlchemy migrations on first startup.

Option 1: Start fresh (recommended for learning)

Your News API's SQLAlchemy models include Base.metadata.create_all() or Alembic migrations. When ECS containers start and connect to the empty RDS database, they'll automatically create the required tables. You'll generate new API keys through your admin endpoint after deployment.

Option 2: Migrate existing data (for production continuity)

If you want to preserve local data, use pg_dump to export and psql to import:

Terminal - Migrate PostgreSQL Data
# Export from local database
pg_dump -h localhost -U newsuser -d newsdb > news_backup.sql

# Import to RDS (requires network access - typically via EC2 bastion or VPN)
psql -h news-api-db.c9z8v7x2y3z4.us-east-1.rds.amazonaws.com \
     -U newsadmin -d postgres < news_backup.sql

For this chapter, we'll use Option 1 (fresh start). Your application handles database initialization automatically, and generating new API keys in production is a security best practice anyway.

Environment Variables for Managed Databases

Your News API reads database connection strings from environment variables. Update these for RDS and ElastiCache endpoints:

Environment Variable Local (Chapter 27) AWS Production
DATABASE_URL postgresql://user:pass@localhost:5432/newsdb postgresql://newsadmin:YourSecurePassword123!@news-api-db.c9z8v7x2y3z4.us-east-1.rds.amazonaws.com:5432/postgres
REDIS_URL redis://localhost:6379 redis://news-api-cache.abc123.0001.use1.cache.amazonaws.com:6379

You'll configure these in your ECS task definition (Section 6). The application code remains unchanged: only connection strings change between local and production.

Connection String Best Practices

Never hardcode database passwords in your application code or commit them to Git. Store credentials in environment variables (for development) or AWS Secrets Manager (for production).

Checkpoint Quiz

Test your understanding of managed databases and production infrastructure. If you can answer confidently, you've mastered the material:

Select question to reveal the answer:
Why use RDS instead of running PostgreSQL in an ECS container?

RDS provides automated daily backups, point-in-time recovery, automated failover across availability zones, online storage scaling, and managed updates/patches. Running PostgreSQL in containers means implementing all of this yourself, testing backup/restore procedures, handling failover orchestration, and managing maintenance windows manually. The operational complexity and risk of data loss make managed databases the better choice for production unless you have specialized database operations expertise.

What does --no-publicly-accessible mean when creating an RDS instance?

It means the RDS database isn't assigned a public IP address and can't be accessed from the internet. Only resources within your AWS VPC (like ECS containers) can connect to it. This is critical security: databases should never be exposed to public internet access, even with strong passwords, because they contain your application's most valuable data. Public accessibility creates attack surface for automated scanners, brute force attempts, and zero-day exploits.

How do security groups control access to RDS and ElastiCache?

Security groups act as virtual firewalls with inbound and outbound rules. By default, RDS and ElastiCache deny all inbound connections. You explicitly allow traffic by creating inbound rules specifying protocol (TCP), port (5432 for PostgreSQL, 6379 for Redis), and source (CIDR range or security group). This follows the principle of least privilege: deny everything by default, then allow only necessary traffic from trusted sources.

6. ECS Fargate: Deploying Containerized Applications

Your News API Docker image sits in ECR. Your databases are running in RDS and ElastiCache. Now you need computing infrastructure to run your containers. AWS ECS (Elastic Container Service) is AWS's container orchestration platform:think of it as Docker Compose for AWS, managing container deployment, health checks, and scaling across multiple servers.

ECS supports two launch types: EC2 (you manage the servers) and Fargate (AWS manages the servers). Fargate is serverless containers:you specify container requirements (CPU, memory, image), and AWS handles provisioning, patching, and scaling servers automatically. You never SSH into servers, worry about kernel updates, or calculate how many containers fit on an instance. Fargate is the modern default for containerized applications.

Understanding ECS Concepts: Clusters, Tasks, and Services

ECS has three core concepts that work together to run your containers:

1.

Cluster: The Container Environment

A cluster is a logical grouping of containerized applications. Think of it as a namespace or environment. You might have separate clusters for development, staging, and production. Or one cluster per application. Clusters themselves don't cost anything:they're just organizational containers for tasks and services.

2.

Task Definition: The Container Blueprint

A task definition is like a Dockerfile for ECS:it specifies what containers to run, what image to use, how much CPU and memory to allocate, environment variables, logging configuration, and networking. Task definitions are versioned: each update creates a new revision. You can rollback to previous revisions if deployments fail.

3.

Task: A Running Container Instance

A task is one running instance of a task definition. If your task definition says "run the News API container with 512MB memory," a task is that container actually running somewhere. Tasks can fail, restart, or be replaced. They're ephemeral:like individual containers in Docker Compose.

4.

Service: The Task Manager

A service maintains a desired count of tasks running continuously. If you configure a service with "desired count: 2," ECS ensures 2 tasks are always running. If a task fails, ECS starts a replacement automatically. If you scale to 4 tasks, ECS launches 2 more. Services handle container lifecycle management, health checks, and load balancer integration.

How they work together: You create a cluster (environment), define a task definition (blueprint), create a service that uses that task definition (manager), and ECS runs the specified number of tasks (containers) continuously. If tasks crash, the service restarts them. If you update the task definition, you deploy a new revision to the service.

The Hierarchy: Cluster → Service → Task Definition → Task

For your News API: You create a "news-api-cluster" cluster. Within that cluster, you create a "news-api-service" service. That service uses "news-api-task-definition" to run tasks. You configure the service to maintain 2 tasks (containers) running at all times. ECS pulls the Docker image from ECR, starts 2 containers with your specified configuration, monitors their health, and replaces any that fail.

Creating Your ECS Cluster

Fargate clusters are simple to create:they're just logical namespaces. No server provisioning, networking configuration, or capacity planning required.

Make: Create an ECS cluster:

Terminal - Create ECS Cluster
aws ecs create-cluster \
    --cluster-name news-api-cluster \
    --region us-east-1

# Output:
{
    "cluster": {
        "clusterArn": "arn:aws:ecs:us-east-1:123456789012:cluster/news-api-cluster",
        "clusterName": "news-api-cluster",
        "status": "ACTIVE",
        "registeredContainerInstancesCount": 0,
        "runningTasksCount": 0,
        "pendingTasksCount": 0
    }
}

Check: Verify cluster creation:

Terminal - List ECS Clusters
aws ecs list-clusters --region us-east-1

# Shows your news-api-cluster

The cluster is ready. Now you'll create the task definition that specifies how to run your News API container.

Creating the Task Definition

Task definitions are JSON documents specifying container configuration. You'll create a task definition for your News API with:

  • Your ECR image URI from Section 4
  • CPU allocation: 256 units (.25 vCPU)
  • Memory allocation: 512 MB
  • Environment variables for database connections and API keys
  • Port mapping: container port 8000 to host port 8000
  • CloudWatch Logs configuration for centralized logging

Make: Create a task definition JSON file:

ECS Task Definition for News API
task-definition.json
{
  "family": "news-api-task",
  "networkMode": "awsvpc",
  "requiresCompatibilities": ["FARGATE"],
  "cpu": "256",
  "memory": "512",
  "executionRoleArn": "arn:aws:iam::123456789012:role/ecsTaskExecutionRole",
  "containerDefinitions": [
    {
      "name": "news-api",
      "image": "123456789012.dkr.ecr.us-east-1.amazonaws.com/news-aggregator-api:latest",
      "portMappings": [
        {
          "containerPort": 8000,
          "protocol": "tcp"
        }
      ],
      "environment": [
        {
          "name": "DATABASE_URL",
          "value": "postgresql://newsadmin:YourSecurePassword123!@news-api-db.c9z8v7x2y3z4.us-east-1.rds.amazonaws.com:5432/postgres"
        },
        {
          "name": "REDIS_URL",
          "value": "redis://news-api-cache.abc123.0001.use1.cache.amazonaws.com:6379"
        },
        {
          "name": "NEWSAPI_KEY",
          "value": "your-newsapi-key-here"
        },
        {
          "name": "GUARDIAN_KEY",
          "value": "your-guardian-key-here"
        }
      ],
      "logConfiguration": {
        "logDriver": "awslogs",
        "options": {
          "awslogs-group": "/ecs/news-api",
          "awslogs-region": "us-east-1",
          "awslogs-stream-prefix": "ecs"
        }
      }
    }
  ]
}

Key configuration explained:

family: Task definition name. Updates to this task definition create new revisions (news-api-task:1, news-api-task:2, etc.).

networkMode: awsvpc: Each task gets its own elastic network interface with a private IP address. This is required for Fargate and provides task-level network isolation.

cpu and memory: Fargate has specific valid combinations. 256 CPU (.25 vCPU) with 512MB memory is Free Tier eligible and sufficient for light-to-moderate API traffic. See AWS documentation for other valid combinations.

executionRoleArn: IAM role that grants ECS permission to pull images from ECR and write logs to CloudWatch. Create this role or use the AWS-managed default.

environment variables: Your application reads these at runtime. Replace placeholder values with your actual RDS endpoint, ElastiCache endpoint, and API keys.

logConfiguration: Sends container stdout/stderr to CloudWatch Logs. You'll query these logs for debugging in Section 9.

Before registering the task definition, create the CloudWatch log group:

Terminal - Create Log Group
aws logs create-log-group \
    --log-group-name /ecs/news-api \
    --region us-east-1

Register the task definition:

Terminal - Register Task Definition
aws ecs register-task-definition \
    --cli-input-json file://task-definition.json \
    --region us-east-1

# Output shows task definition registered as revision 1

Check: List task definitions:

Terminal - List Task Definitions
aws ecs list-task-definitions --region us-east-1

# Shows: news-api-task:1
Secrets in Environment Variables

This example hardcodes database passwords and API keys in the task definition for simplicity. In production, use AWS Secrets Manager or Parameter Store to store secrets separately. Task definitions can reference secrets, and ECS injects them at runtime. You'll learn secure secrets management patterns as you progress to production operations. For now, understand that environment variables in task definitions are visible to anyone with ECS permissions—not ideal for sensitive data.

Creating an ECS Service

The task definition describes what to run. The service describes how many to run and where to run them. You'll create a service that maintains 2 tasks (containers) running continuously in your cluster.

Make: Create an ECS service:

Terminal - Create ECS Service
# Get default VPC and subnet IDs
VPC_ID=$(aws ec2 describe-vpcs \
    --filters "Name=isDefault,Values=true" \
    --query 'Vpcs[0].VpcId' \
    --output text)

SUBNET_IDS=$(aws ec2 describe-subnets \
    --filters "Name=vpc-id,Values=$VPC_ID" \
    --query 'Subnets[*].SubnetId' \
    --output text | tr '\t' ',')

# Create security group for ECS tasks
ECS_SG=$(aws ec2 create-security-group \
    --group-name news-api-ecs-sg \
    --description "Security group for News API ECS tasks" \
    --vpc-id $VPC_ID \
    --query 'GroupId' \
    --output text)

# Allow outbound traffic (required for pulling ECR images, accessing RDS/Redis)
aws ec2 authorize-security-group-egress \
    --group-id $ECS_SG \
    --protocol -1 \
    --cidr 0.0.0.0/0

# Create the service
aws ecs create-service \
    --cluster news-api-cluster \
    --service-name news-api-service \
    --task-definition news-api-task:1 \
    --desired-count 2 \
    --launch-type FARGATE \
    --network-configuration "awsvpcConfiguration={subnets=[$SUBNET_IDS],securityGroups=[$ECS_SG],assignPublicIp=ENABLED}" \
    --region us-east-1

What this does:

desired-count: 2: ECS maintains 2 running tasks at all times. If a task fails, ECS starts a replacement immediately. This provides high availability:if one container crashes, the other continues serving requests.

launch-type: FARGATE: Use serverless containers. No server management required.

network-configuration: Tasks run in your default VPC subnets. Each task gets a private IP address from the subnet range. assignPublicIp=ENABLED gives tasks public IP addresses so they can pull images from ECR (ECR requires internet access or VPC endpoints).

Check: Monitor service deployment:

Terminal - Check Service Status
aws ecs describe-services \
    --cluster news-api-cluster \
    --services news-api-service \
    --query 'services[0].{Status:status,Running:runningCount,Desired:desiredCount}' \
    --output table

# Output shows deployment progress:
# Status: ACTIVE
# Running: 2
# Desired: 2

When runningCount equals desiredCount, your containers are running. This typically takes 2-3 minutes for initial deployment (pulling image, starting containers, running health checks).

View container logs in CloudWatch:

Terminal - View Recent Logs
aws logs tail /ecs/news-api --follow --region us-east-1

# Shows real-time container logs:
# INFO:     Uvicorn running on http://0.0.0.0:8000
# INFO:     Application startup complete
# INFO:     Connected to PostgreSQL database
# INFO:     Connected to Redis cache

Your News API is now running on AWS! The containers are deployed, connected to RDS and ElastiCache, and logging to CloudWatch. However, you can't access them yet:they have private IP addresses within your VPC. Section 7 adds the Application Load Balancer that provides public HTTPS access.

Verifying Container Deployment

Your containers are running but only accessible within your VPC. To verify they're working before adding the load balancer, you have two options: create a bastion host (EC2 instance in the same VPC for SSH access), or temporarily add an inbound rule to the ECS security group allowing your home IP address.

Quick verification (temporary public access):

Terminal - Temporary Public Access
# Get your public IP
MY_IP=$(curl -s https://checkip.amazonaws.com)

# Allow HTTP access from your IP temporarily
aws ec2 authorize-security-group-ingress \
    --group-id $ECS_SG \
    --protocol tcp \
    --port 8000 \
    --cidr $MY_IP/32

# Get a task's public IP
TASK_IP=$(aws ecs list-tasks \
    --cluster news-api-cluster \
    --service-name news-api-service \
    --query 'taskArns[0]' \
    --output text | xargs -I {} aws ecs describe-tasks \
    --cluster news-api-cluster \
    --tasks {} \
    --query 'tasks[0].attachments[0].details[?name==`networkInterfaceId`].value' \
    --output text | xargs -I {} aws ec2 describe-network-interfaces \
    --network-interface-ids {} \
    --query 'NetworkInterfaces[0].Association.PublicIp' \
    --output text)

echo "Task public IP: $TASK_IP"

# Test the API
curl http://$TASK_IP:8000/docs

# Remove the temporary rule after testing
aws ec2 revoke-security-group-ingress \
    --group-id $ECS_SG \
    --protocol tcp \
    --port 8000 \
    --cidr $MY_IP/32

If you see the FastAPI documentation page at http://TASK_IP:8000/docs, your containers are working correctly. They're connected to RDS and ElastiCache, serving requests, and ready for production traffic through the load balancer you'll create in Section 7.

Why Not Keep Public IP Access?

You could leave containers publicly accessible on port 8000, but this creates several problems: (1) Container IP addresses change when tasks restart, (2) No SSL/TLS encryption for HTTPS, (3) No health checks or automatic failover, (4) No traffic distribution across multiple containers, (5) Direct exposure to internet attacks. Application Load Balancers solve all of these problems, which is why production deployments always use them.

7. Application Load Balancer and HTTPS

Your News API containers are running in ECS Fargate with private IP addresses. Users can't access them directly because containers aren't assigned public DNS names, and their IP addresses change when tasks restart. This is by design: containers are ephemeral infrastructure. You need a stable public endpoint that routes traffic to whatever containers are currently running.

Application Load Balancers (ALBs) solve this problem. An ALB is a managed service that distributes incoming HTTP/HTTPS requests across multiple targets (in this case, your ECS containers). The ALB has a public DNS name that never changes. Behind that stable endpoint, containers can start, stop, restart, and scale:the ALB automatically adjusts routing to healthy containers. Users always connect to the same URL, even as your infrastructure changes underneath.

What Application Load Balancers Provide

ALBs handle multiple concerns that your application shouldn't manage itself:

1.

Traffic Distribution

Incoming requests distribute across all healthy containers using round-robin or least-connections algorithms. With 2 containers running, each handles roughly 50% of traffic. Scale to 4 containers, each handles 25%. The ALB manages this distribution automatically.

2.

Health Checks and Automatic Failover

The ALB continuously health checks each container by making HTTP requests to a specified path (like /docs). Containers that fail health checks are removed from the routing pool. Traffic goes only to healthy containers. When failed containers recover or new containers start, the ALB adds them back automatically.

3.

SSL/TLS Termination

The ALB handles HTTPS encryption and decryption. You install SSL certificates on the ALB. It receives encrypted HTTPS requests from users, decrypts them, and forwards plain HTTP requests to containers. Responses travel back encrypted. This offloads SSL processing from your application and centralizes certificate management.

4.

Sticky Sessions and Connection Draining

ALBs support sticky sessions (routing users to the same container for session persistence) and connection draining (gracefully finishing in-flight requests before stopping containers during deployments). These features enable zero-downtime deployments.

For your News API, the ALB provides a public HTTPS URL like https://news-api-123456789.us-east-1.elb.amazonaws.com (or your custom domain) that forwards to your ECS containers. This is the URL you'll share with recruiters and users.

Creating Your Application Load Balancer

ALBs require several components: the load balancer itself, target groups (where traffic routes to), security groups (firewall rules), and listeners (routing rules for different protocols/ports). You'll create all of these to connect your public endpoint to your ECS containers.

Make: Create an Application Load Balancer:

Terminal - Create ALB
# Get VPC and subnets (need at least 2 subnets in different AZs)
VPC_ID=$(aws ec2 describe-vpcs \
    --filters "Name=isDefault,Values=true" \
    --query 'Vpcs[0].VpcId' \
    --output text)

SUBNET_IDS=$(aws ec2 describe-subnets \
    --filters "Name=vpc-id,Values=$VPC_ID" \
    --query 'Subnets[0:2].SubnetId' \
    --output text | tr '\t' ' ')

# Create security group for ALB (allows HTTP/HTTPS from internet)
ALB_SG=$(aws ec2 create-security-group \
    --group-name news-api-alb-sg \
    --description "Security group for News API ALB" \
    --vpc-id $VPC_ID \
    --query 'GroupId' \
    --output text)

# Allow inbound HTTP (port 80) from anywhere
aws ec2 authorize-security-group-ingress \
    --group-id $ALB_SG \
    --protocol tcp \
    --port 80 \
    --cidr 0.0.0.0/0

# Allow inbound HTTPS (port 443) from anywhere
aws ec2 authorize-security-group-ingress \
    --group-id $ALB_SG \
    --protocol tcp \
    --port 443 \
    --cidr 0.0.0.0/0

# Create the Application Load Balancer
ALB_ARN=$(aws elbv2 create-load-balancer \
    --name news-api-alb \
    --subnets $SUBNET_IDS \
    --security-groups $ALB_SG \
    --scheme internet-facing \
    --type application \
    --ip-address-type ipv4 \
    --query 'LoadBalancers[0].LoadBalancerArn' \
    --output text)

echo "Load Balancer ARN: $ALB_ARN"

# Get the ALB's public DNS name
ALB_DNS=$(aws elbv2 describe-load-balancers \
    --load-balancer-arns $ALB_ARN \
    --query 'LoadBalancers[0].DNSName' \
    --output text)

echo "Your API will be accessible at: http://$ALB_DNS"

What this creates: A public-facing load balancer in two availability zones (for high availability). The ALB accepts HTTP and HTTPS traffic from the internet and will forward it to your ECS containers. The DNS name is available immediately, but you need to configure target groups and listeners before traffic flows through.

Configuring Target Groups

Target groups define where the ALB sends traffic. For ECS, you create a target group with target type ip (since Fargate tasks use awsvpc networking and get IP addresses). ECS automatically registers and deregisters container IP addresses as tasks start and stop.

Make: Create a target group with health checks:

Terminal - Create Target Group
TARGET_GROUP_ARN=$(aws elbv2 create-target-group \
    --name news-api-tg \
    --protocol HTTP \
    --port 8000 \
    --vpc-id $VPC_ID \
    --target-type ip \
    --health-check-enabled \
    --health-check-protocol HTTP \
    --health-check-path /docs \
    --health-check-interval-seconds 30 \
    --health-check-timeout-seconds 5 \
    --healthy-threshold-count 2 \
    --unhealthy-threshold-count 3 \
    --query 'TargetGroups[0].TargetGroupArn' \
    --output text)

echo "Target Group ARN: $TARGET_GROUP_ARN"

Health check configuration explained:

health-check-path: /docs: The ALB requests this path every 30 seconds. FastAPI's automatic documentation endpoint always returns 200 OK if the application is running. If the container can't respond (crashed, unresponsive, network issue), health checks fail.

healthy-threshold-count: 2: The container must pass 2 consecutive health checks (60 seconds total) before receiving traffic. This prevents routing to containers that are still starting up.

unhealthy-threshold-count: 3: The container must fail 3 consecutive health checks (90 seconds) before being marked unhealthy and removed from rotation. This prevents brief hiccups from triggering unnecessary container restarts.

These thresholds balance responsiveness (detecting failures quickly) with stability (not overreacting to transient issues). Tuning these values is a production operations skill.

Creating Load Balancer Listeners

Listeners define how the ALB handles incoming traffic. You'll create an HTTP listener that forwards all requests to your target group. For production, you'd also create an HTTPS listener with SSL certificates, but HTTP works for initial testing.

Make: Create HTTP listener:

Terminal - Create HTTP Listener
aws elbv2 create-listener \
    --load-balancer-arn $ALB_ARN \
    --protocol HTTP \
    --port 80 \
    --default-actions Type=forward,TargetGroupArn=$TARGET_GROUP_ARN

# Output shows listener created successfully

What this does: Requests to http://your-alb-dns.amazonaws.com on port 80 forward to your target group, which routes to healthy ECS containers on port 8000. The routing happens automatically:no additional configuration needed.

Connecting ECS Service to Load Balancer

Your ECS service and ALB target group exist independently. You need to update the ECS service to register containers with the target group automatically. ECS will handle adding new task IP addresses to the target group when containers start, and removing them when containers stop.

Make: Update ECS service to use load balancer:

Terminal - Update ECS Service
# Update ECS security group to allow ALB traffic
aws ec2 authorize-security-group-ingress \
    --group-id $ECS_SG \
    --protocol tcp \
    --port 8000 \
    --source-group $ALB_SG

# Update the service with load balancer configuration
aws ecs update-service \
    --cluster news-api-cluster \
    --service news-api-service \
    --load-balancers "targetGroupArn=$TARGET_GROUP_ARN,containerName=news-api,containerPort=8000" \
    --health-check-grace-period-seconds 60 \
    --region us-east-1

# Note: This requires recreating the service because load balancer
# configuration can't be modified on existing services
# Instead, delete and recreate:

aws ecs delete-service \
    --cluster news-api-cluster \
    --service news-api-service \
    --force

# Wait 2 minutes for service to fully terminate

# Recreate with load balancer
aws ecs create-service \
    --cluster news-api-cluster \
    --service-name news-api-service \
    --task-definition news-api-task:1 \
    --desired-count 2 \
    --launch-type FARGATE \
    --network-configuration "awsvpcConfiguration={subnets=[$SUBNET_IDS],securityGroups=[$ECS_SG],assignPublicIp=ENABLED}" \
    --load-balancers "targetGroupArn=$TARGET_GROUP_ARN,containerName=news-api,containerPort=8000" \
    --health-check-grace-period-seconds 60 \
    --region us-east-1

health-check-grace-period-seconds: ECS waits 60 seconds after starting containers before health checks affect service stability. This grace period prevents ECS from marking containers unhealthy during startup (when they're still initializing databases, loading configuration, etc.).

Check: Wait 2-3 minutes for containers to register, then verify target health:

Terminal - Check Target Health
aws elbv2 describe-target-health \
    --target-group-arn $TARGET_GROUP_ARN \
    --query 'TargetHealthDescriptions[*].{Target:Target.Id,Health:TargetHealth.State}' \
    --output table

# Output shows 2 targets with "healthy" status:
# --------------------------------
# |  Target        | Health      |
# --------------------------------
# | 10.0.1.123     | healthy     |
# | 10.0.2.456     | healthy     |
# --------------------------------

When both targets show healthy, your API is ready to serve traffic through the load balancer.

Testing Your Public API

Your News API is now publicly accessible through the Application Load Balancer. The ALB DNS name provides a stable endpoint that distributes requests across your ECS containers.

Check: Test all endpoints through the load balancer:

Terminal - Test Public API
# Get your ALB DNS name
ALB_DNS=$(aws elbv2 describe-load-balancers \
    --load-balancer-arns $ALB_ARN \
    --query 'LoadBalancers[0].DNSName' \
    --output text)

echo "Testing API at: http://$ALB_DNS"

# Test automatic documentation
curl http://$ALB_DNS/docs

# Test articles endpoint
curl http://$ALB_DNS/articles

# Test categories endpoint  
curl http://$ALB_DNS/categories

# Test sources endpoint
curl http://$ALB_DNS/sources

# Test with filters
curl "http://$ALB_DNS/articles?category=technology&source=newsapi"

# Test authenticated endpoint (requires API key)
curl -H "Authorization: Bearer YOUR_API_KEY" http://$ALB_DNS/articles

Visit in browser: Open http://YOUR-ALB-DNS/docs in your browser. You'll see FastAPI's interactive documentation. This is your publicly accessible API:anyone with the URL can access it. This is what you'll share with recruiters and users.

Success criteria: If you see JSON responses from the articles, categories, and sources endpoints, your complete infrastructure is working: ECR provides images, ECS runs containers, RDS provides PostgreSQL, ElastiCache provides Redis, and the ALB routes traffic. You've built production infrastructure from scratch.

Adding HTTPS with SSL Certificates (Optional)

HTTP works for testing, but production APIs require HTTPS. AWS Certificate Manager (ACM) provides free SSL certificates for use with load balancers. You need a custom domain (like api.yourdomain.com) to use ACM certificates.

If you have a custom domain:

  1. Request an SSL certificate in ACM for your domain
  2. Validate domain ownership via DNS or email
  3. Create an HTTPS listener on port 443 using the ACM certificate
  4. Add a redirect rule on the HTTP listener to redirect HTTP → HTTPS
  5. Create a Route 53 alias record pointing your domain to the ALB DNS name

Without a custom domain: The ALB DNS name works perfectly for testing and portfolio projects. Many students deploy with the default ALB DNS name and document: "Uses AWS ALB for load balancing and high availability" in their portfolio. Custom domains are polish, not requirements.

Domain Recommendations for Students

If you want a custom domain for your portfolio, services like Namecheap, Google Domains, or Cloudflare offer domains for $10-15/year. Point your domain's DNS to Route 53 (AWS's DNS service), request an ACM certificate, and configure the HTTPS listener. This adds professional polish: https://news-api.yourname.dev looks better in portfolio documentation than an ALB DNS name. But it's not essential:the infrastructure skills matter more than the domain name.

8. Chapter Summary

You started this chapter with a News API that worked perfectly on localhost:8000 but disappeared when you closed your laptop. You finish with production infrastructure running on AWS: containers deployed on ECS Fargate, managed databases providing reliable data storage, a load balancer distributing traffic across multiple containers, and a public HTTPS endpoint accessible to anyone in the world. You can show recruiters a live API with professional deployment patterns and explain every infrastructure decision in technical interviews.

More importantly, you understand the "why" behind each component. ECR centralizes container images. RDS and ElastiCache eliminate database operations overhead. ECS Fargate removes server management. ALBs provide stable public endpoints with automatic failover. Security groups implement least-privilege access control. These aren't abstract concepts: you implemented them yourself and watched them work.

The patterns you learned here (container registries, serverless compute, managed databases, load balancing, health checks) apply to any cloud platform and any scale of application. You've moved from "I can write code" to "I can build and deploy systems at scale." That expertise opens doors to senior engineering roles where deployment decisions shape entire organizations.

Congratulations on deploying to production. The next chapter makes that deployment world-class.

Key Skills Mastered

1.

Cloud Computing Fundamentals

You understand what cloud computing is (renting infrastructure), when to use AWS versus PaaS alternatives, and the IaaS/PaaS/SaaS service model spectrum. You can explain trade-offs between control and operational simplicity, and articulate why cloud economics favor elastic capacity over fixed infrastructure. These concepts transfer to any cloud provider and form the foundation for infrastructure decision-making.

2.

AWS Account Security

You created an AWS account following security best practices: root account protection with MFA, IAM users for daily work, billing alerts to prevent cost surprises, and AWS CLI configuration for programmatic access. You understand why root accounts should never be used for daily work and how security groups implement least-privilege access control. These security fundamentals prevent the disasters that hit unprepared AWS users.

3.

Container Registry Management

You pushed Docker images to ECR, authenticated Docker with AWS credentials, and implemented professional tagging strategies (latest, semantic versioning, commit SHA). You understand how container registries centralize image distribution and why ECS pulls from ECR rather than Docker Hub. This pattern applies to any container orchestration platform:Kubernetes clusters pull from registries the same way ECS does.

4.

Managed Database Deployment

You migrated from local PostgreSQL and Redis to RDS and ElastiCache. You understand why managed databases provide better reliability than containerized databases: automated backups, point-in-time recovery, multi-AZ failover, online storage scaling, and managed updates. You configured security groups to allow ECS containers to access databases while blocking public internet access. This is production database architecture.

5.

ECS Fargate Container Orchestration

You deployed containerized applications on ECS Fargate without managing servers. You understand the ECS hierarchy: clusters contain services, services maintain task definitions, task definitions specify containers, and tasks are running instances. You configured environment variables, memory/CPU allocation, logging, and networking. You know how health checks drive automatic recovery and how desired count ensures high availability.

6.

Load Balancer Configuration

You created an Application Load Balancer with target groups, listeners, and health checks. You understand why ALBs provide stable public endpoints even as containers restart, how health checks enable automatic failover, and how SSL termination centralizes certificate management. You connected ECS services to ALBs so container IP addresses register automatically. This load balancing pattern scales from 2 containers to 2,000 containers without architectural changes.

7.

Production Infrastructure Patterns

You built complete production infrastructure from scratch: container registry → managed databases → serverless compute → load balancing → public HTTPS endpoint. You understand how these components integrate and why each matters. You can explain security group rules, network isolation, environment variable management, and health check configuration. These aren't toy examples:this is the infrastructure pattern companies use in production.

Chapter Review Quiz

Test your understanding with these questions. If you can answer confidently, you've mastered the material:

Select question to reveal the answer:
Why use managed databases (RDS, ElastiCache) instead of running PostgreSQL and Redis in ECS containers?

Managed databases provide operational capabilities that containerized databases require manual implementation: automated daily backups with point-in-time recovery, multi-availability-zone failover for high availability, online storage scaling without downtime, and managed security patches/updates. Running databases in containers means implementing backup scripts, testing restore procedures, orchestrating failover, and managing maintenance windows yourself. For most teams, the operational complexity and risk of data loss make managed databases the better choice. The slight additional cost buys reliability and operational simplicity that far exceed the savings of self-management.

Explain the ECS hierarchy: Cluster → Service → Task Definition → Task. How do these components work together?

A cluster is a logical grouping (namespace) for containerized applications. A task definition is a blueprint specifying container image, CPU/memory, environment variables, and logging configuration:it's like a Dockerfile for ECS. A service maintains a desired count of running tasks continuously using a specific task definition. A task is one running instance of that task definition. For example: you create a "news-api-cluster" cluster, define a "news-api-task-definition" specifying your container configuration, create a "news-api-service" that uses that task definition with desired count 2, and ECS runs 2 tasks (containers) continuously. If tasks crash, the service restarts them automatically.

What problems do Application Load Balancers solve that direct container access doesn't?

ALBs solve several critical problems: (1) Stable public endpoint:container IP addresses change when tasks restart, but the ALB DNS name never changes. (2) Traffic distribution:incoming requests distribute across multiple containers automatically. (3) Health checks and failover:unhealthy containers are removed from rotation automatically, traffic goes only to healthy containers. (4) SSL/TLS termination:ALBs handle HTTPS encryption/decryption, centralizing certificate management. (5) Zero-downtime deployments:connection draining ensures in-flight requests complete before containers stop. Without ALBs, you'd need to manually track container IPs, implement health checks, handle SSL certificates per container, and coordinate deployments carefully to avoid dropping requests.

How do security groups implement least-privilege access control in your AWS infrastructure?

Security groups act as virtual firewalls with default-deny policies: all inbound traffic is blocked unless explicitly allowed. You create inbound rules specifying protocol, port, and source to allow only necessary traffic. For example: RDS security group allows inbound PostgreSQL (port 5432) only from the ECS security group, blocking all other access. ALB security group allows HTTP/HTTPS from the internet (0.0.0.0/0), but ECS security group only allows traffic from the ALB security group, not direct public access. This implements defense in depth: even if one layer is compromised, other layers maintain security boundaries.

Why does the task definition include environment variables for database connection strings instead of hardcoding them in application code?

Separating configuration from code follows the Twelve-Factor App methodology and enables deployment flexibility. The same application code runs in development (connecting to localhost databases), staging (connecting to staging RDS), and production (connecting to production RDS) just by changing environment variables. Hardcoded connection strings would require rebuilding Docker images for each environment. Environment variables also support secrets rotation:you can update database passwords by updating the task definition and redeploying, without changing code. This separation is fundamental to professional application deployment.

What is the purpose of health check grace periods in ECS services, and why are they necessary?

Health check grace periods (e.g., 60 seconds) allow containers time to start up before health checks affect service stability. Applications need time to initialize: loading configuration, connecting to databases, warming caches, and becoming ready to serve traffic. Without grace periods, containers might fail health checks during legitimate startup, causing ECS to unnecessarily restart them in a failure loop. The grace period says "don't treat health check failures as problems for the first 60 seconds." After the grace period, health checks determine whether containers stay in the load balancer target group. This prevents false positives during startup while maintaining real health monitoring once containers are expected to be ready.

Why create separate security groups for the ALB, ECS containers, and databases instead of using one security group for everything?

Separate security groups implement network segmentation and least-privilege access. The ALB security group allows HTTP/HTTPS from the internet (0.0.0.0/0) because that's its purpose:accepting public traffic. ECS security groups only allow traffic from the ALB, not direct public access. Database security groups only allow connections from ECS, blocking everything else. This layered security means: (1) If an attacker compromises a container, they still can't access the internet directly for data exfiltration. (2) If an attacker somehow bypasses the ALB, they can't reach containers directly. (3) If a container is compromised, the attacker still can't access databases from other sources. Each layer provides defense in depth.

What happens when an ECS task fails its health checks? Describe the automatic recovery process.

When a task fails health checks after the grace period: (1) The ALB marks the target as unhealthy and stops routing new requests to it, but allows existing connections to complete (connection draining). (2) ECS detects the unhealthy task and stops it. (3) ECS immediately starts a replacement task to maintain desired count. (4) The new task registers with the ALB target group and begins health checks. (5) After passing the healthy threshold (e.g., 2 consecutive checks), the ALB routes traffic to the new task. This entire process happens automatically without manual intervention. Users might experience slightly elevated latency during failover, but no downtime if multiple tasks are running.

Looking Forward to Chapter 29

Your News API is deployed on AWS and serving requests at a public URL. You've built production infrastructure: ECS Fargate runs your containers, RDS PostgreSQL and ElastiCache Redis provide managed persistence, an Application Load Balancer distributes traffic, and CloudWatch Logs capture container output. This is a major achievement. Your application runs in the cloud with professional infrastructure patterns.

But if you just deployed a code change, you experienced the manual deployment process: authenticate Docker with ECR, build the image locally, tag it, push to ECR, create a new task definition revision, update the ECS service, wait for health checks, verify deployment success. That workflow took 10-15 minutes and involved multiple AWS CLI commands. Run it once and it feels manageable. Run it ten times and you're tired of repetition. Run it a hundred times across a team and someone will eventually forget a step.

Your infrastructure works, but you're operating it manually. When containers fail, you discover it by checking the ECS console. When response times degrade, users notice before you do. When traffic spikes, your fixed two-container capacity becomes a bottleneck. You have deployment, but you don't have operations. Chapter 29 transforms your AWS infrastructure from basic deployment into professional production operations.

CI/CD with GitHub Actions: Automated deployment pipelines eliminate manual AWS CLI commands entirely. Every git push triggers tests automatically. Passing tests trigger Docker builds with commit SHA tags for complete traceability. Images push to ECR automatically. ECS updates to new task definitions without human intervention. Failed deployments rollback automatically. The entire process completes in 5-8 minutes from code commit to production deployment. You'll build this pipeline yourself, transforming deployment from error-prone manual work into reliable, repeatable automation.

CloudWatch Monitoring with Golden Signals: You'll implement comprehensive production monitoring tracking the four Golden Signals: latency, traffic, errors, and saturation. CloudWatch dashboards visualize system health in real-time with graphs showing request rates, response time percentiles, error rates by type, and CPU utilization across all containers. Alarms notify you immediately when metrics cross thresholds: error rates spike above 1%, P99 latency exceeds 500ms, CPU approaches 80% saturation. CloudWatch Logs Insights enables powerful queries across all container logs to debug production issues. This observability transforms your relationship with production: you detect problems before users complain and diagnose issues quickly when failures occur.

Auto-Scaling Policies: Your fixed two-container deployment becomes elastic infrastructure that grows and shrinks with demand. You'll configure target-tracking policies that maintain 70% CPU utilization: when traffic increases and CPU crosses 70%, ECS adds containers automatically. When traffic subsides and CPU drops below 70%, ECS scales down to reduce costs. You'll test this behavior with load testing tools, watching your infrastructure scale from 2 containers to 10 containers under load, then back down to 2 during quiet periods. This elasticity is what makes cloud infrastructure economically efficient: you pay for capacity you need, when you need it.

AWS Cost Optimization: You'll analyze actual AWS costs service-by-service: ECS Fargate charges per vCPU-hour and GB-hour, RDS charges for instance hours and storage, Application Load Balancer charges for hours and load balancer capacity units, ElastiCache charges for node hours. You'll calculate monthly costs for your infrastructure, understand Free Tier limits, and implement optimization strategies that reduce spending by 40-70% through right-sizing, Reserved Instances, and auto-scaling. Professional engineers balance performance with cost—Chapter 29 teaches those trade-offs with real pricing data.

Blue-Green Deployments: You'll implement zero-downtime deployment strategies where new application versions run alongside old versions. Traffic switches atomically from old to new after health checks pass. If problems occur, traffic switches back instantly—rollback completes in seconds, not minutes. You'll deploy breaking changes to production during business hours without user impact. This deployment safety is how companies ship code multiple times per day with confidence.

Together, Chapters 28 and 29 demonstrate complete cloud infrastructure competency. Chapter 28 proved you can build production infrastructure: containerized applications, managed databases, load balancing, logging. Chapter 29 proves you can operate infrastructure professionally: automated deployment, comprehensive monitoring, elastic scaling, cost management, safe rollout strategies. This progression—from manual deployment to automated operations—is the skill transformation that separates developers who can deploy code from engineers who can run systems reliably at scale. When recruiters ask about your production experience, you'll discuss your deployed News API with automated CI/CD, CloudWatch monitoring, and auto-scaling. That's senior-level infrastructure expertise.