Chapter 24: From SQLite to PostgreSQL

Production-Scale Databases: When and How to Graduate

1. When SQLite Isn't Enough

SQLite's architectural limit

SQLite is excellent software. It powers things like phone apps and browser history, and it is used in plenty of reliable systems. It is perfect for prototypes and single user apps because it is simple, fast, and runs from a single file.

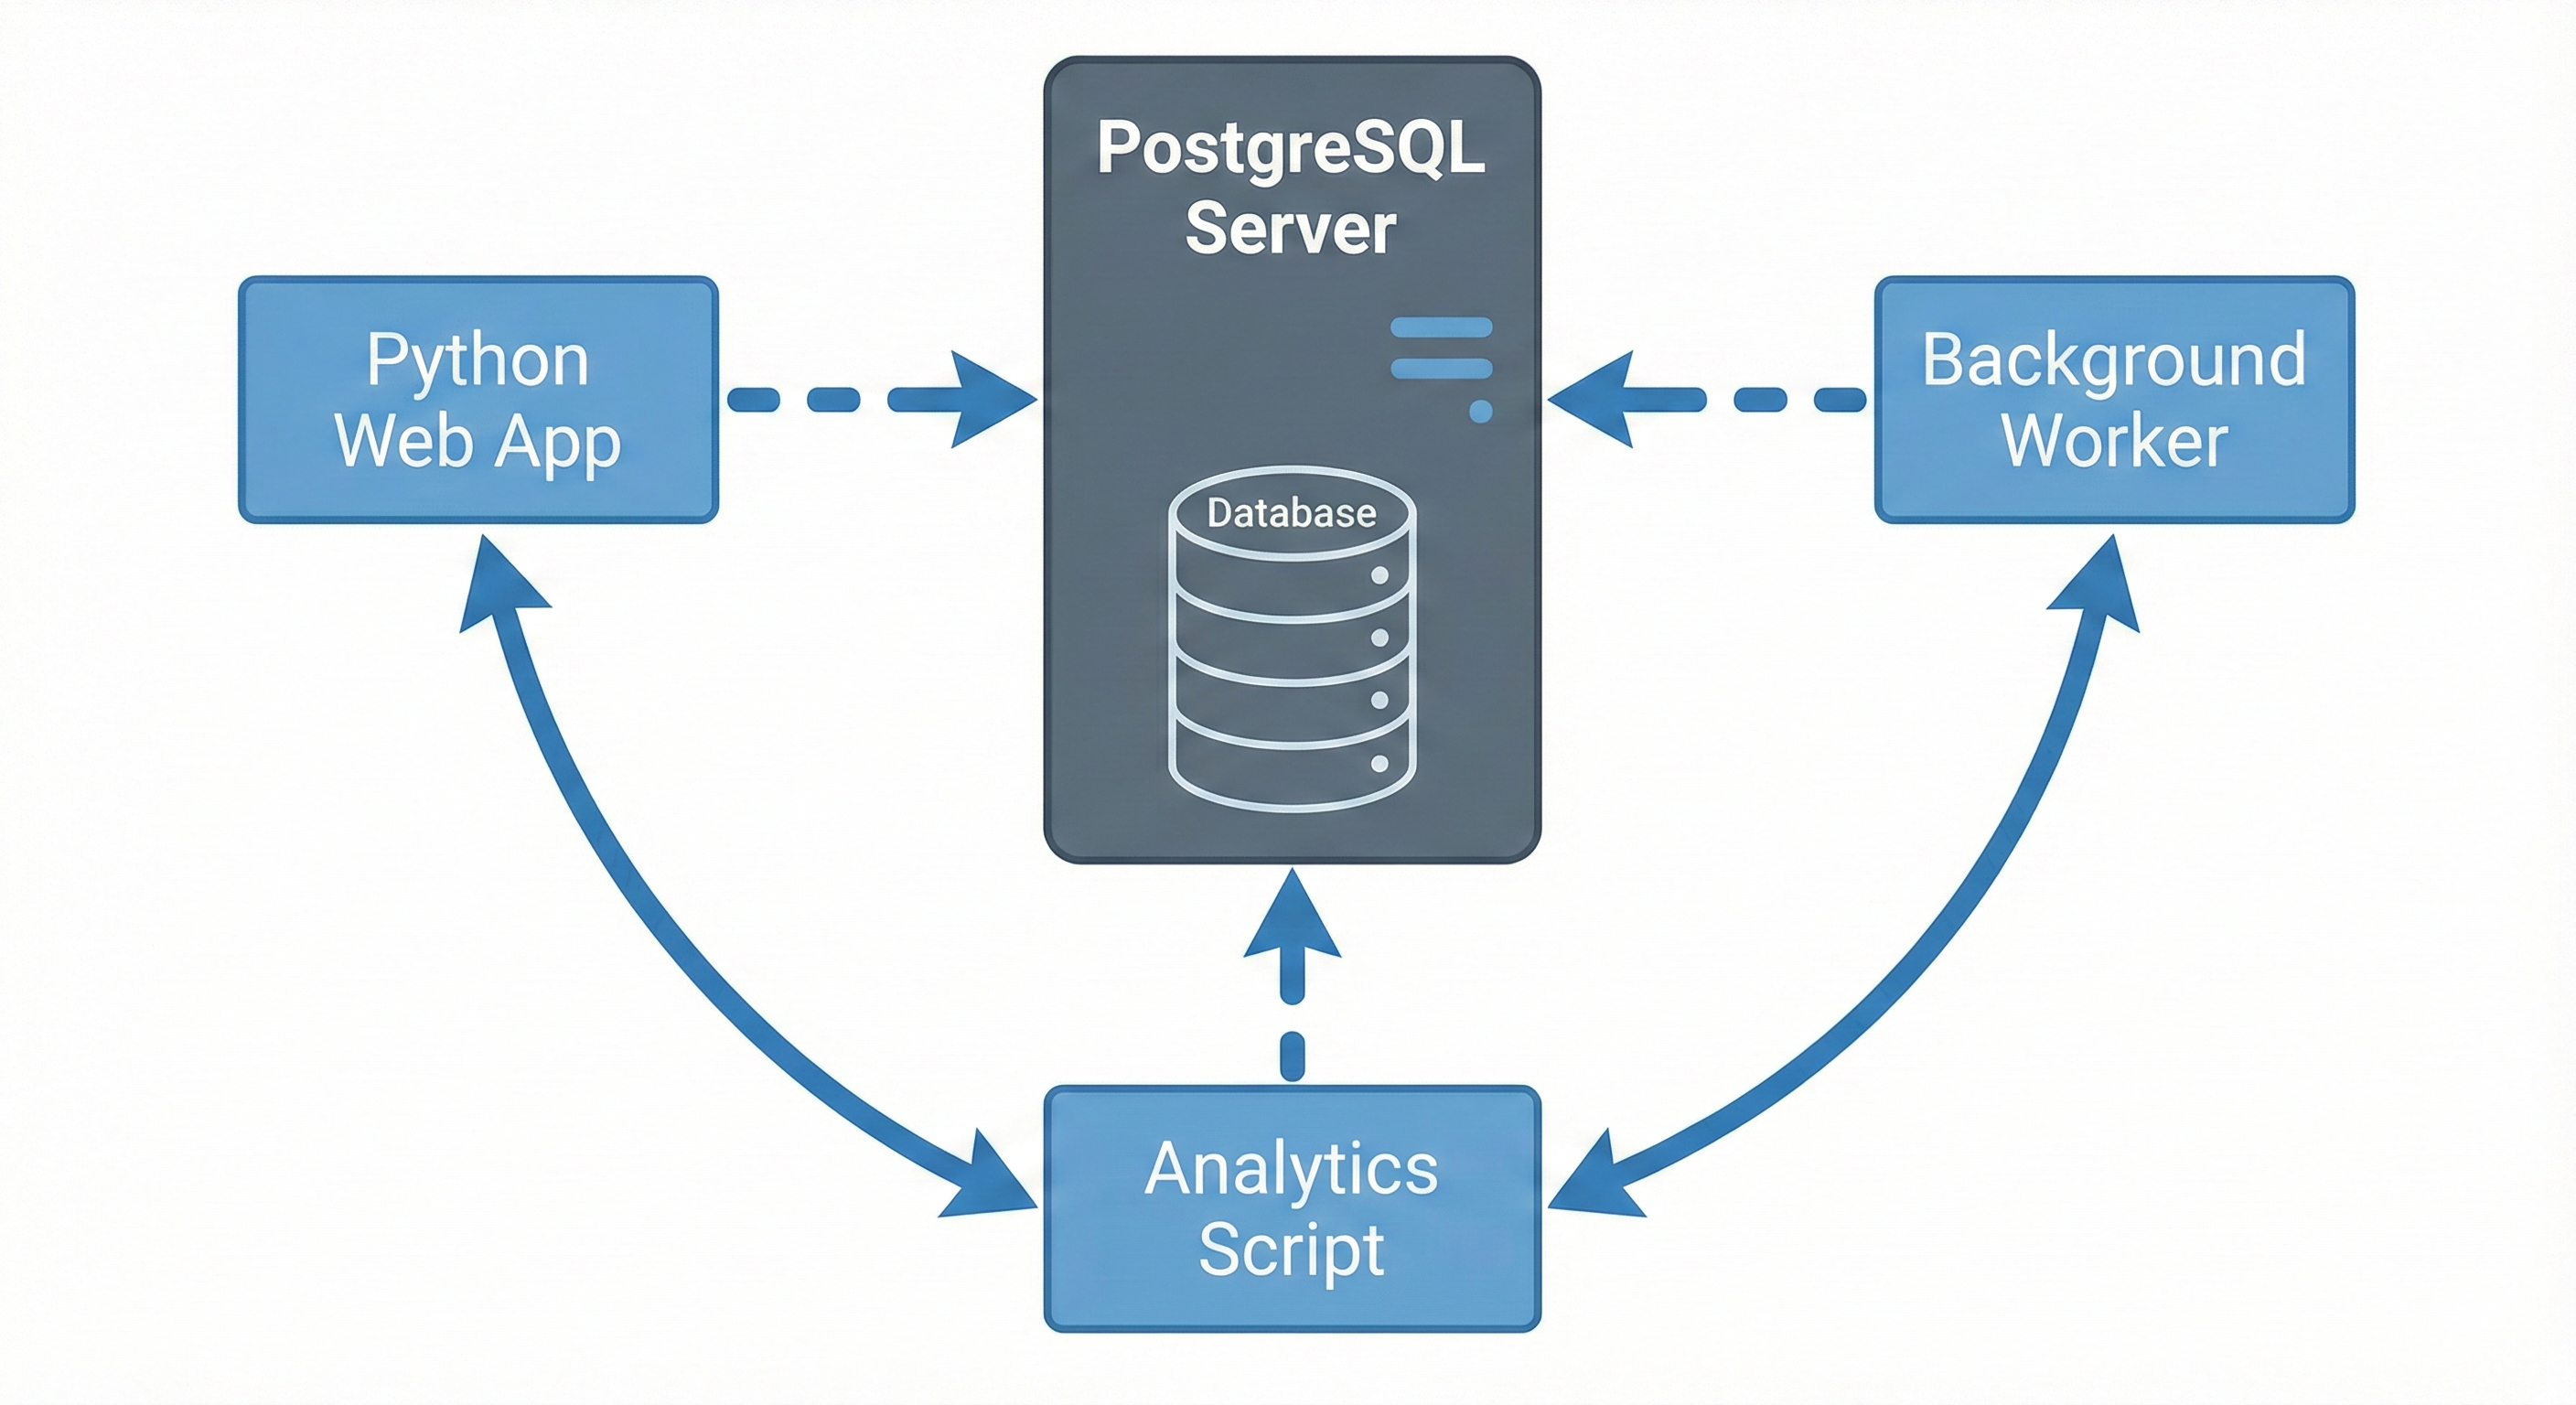
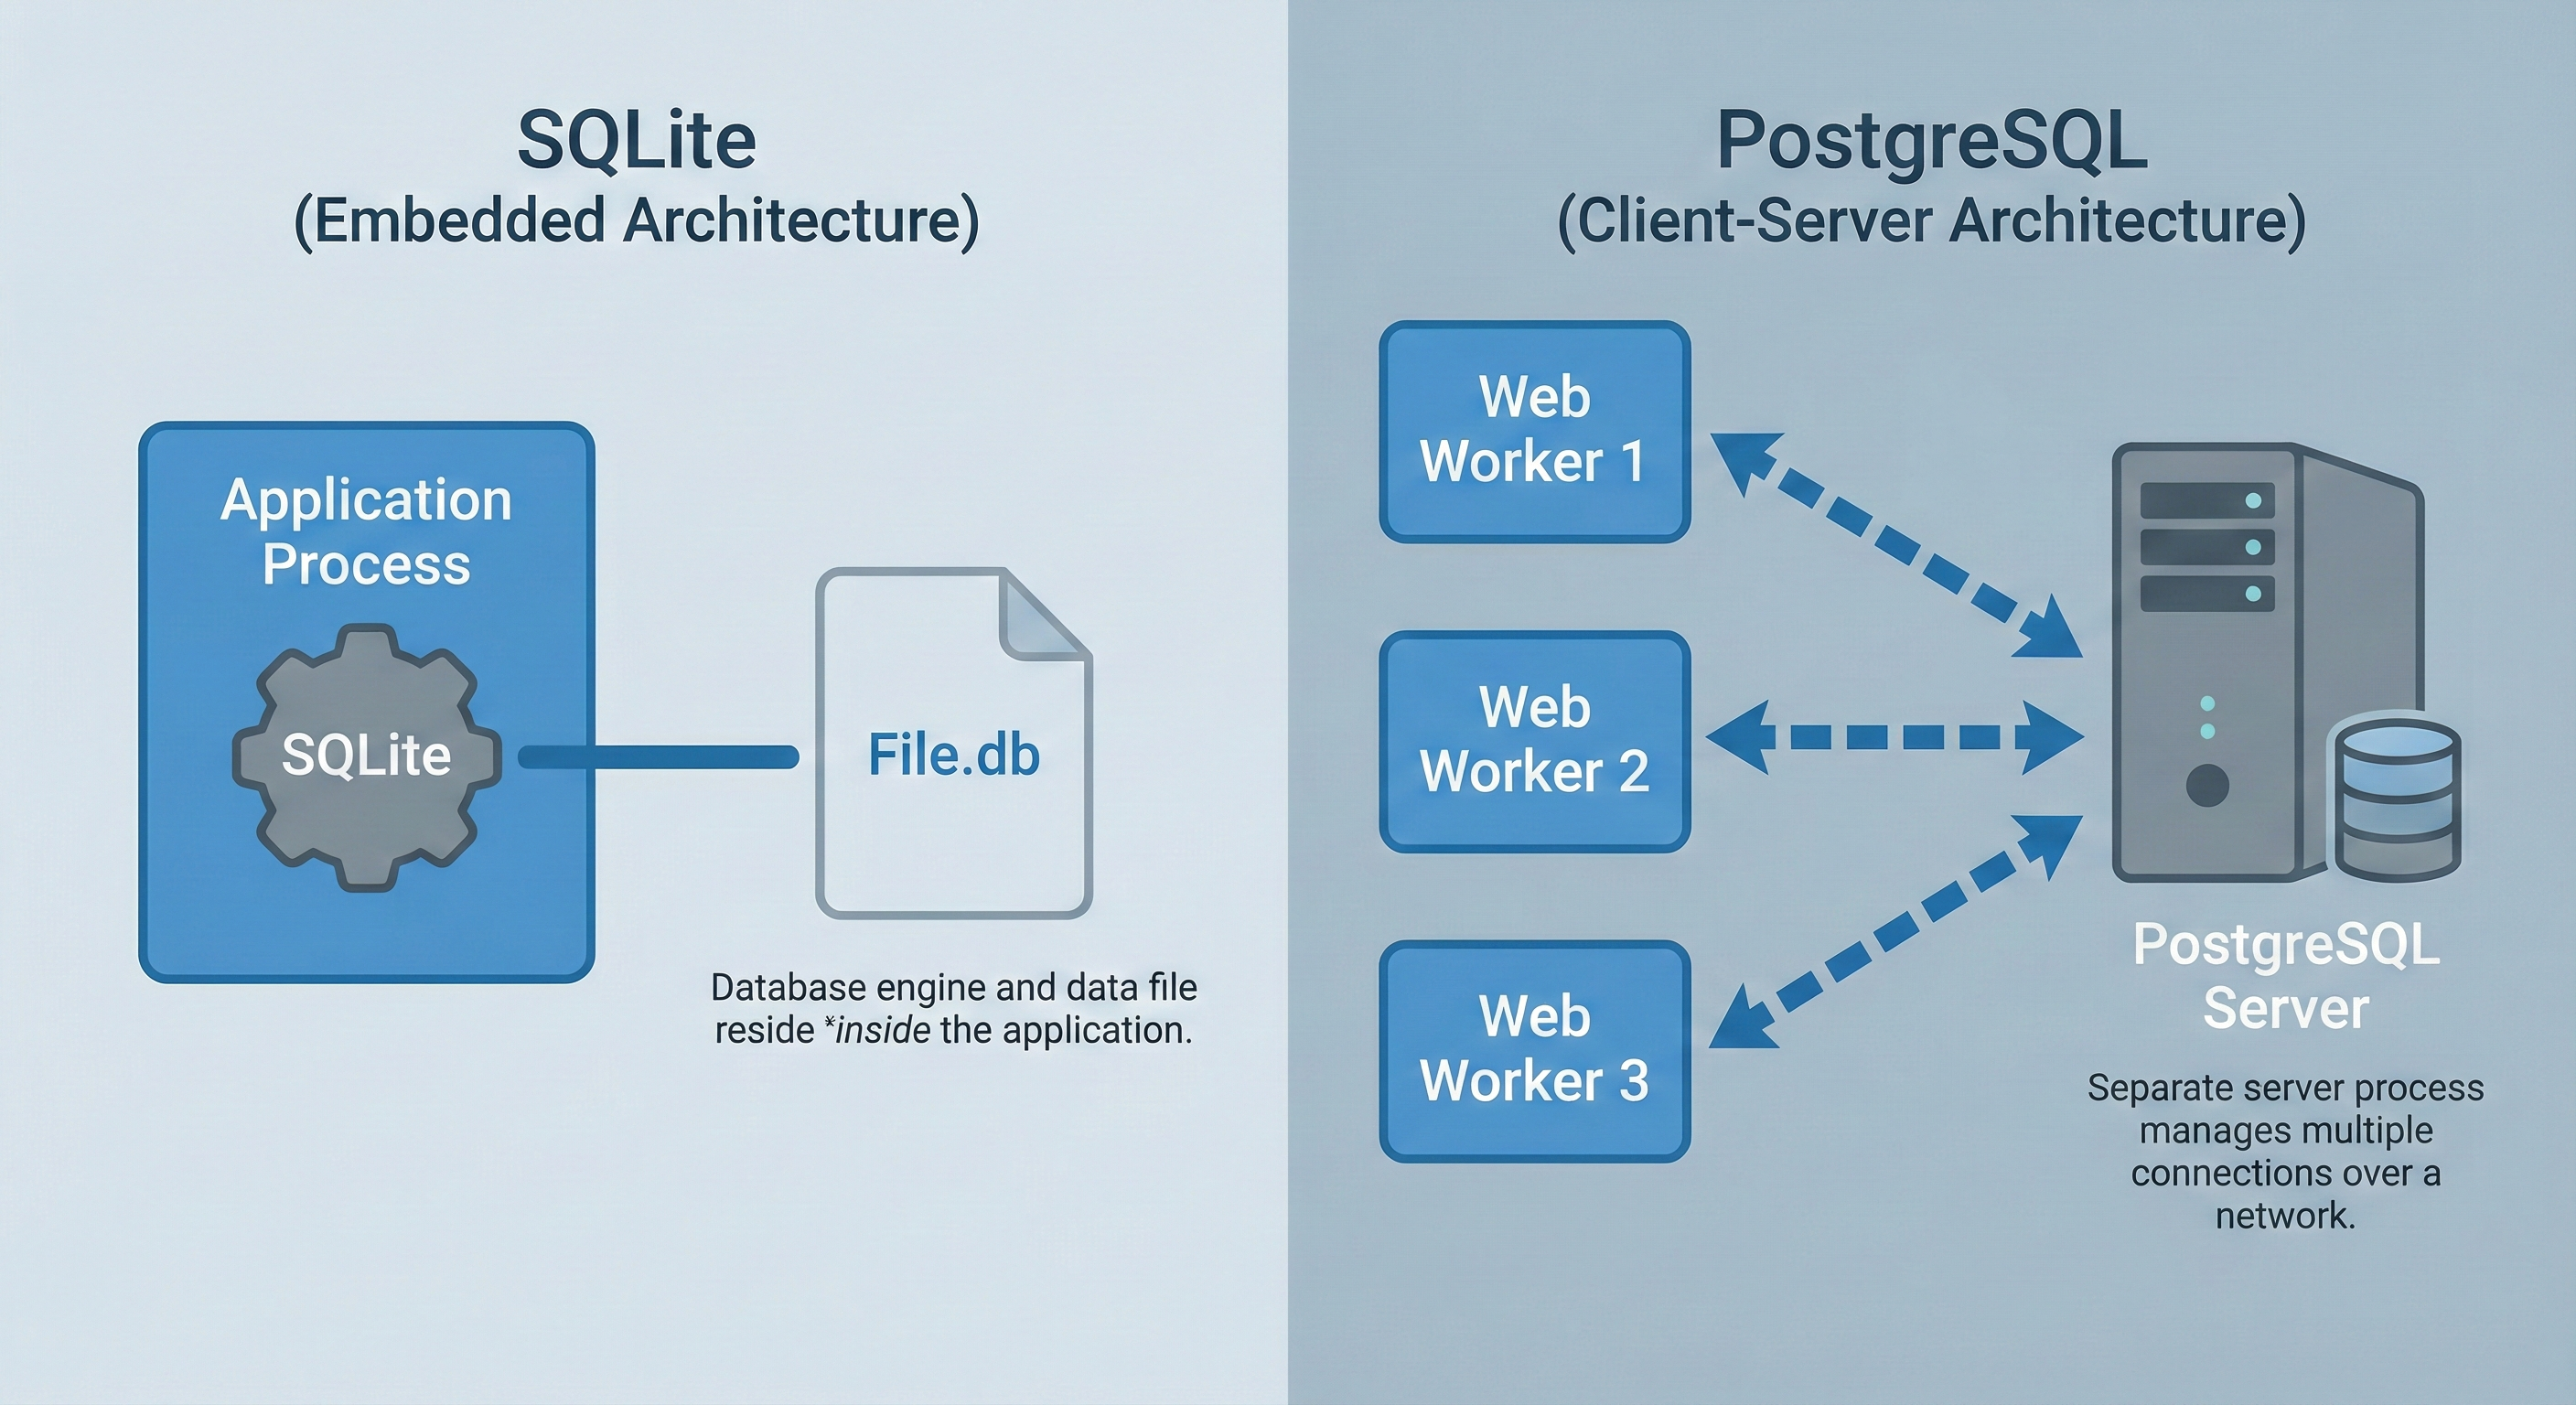
Then you deploy with three web workers and everything changes. Your app isn't one person writing to one file anymore. It's multiple processes trying to update the same database simultaneously. "Database is locked" errors start appearing. Users see failures. Things that worked locally become flaky in production.

The problem is simple: SQLite can handle many readers, but only one writer at a time. As soon as your app has real concurrency, writes start competing for the same lock.

The Solution: Client-Server Architecture

PostgreSQL solves this with client-server architecture. PostgreSQL runs as a separate server that coordinates access from multiple clients simultaneously. Your three workers connect over the network. The server handles concurrency internally. Write conflicts disappear. This chapter teaches you when to migrate and how to do it safely.

Architecture comparison diagram showing SQLite on the left as embedded architecture with an application process containing SQLite engine connecting to a single File.db. PostgreSQL on the right shows client-server architecture with three web workers (Web Worker 1, 2, and 3) all connecting over a network to a separate PostgreSQL Server process managing the database.
SQLite embeds the database engine inside your application. PostgreSQL runs as a separate server that multiple workers can connect to simultaneously.

When to use each approach:

Use SQLite when… Use PostgreSQL when…
You have a single app or script on one machine. You have multiple web workers, services, or machines.
You want the simplest possible setup: ship one file with your app. You are happy to run a database server or use a managed Postgres service.
Your workload is mostly reads with modest writes. You expect lots of concurrent writes or heavier queries.
You are prototyping, teaching, or building a small internal tool. You are building a production web app or shared internal platform.
Only your app needs to touch the data. Many tools and services should share the same database.

When to Migrate

Migrate when you see any of these signals:

  • Write concurrency errors - "database is locked" appearing in production logs
  • Network access needed - database must live on a different server
  • Team collaboration friction - multiple developers need direct database access
  • Advanced features required - JSONB, full-text search, PostGIS
  • Growing database size - approaching 100GB with performance degradation

Learning Objectives

By the end of this chapter, you'll be able to:

  • Recognize when SQLite's architectural limits require migration to PostgreSQL.
  • Set up PostgreSQL locally and connect from Python using psycopg2.
  • Plan database migrations by analyzing schemas and mapping SQLite types to PostgreSQL.
  • Write migration scripts that transfer data safely with zero data loss.
  • Convert Python applications from sqlite3 to psycopg2 with connection pooling.
  • Use Alembic to manage schema changes and automate migrations safely.

What You'll Accomplish

You'll migrate a production SQLite application to PostgreSQL using professional migration patterns. Four core capabilities:

1.

Safe Migration Planning

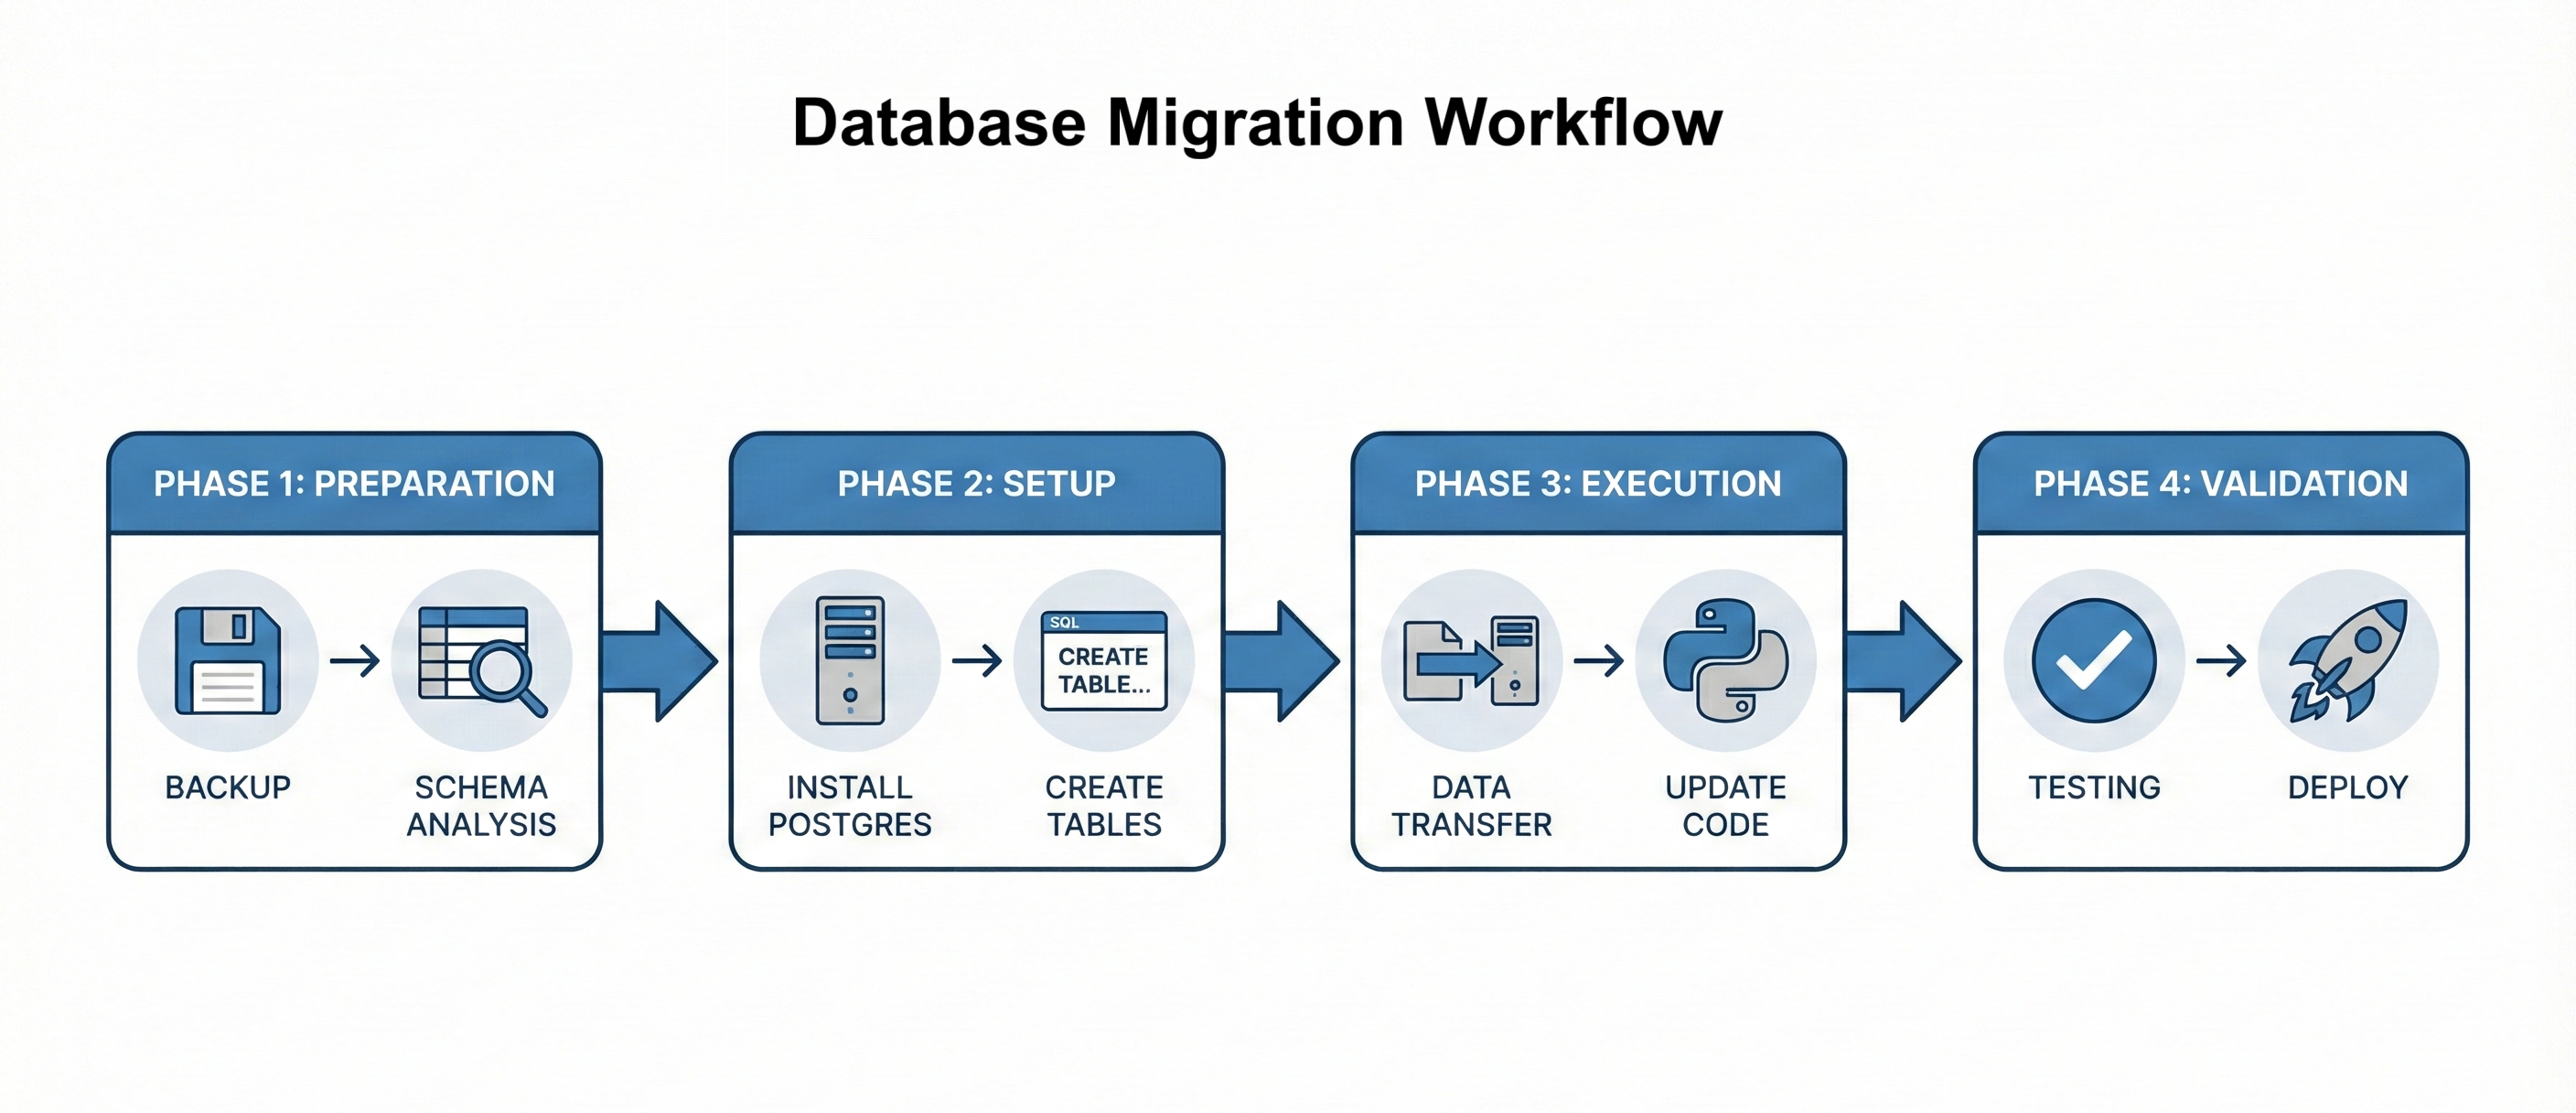
Follow the four-phase workflow: Preparation (backup and analyze), Setup (install PostgreSQL and create schema), Execution (migrate data and update code), Validation (test and deploy). Map SQLite types to PostgreSQL types correctly.

2.

Zero-Data-Loss Execution

Write Python migration scripts with progress tracking, error handling, and row count verification. Handle type conversions, preserve foreign keys, and make migrations idempotent for safe reruns.

3.

Application Code Migration

Convert from sqlite3 to psycopg2 by updating connection strings, converting placeholder syntax, adding explicit commits, and implementing connection pooling for production performance.

4.

Schema Version Control with Alembic

Set up Alembic for automated schema migrations. Create version-controlled schema changes, coordinate across teams, and understand manual versus autogenerated migrations.

Why This Matters for Your Portfolio

Migration skills prove you can handle production constraints. Junior developers build features. Mid-level engineers migrate systems without breaking them.

2. Chapter Roadmap

This chapter builds your database migration expertise through seven progressive stages. Here's the journey:

1

Your First PostgreSQL Connection in 5 Minutes

Section 3 • Quick Win

Install PostgreSQL, connect from Python, run your first query. This quick win proves PostgreSQL works before diving into migration theory.

Install PostgreSQL psycopg2 First Query
2

When SQLite Isn't Enough

Section 1 • Decision Framework

Recognize the five signals indicating migration time: write concurrency errors, network access needs, team collaboration, advanced features, and database size.

Five Signals Architectural Limits Decision Framework
3

PostgreSQL Fundamentals

Section 4 • Architecture Deep Dive

Understand client-server architecture, connection strings, SQL differences, and type mapping from SQLite to PostgreSQL.

Client-Server Type Mapping Connection Strings
4

Planning Your Migration

Section 5 • Migration Strategy

Follow the four-phase workflow: Preparation, Setup, Execution, Validation. Analyze schemas, backup data, and plan systematically.

Four Phases Schema Analysis Risk Management
5

First Migration: Weather Cache

Section 6 • Hands-On Migration

Execute a complete migration: write migration scripts, handle type conversions, verify data integrity, and update application code.

Migration Scripts Zero Data Loss Code Updates
6

PostgreSQL-Specific Features

Section 7 • Advanced Capabilities

Leverage features SQLite doesn't have: JSONB columns, full-text search, proper timestamp handling, and connection pooling.

JSONB Full-Text Search Connection Pooling
7

Automated Migrations with Alembic

Section 8 • Schema Version Control

Set up Alembic for automated schema migrations. Version-control database changes and coordinate migrations across development teams.

Alembic Setup Version Control Team Coordination

Key strategy: You'll build incrementally from proof-of-concept (Section 3) to production-ready patterns (Section 8). Each stage builds on the previous, teaching you how professional database migrations evolve from simple scripts to systematic, repeatable processes.

3. Your First PostgreSQL Connection in 5 Minutes

Before theory, proof. You'll install PostgreSQL, connect from Python, and run your first query. Five minutes from now, you'll have PostgreSQL running and understand the client-server pattern.

Install PostgreSQL

PostgreSQL installation varies by operating system:

macOS (using Homebrew):

Shell
brew install postgresql@15
brew services start postgresql@15

Ubuntu/Debian:

Shell
sudo apt update
sudo apt install postgresql postgresql-contrib
sudo systemctl start postgresql

Windows:

Download the installer from postgresql.org/download/windows and run it. Accept all defaults during installation.

PostgreSQL now runs as a background service. Unlike SQLite (where you open a file), PostgreSQL is a server that's always running, waiting for connections.

Cloud Alternative: Skip Local Installation

Don't want to install PostgreSQL locally? Use a free tier from Railway, Render, or Supabase. These provide PostgreSQL databases accessible over the internet. You'll get connection credentials (host, database name, username, password) to use in Python code.

Install psycopg2 (PostgreSQL Python Driver)

Install psycopg2, the PostgreSQL adapter for Python:

Shell
pip install psycopg2-binary python-dotenv

The -binary suffix installs precompiled binaries, which avoids compilation issues on some systems. It is great for learning and local development. In production, many teams prefer psycopg2 built against system libraries. We also install python-dotenv so you can load credentials from a .env file.

Your First Connection

First, create a database and a user for this book's projects. This avoids relying on default accounts like postgres.

Create a Database and User
SQL (psql)
-- Open a psql session first:
-- psql -U postgres

CREATE USER weather_user WITH PASSWORD 'change_me';
CREATE DATABASE weather_db OWNER weather_user;

\q

Verify you can connect. You should be prompted for the password you set:

Shell
psql -h localhost -U weather_user -d weather_db -c "SELECT 1;"

Next, create a .env file in your project folder so your credentials stay out of your code:

.env
DB_HOST=localhost
DB_PORT=5432
DB_NAME=weather_db
DB_USER=weather_user
DB_PASSWORD=change_me

Now create first_postgres.py:

Your First PostgreSQL Connection
Python
import os

import psycopg2
from dotenv import load_dotenv

load_dotenv()

conn = psycopg2.connect(
    host=os.getenv("DB_HOST", "localhost"),
    port=int(os.getenv("DB_PORT", "5432")),
    dbname=os.getenv("DB_NAME"),
    user=os.getenv("DB_USER"),
    password=os.getenv("DB_PASSWORD"),
)

with conn:
    with conn.cursor() as cur:
        cur.execute("SELECT version();")
        print("PostgreSQL version:")
        print(cur.fetchone()[0])

Run it:

Shell
python first_postgres.py

You will see output like:

Output
PostgreSQL version:
PostgreSQL 15.x on x86_64...

Success. You connected to PostgreSQL from Python and executed your first query.

Common gotchas

If something fails here, it is usually one of these: the PostgreSQL server is not running, the port is wrong, the username or password is wrong, or the database name does not exist. Verify psql works first, then check your .env values.

What Just Happened

Let's break down the pattern:

  • Connection: psycopg2.connect() establishes a TCP connection to the PostgreSQL server. You provide host (server address), database name, username, and password.
  • Cursor: A cursor executes SQL commands and retrieves results. Think of it as a channel for sending queries.
  • Execute: cursor.execute() sends SQL to the server. The server processes it and stores results.
  • Fetch: fetchone() retrieves one row of results. Use fetchall() for all rows.
  • Cleanup: Always close cursors and connections when done.
Compare to SQLite

SQLite connection:

conn = sqlite3.connect('database.db')  # Opens a file

PostgreSQL connection:

conn = psycopg2.connect(host='localhost', dbname='weather_db', user='weather_user', ...)  # Connects to server

SQLite opens a file on disk. PostgreSQL connects to a running server over the network. This architectural difference enables PostgreSQL's concurrent access but requires server configuration.

Create Your First Table

Let's create a simple table and insert data:

Create Table and Insert Data
Python
import os

import psycopg2
from dotenv import load_dotenv

load_dotenv()

conn = psycopg2.connect(
    host=os.getenv("DB_HOST", "localhost"),
    port=int(os.getenv("DB_PORT", "5432")),
    dbname=os.getenv("DB_NAME"),
    user=os.getenv("DB_USER"),
    password=os.getenv("DB_PASSWORD"),
)

with conn:
    with conn.cursor() as cur:
        # Create table
        cur.execute(
            """
            CREATE TABLE IF NOT EXISTS users (
                id SERIAL PRIMARY KEY,
                name VARCHAR(100),
                email VARCHAR(100)
            )
            """
        )

        # Insert data (psycopg2 uses %s placeholders)
        cur.execute(
            "INSERT INTO users (name, email) VALUES (%s, %s)",
            ("Alice", "alice@example.com"),
        )

        # Query data
        cur.execute("SELECT id, name, email FROM users ORDER BY id;")
        users = cur.fetchall()

print("Users in database:")
for user_id, name, email in users:
    print(f"  ID: {user_id}, Name: {name}, Email: {email}")
e>

Run it and you'll see:

Output
Users in database:
  ID: 1, Name: Alice, Email: alice@example.com

PostgreSQL is working! You've created a table, inserted data, and queried it back.

Key Differences from SQLite

Notice three important differences:

1.

Connection Strings Need Credentials

SQLite: sqlite3.connect('file.db') opens a file. PostgreSQL: psycopg2.connect(host=..., database=..., user=..., password=...) connects to a server with authentication.

2.

Placeholder Syntax Changes

SQLite uses ? for placeholders: "INSERT INTO users VALUES (?, ?)". PostgreSQL uses %s: "INSERT INTO users VALUES (%s, %s)". This is the most common migration bug.

3.

Explicit Commits Required

SQLite auto-commits by default. PostgreSQL requires explicit conn.commit() after INSERT/UPDATE/DELETE. Forget this and your changes vanish when the connection closes.

What's Next

You've proved PostgreSQL works. Now you need to know when to migrate from SQLite and how to do it safely. The next sections teach the decision framework, migration planning, and execution strategies that prevent data loss in production migrations.

4. PostgreSQL Fundamentals

Architecture: Client-Server vs Embedded

The fundamental difference between SQLite and PostgreSQL is architectural. Understanding this difference helps you understand why migration solves concurrency problems.

SQLite (Embedded Architecture): Your Python application opens a database file directly, reads and writes to it, then closes the file. The database code runs inside your application's process. There is no separate database program running. This is like having a notebook that only you can write in. When you're using it, nobody else can.

PostgreSQL (Client-Server Architecture): PostgreSQL runs as a separate server process that's always running, listening for connections. Your Python application connects to this server over a network socket (even if it's on the same machine) and sends SQL commands. The server executes those commands and returns results. Multiple applications can connect simultaneously, and the server coordinates all access. This is like having a librarian who manages a shared resource and handles multiple people's requests at once.

Diagram showing PostgreSQL Server at the center with a database icon, connected to three different clients: Python Web App on the left, Background Worker on the right, and Analytics Script at the bottom. Arrows show bidirectional communication between each client and the central PostgreSQL Server.
Multiple applications can connect to PostgreSQL simultaneously. The server coordinates all database access and handles concurrent requests.
What This Means for Your Code

With SQLite, you connect to a file:

conn = sqlite3.connect('weather.db')  # Opens a file

With PostgreSQL, you connect to a server:

conn = psycopg2.connect(
    host='localhost',
    database='weather',
    user='your_username',
    password='your_password'
)  # Connects to a running server process

The SQL you write stays mostly the same. The connection string changes.

Feature SQLite PostgreSQL
Architecture Embedded (runs in your app) Client-Server (separate process)
Setup Import sqlite3 (built into Python) Install server + Python driver (psycopg2)
Connection File path Host, port, database name, credentials
Concurrent Writers One at a time (blocking) Thousands simultaneously
Network Access File must be local Connect from anywhere
Data Storage Single file Managed file structure
Backup Copy the file pg_dump / pg_restore commands

Setting Up PostgreSQL Locally

By now you should have PostgreSQL running locally and a project database created. If you followed Section 3, you already created a dedicated database and user for this chapter.

It helps to know what is actually running:

  • Server process: the PostgreSQL service listening on a port (usually 5432).
  • Database: a named database inside the server, such as weather_db.
  • Role (user): the account that logs in, such as weather_user.

The fastest way to confirm your setup is to run a simple query with psql:

Shell
psql -h localhost -U weather_user -d weather_db -c "SELECT current_database(), current_user;"

If that works, your Python code will work once it uses the same credentials.

Connecting from Python

When you connect to PostgreSQL from Python, you are not opening a file. You are opening a network connection to a server process. That server can handle many clients at once, which is why PostgreSQL scales in a way SQLite cannot.

A PostgreSQL driver, such as psycopg2, does two main jobs:

  • Create a connection to the server using host, port, database name, and credentials.
  • Send SQL to the server and receive results.

Two practical differences from SQLite matter immediately:

  • Placeholders: SQLite uses ?. psycopg2 uses %s.
  • Transactions: PostgreSQL writes are transactional. If you do not commit, your changes may not persist.
A good default

Use environment variables for credentials and wrap database work in context managers. That gives you automatic commits on success and rollbacks on failure.

Context Managers and Best Practices

PostgreSQL connections work similarly to SQLite connections, but with one critical difference: you must explicitly commit transactions. SQLite in default mode auto-commits, but PostgreSQL requires you to call conn.commit() to save changes.

Proper PostgreSQL Connection Pattern
Python
import psycopg2

# Establish connection (persists across operations)
conn = psycopg2.connect(
    host='localhost',
    database='weather_db',
    user='your_username'
)

try:
    # Create cursor for this operation
    with conn.cursor() as cursor:
        cursor.execute("""
            CREATE TABLE IF NOT EXISTS weather_history (
                id SERIAL PRIMARY KEY,
                location VARCHAR(100),
                temperature NUMERIC(5, 2),
                conditions TEXT,
                timestamp TIMESTAMP WITH TIME ZONE
            )
        """)
        
        # Insert data
        cursor.execute("""
            INSERT INTO weather_history (location, temperature, conditions, timestamp)
            VALUES (%s, %s, %s, CURRENT_TIMESTAMP)
        """, ('Dublin', 12.5, 'Cloudy'))
    
    # Commit changes - REQUIRED for PostgreSQL
    conn.commit()
    print("Data saved successfully")

except psycopg2.Error as e:
    # Roll back on error
    conn.rollback()
    print(f"Database error: {e}")

finally:
    # Close connection when done
    conn.close()
Key Differences from SQLite

1. Placeholder syntax: PostgreSQL uses %s for parameters, not ? like SQLite.

2. Explicit commits: You must call conn.commit() to save changes. Forgetting this means your data disappears when the connection closes.

3. Data types: PostgreSQL uses SERIAL for auto-incrementing IDs (not INTEGER PRIMARY KEY AUTOINCREMENT), VARCHAR instead of TEXT for strings with length limits, and NUMERIC for precise decimals.

4. Timezone awareness: TIMESTAMP WITH TIME ZONE stores timestamps with timezone information, avoiding the UTC conversion issues common in distributed applications.

Managing Credentials with python-dotenv

Saying "use environment variables" without showing how is a common source of confusion for developers. The standard Python approach is using python-dotenv, which loads variables from a .env file.

Installing python-dotenv
Terminal
# Install python-dotenv
pip install python-dotenv

Create a .env file in your project root directory:

.env File
Environment Variables
# Database Configuration
DB_HOST=localhost
DB_NAME=weather_db
DB_USER=your_username
DB_PASSWORD=your_password

# Or use a complete connection string
DATABASE_URL=postgresql://your_username:your_password@localhost:5432/weather_db

Load these variables at the start of your application:

Using python-dotenv in Your Application
Python
import os
import psycopg2
from dotenv import load_dotenv

# Load environment variables from .env file
load_dotenv()

# Now os.getenv() works as expected
conn = psycopg2.connect(
    host=os.getenv('DB_HOST'),
    database=os.getenv('DB_NAME'),
    user=os.getenv('DB_USER'),
    password=os.getenv('DB_PASSWORD')
)

# Or use the full connection string
# conn = psycopg2.connect(os.getenv('DATABASE_URL'))

print("Connected successfully!")
conn.close()
CRITICAL: Add .env to .gitignore

Your .env file contains credentials and should NEVER be committed to version control. Create or update your .gitignore file:

# .gitignore
.env
*.env
.env.local

Create a .env.example file (without real credentials) to show teammates what variables are needed:

# .env.example
DB_HOST=localhost
DB_NAME=your_database_name
DB_USER=your_username
DB_PASSWORD=your_password

This approach works locally and in production. Deployment platforms like Railway, Render, and Heroku let you set environment variables through their web interfaces, keeping credentials secure without hardcoding them in your code.

5. Planning Your Migration

Migrating from SQLite to PostgreSQL isn't just about copying data. You need to analyze your schema, map data types, test queries, and validate results. A good migration plan minimizes downtime and prevents data loss.

This section walks through the planning process using a simple weather cache as an example. The same principles apply to any database migration, from small single-table applications to complex multi-table systems.

Database migration follows a predictable four-phase workflow. Understanding this structure helps you avoid common mistakes like migrating data before the schema is ready or deploying code before testing is complete. Each phase builds on the previous one, creating a safe path from SQLite to PostgreSQL.

Migration roadmap diagram showing four phases: Preparation (Backup & Analyze), Setup (Install & Schema), Execution (Data Transfer & Code Update), and Validation (Testing & Deployment).
A safe migration follows a strict order: backup and plan first, set up infrastructure second, migrate data and code third, and validate last.

Phase 1: Preparation means backing up your SQLite database and analyzing its schema. You document every table, column, constraint, and index. This phase prevents data loss and ensures you understand what you're migrating.

Phase 2: Setup involves installing PostgreSQL and creating the new schema with appropriate data types. You map SQLite types to PostgreSQL equivalents and create tables, indexes, and constraints. The PostgreSQL database stays empty until Phase 3.

Phase 3: Execution transfers data from SQLite to PostgreSQL and updates your application code. You write migration scripts that handle type conversions, then modify your Python code to use psycopg2 instead of sqlite3. This is where the actual migration happens.

Phase 4: Validation tests the migrated database and deploys to production. You verify data integrity, test query performance, and confirm your application works identically with PostgreSQL. Only after validation passes do you deploy.

The rest of section 3. Planning Your Migration covers Phase 1 in detail. Section 4 demonstrates Phases 2-4 with a complete weather cache migration, and Section 5 applies these phases to the full Spotify Music Time Machine project.

Analyzing Your Current Schema

Start by understanding your existing SQLite schema. You need to know what tables exist, what columns they have, what data types they use, and what constraints are defined.

Examining SQLite Schema
Python
import sqlite3

# Connect to your SQLite database
conn = sqlite3.connect('weather.db')
cursor = conn.cursor()

# List all tables
cursor.execute("""
    SELECT name FROM sqlite_master 
    WHERE type='table'
""")
tables = cursor.fetchall()
print("Tables:", [t[0] for t in tables])

# For each table, get its schema
for table_name, in tables:
    print(f"\nSchema for {table_name}:")
    cursor.execute(f"PRAGMA table_info({table_name})")
    columns = cursor.fetchall()
    
    for col in columns:
        col_id, name, type_, not_null, default, is_pk = col
        print(f"  {name}: {type_}", end='')
        if is_pk:
            print(" PRIMARY KEY", end='')
        if not_null:
            print(" NOT NULL", end='')
        if default:
            print(f" DEFAULT {default}", end='')
        print()

conn.close()
Output
Tables: ['weather_history']

Schema for weather_history:
  id: INTEGER PRIMARY KEY
  location: TEXT NOT NULL
  temperature: REAL
  conditions: TEXT
  timestamp: TEXT NOT NULL

This output tells you everything about your schema: table names, column names, data types, and constraints. You'll use this information to design your PostgreSQL schema.

Data Type Mapping: SQLite to PostgreSQL

SQLite has a flexible type system with only a few core types. PostgreSQL has strict types with many specialized options. Here's how to map common SQLite types to appropriate PostgreSQL types:

SQLite Type PostgreSQL Type Notes
INTEGER PRIMARY KEY AUTOINCREMENT SERIAL PRIMARY KEY Auto-incrementing integer ID
INTEGER INTEGER or BIGINT Use BIGINT for large numbers
REAL NUMERIC or DOUBLE PRECISION NUMERIC for exact decimals, DOUBLE PRECISION for floats
TEXT TEXT or VARCHAR(n) VARCHAR when you want length limits
BLOB BYTEA Binary data storage
TEXT (for timestamps) TIMESTAMP WITH TIME ZONE Proper timestamp type with timezone support
TEXT (for JSON) JSONB Native JSON with indexing and querying

For our weather cache example, here's the migration:

Column SQLite PostgreSQL Why
id INTEGER PRIMARY KEY SERIAL PRIMARY KEY Standard auto-increment pattern
location TEXT NOT NULL VARCHAR(100) NOT NULL City names rarely exceed 100 chars
temperature REAL NUMERIC(5, 2) Exact decimals for temperature (e.g., 12.34)
conditions TEXT TEXT Unlimited length for descriptions
timestamp TEXT NOT NULL TIMESTAMP WITH TIME ZONE NOT NULL Proper timestamp type with timezone

Creating the Migration Checklist

Before starting the actual migration, create a checklist to ensure you don't skip critical steps. Here's a complete checklist you can adapt to any migration:

1.

Backup Your SQLite Database

Copy your .db file to a safe location. If anything goes wrong during migration, you can restore from this backup. Never migrate without a backup.

2.

Document Your Schema

Write down all tables, columns, indexes, and constraints. Include sample queries your application runs. This documentation helps you verify the PostgreSQL version works identically.

3.

Set Up PostgreSQL

Install PostgreSQL locally, create a new database, and verify you can connect from Python. Test the connection before proceeding.

4.

Create PostgreSQL Schema

Write CREATE TABLE statements for PostgreSQL with appropriate data types. Start with an empty database and run these statements to create the structure.

5.

Write Data Migration Script

Create a Python script that reads from SQLite and writes to PostgreSQL. Handle type conversions (especially timestamps). Test with small amounts of data first.

6.

Migrate Data

Run your migration script on the full database. Monitor for errors. Verify row counts match between SQLite and PostgreSQL.

7.

Update Application Code

Change connection strings from sqlite3 to psycopg2. Update placeholder syntax from ? to %s. Add explicit commits. Test each database operation.

8.

Test Thoroughly

Run your test suite (you have tests, right?). Manually test critical features. Compare query results between SQLite and PostgreSQL versions. Verify data integrity.

9.

Performance Testing

Test query performance with realistic data volumes. Check connection handling under load. Verify concurrent operations work correctly.

10.

Deployment Plan

Document how to deploy the PostgreSQL version to production. Include database server setup, credential management, and rollback procedures.

Testing Is Not Optional

Database migrations can lose data or break functionality in subtle ways. Thorough testing catches these issues before they reach production. Test edge cases: empty strings, NULL values, maximum field lengths, timestamps in different timezones, and concurrent operations.

6. First Migration: Weather Cache

Let's migrate a real database. This weather cache stores API responses from OpenWeatherMap. It's simple enough to understand every step, but realistic enough to demonstrate actual migration challenges.

You'll see the complete process: creating the PostgreSQL schema, writing the data migration script, converting application code, and testing the results. Every step here transfers to larger migrations.

Creating the PostgreSQL Schema

First, create the table structure in PostgreSQL. This SQL creates the same schema as our SQLite database, but with PostgreSQL-specific types.

PostgreSQL Schema Creation
Python
import psycopg2

# Connect to PostgreSQL
conn = psycopg2.connect(
    host='localhost',
    database='weather_db',
    user='your_username'
)

try:
    with conn.cursor() as cursor:
        # Create weather_history table with PostgreSQL types
        cursor.execute("""
            CREATE TABLE IF NOT EXISTS weather_history (
                id SERIAL PRIMARY KEY,
                location VARCHAR(100) NOT NULL,
                temperature NUMERIC(5, 2),
                conditions TEXT,
                timestamp TIMESTAMP WITH TIME ZONE NOT NULL,
                created_at TIMESTAMP WITH TIME ZONE DEFAULT CURRENT_TIMESTAMP
            )
        """)
        
        # Create index for common queries
        cursor.execute("""
            CREATE INDEX IF NOT EXISTS idx_location_timestamp 
            ON weather_history(location, timestamp DESC)
        """)
        
    conn.commit()
    print("PostgreSQL schema created successfully")

except psycopg2.Error as e:
    conn.rollback()
    print(f"Error creating schema: {e}")

finally:
    conn.close()
What Changed from SQLite

1. SERIAL instead of INTEGER PRIMARY KEY: PostgreSQL's way of auto-incrementing IDs.

2. VARCHAR(100) instead of TEXT: Enforces reasonable length limit on location names.

3. NUMERIC(5, 2) instead of REAL: Precise decimals for temperatures (max 999.99).

4. TIMESTAMP WITH TIME ZONE: Proper timestamp type that stores timezone information.

5. Added created_at column: Track when records were inserted (common pattern in production).

6. Added index: Optimize queries that filter by location and timestamp.

Writing the Migration Script

Now write a script that reads data from SQLite and writes it to PostgreSQL. This script handles type conversions and provides progress feedback for large datasets.

Data Migration Script
Python
import sqlite3
import psycopg2
from datetime import datetime

def migrate_weather_data():
    # Connect to both databases
    sqlite_conn = sqlite3.connect('weather.db')
    pg_conn = psycopg2.connect(
        host='localhost',
        database='weather_db',
        user='your_username'
    )
    
    try:
        # Count total rows to migrate
        sqlite_cursor = sqlite_conn.cursor()
        sqlite_cursor.execute("SELECT COUNT(*) FROM weather_history")
        total_rows = sqlite_cursor.fetchone()[0]
        print(f"Migrating {total_rows} rows from SQLite to PostgreSQL...")
        
        # Fetch all data from SQLite
        sqlite_cursor.execute("""
            SELECT id, location, temperature, conditions, timestamp
            FROM weather_history
            ORDER BY id
        """)
        
        # Insert into PostgreSQL in batches
        pg_cursor = pg_conn.cursor()
        batch_size = 1000
        migrated = 0
        
        while True:
            rows = sqlite_cursor.fetchmany(batch_size)
            if not rows:
                break
            
            # Prepare batch insert
            for row in rows:
                # Convert timestamp string to datetime object
                # SQLite stores as TEXT, PostgreSQL needs proper timestamp
                timestamp_str = row[4]
                timestamp_dt = datetime.fromisoformat(timestamp_str)
                
                pg_cursor.execute("""
                    INSERT INTO weather_history 
                    (location, temperature, conditions, timestamp)
                    VALUES (%s, %s, %s, %s)
                """, (row[1], row[2], row[3], timestamp_dt))
                
                migrated += 1
                if migrated % 100 == 0:
                    print(f"  Migrated {migrated}/{total_rows} rows...")
            
            # Commit batch
            pg_conn.commit()
        
        print(f"\nMigration complete! {migrated} rows transferred.")
        
        # Verify counts match
        pg_cursor.execute("SELECT COUNT(*) FROM weather_history")
        pg_count = pg_cursor.fetchone()[0]
        
        if pg_count == total_rows:
            print(f"✓ Verification passed: {pg_count} rows in PostgreSQL")
        else:
            print(f"✗ Count mismatch: SQLite={total_rows}, PostgreSQL={pg_count}")
        
    except Exception as e:
        pg_conn.rollback()
        print(f"Migration failed: {e}")
        raise
    
    finally:
        sqlite_conn.close()
        pg_conn.close()

if __name__ == '__main__':
    migrate_weather_data()
Output
Migrating 2543 rows from SQLite to PostgreSQL...
  Migrated 100/2543 rows...
  Migrated 200/2543 rows...
  Migrated 300/2543 rows...
  ...
  Migrated 2500/2543 rows...

Migration complete! 2543 rows transferred.
✓ Verification passed: 2543 rows in PostgreSQL
Migration Script Best Practices

Batch processing: Inserting 1000 rows at a time is faster than individual inserts and commits.

Progress reporting: For large migrations, progress updates prevent you from wondering if the script is frozen.

Type conversion: The script explicitly converts SQLite's TEXT timestamps to Python datetime objects that PostgreSQL expects.

Verification: Always compare row counts after migration to catch data loss.

Error handling: If anything fails, rollback prevents partial data in PostgreSQL.

Converting Application Code

With data migrated, update your application code to use PostgreSQL. The changes are minimal but critical.

Before: SQLite Version
Python
import sqlite3
from datetime import datetime, timezone

def save_weather(location, temperature, conditions):
    with sqlite3.connect('weather.db') as conn:
        conn.execute("""
            INSERT INTO weather_history 
            (location, temperature, conditions, timestamp)
            VALUES (?, ?, ?, ?)
        """, (location, temperature, conditions, datetime.now(timezone.utc)))

def get_recent_weather(location, days=7):
    with sqlite3.connect('weather.db') as conn:
        cursor = conn.execute("""
            SELECT temperature, conditions, timestamp
            FROM weather_history
            WHERE location = ?
            AND timestamp >= datetime('now', ? || ' days')
            ORDER BY timestamp DESC
        """, (location, -days))
        return cursor.fetchall()
After: PostgreSQL Version
Python
import psycopg2
from datetime import datetime, timezone, timedelta
import os

def get_connection():
    """Get database connection - change this one function to switch databases"""
    return psycopg2.connect(
        host=os.getenv('DB_HOST', 'localhost'),
        database=os.getenv('DB_NAME', 'weather_db'),
        user=os.getenv('DB_USER', 'your_username'),
        password=os.getenv('DB_PASSWORD', '')
    )

def save_weather(location, temperature, conditions):
    conn = get_connection()
    try:
        with conn.cursor() as cursor:
            cursor.execute("""
                INSERT INTO weather_history 
                (location, temperature, conditions, timestamp)
                VALUES (%s, %s, %s, %s)
            """, (location, temperature, conditions, datetime.now(timezone.utc)))
        conn.commit()  # MUST commit - PostgreSQL doesn't auto-commit
    except psycopg2.Error as e:
        conn.rollback()
        print(f"Database error: {e}")
        raise
    finally:
        conn.close()

def get_recent_weather(location, days=7):
    conn = get_connection()
    try:
        with conn.cursor() as cursor:
            cutoff_date = datetime.now(timezone.utc) - timedelta(days=days)
            cursor.execute("""
                SELECT temperature, conditions, timestamp
                FROM weather_history
                WHERE location = %s
                AND timestamp >= %s
                ORDER BY timestamp DESC
            """, (location, cutoff_date))
            return cursor.fetchall()
    finally:
        conn.close()
Key Code Changes

1. Import changed: sqlite3psycopg2

2. Connection centralized: get_connection() function makes it easy to switch databases or configure from environment variables.

3. Placeholders changed: ?%s in all SQL queries.

4. Explicit commits required: Must call conn.commit() after write operations.

5. Date math changed: SQLite's datetime('now', '-7 days') becomes Python's timedelta calculation.

6. Connections must be closed: Use finally blocks to ensure cleanup.

Testing the Migration

After converting code, test thoroughly. Run your existing tests (if you have them) and manually verify critical operations.

Migration Test Script
Python
def test_migration():
    """Test that PostgreSQL version works identically to SQLite"""
    
    print("Testing write operations...")
    save_weather('Dublin', 12.5, 'Cloudy')
    save_weather('Dublin', 13.2, 'Partly Cloudy')
    save_weather('London', 15.0, 'Rainy')
    print("✓ Writes successful")
    
    print("\nTesting read operations...")
    dublin_weather = get_recent_weather('Dublin', days=7)
    assert len(dublin_weather) >= 2, "Should have at least 2 Dublin records"
    print(f"✓ Retrieved {len(dublin_weather)} Dublin records")
    
    print("\nTesting data integrity...")
    temp, conditions, timestamp = dublin_weather[0]
    assert isinstance(temp, float), "Temperature should be numeric"
    assert isinstance(conditions, str), "Conditions should be string"
    assert timestamp is not None, "Timestamp should exist"
    print("✓ Data types correct")
    
    print("\nTesting location filtering...")
    london_weather = get_recent_weather('London', days=7)
    assert len(london_weather) >= 1, "Should have London records"
    assert 'London' not in str(dublin_weather), "Dublin query shouldn't return London"
    print("✓ Location filtering works")
    
    print("\n✓ All tests passed! Migration successful.")

if __name__ == '__main__':
    test_migration()
Output
Testing write operations...
✓ Writes successful

Testing read operations...
✓ Retrieved 2 Dublin records

Testing data integrity...
✓ Data types correct

Testing location filtering...
✓ Location filtering works

✓ All tests passed! Migration successful.

If all tests pass, your migration is complete. The application works identically, but now runs on PostgreSQL with support for concurrent writes, network access, and advanced features.

7. PostgreSQL-Specific Features

Migration isn't just about matching SQLite's functionality. PostgreSQL offers features that improve your application beyond what SQLite could do. This section demonstrates three powerful features you'll use in production applications.

JSONB Columns for API Data

API responses often contain nested JSON with varying structures. Storing raw JSON in TEXT columns works, but you can't query the data efficiently. PostgreSQL's JSONB type stores JSON with full indexing and querying capabilities.

Imagine our weather cache receives rich API responses with nested data: temperature, humidity, wind speed, pressure, and forecast arrays. Instead of creating columns for every possible field (and updating the schema when the API changes), store the full response as JSONB.

Weather Cache with JSONB
Python
import psycopg2
import psycopg2.extras
import json
from datetime import datetime, timezone

def create_enhanced_schema():
    conn = get_connection()
    try:
        with conn.cursor() as cursor:
            cursor.execute("""
                CREATE TABLE IF NOT EXISTS weather_cache (
                    id SERIAL PRIMARY KEY,
                    location VARCHAR(100) NOT NULL,
                    api_response JSONB NOT NULL,
                    timestamp TIMESTAMP WITH TIME ZONE DEFAULT CURRENT_TIMESTAMP
                )
            """)
            
            # Index on JSON field for fast queries
            cursor.execute("""
                CREATE INDEX IF NOT EXISTS idx_weather_temp 
                ON weather_cache 
                ((api_response->'main'->>'temp'))
            """)
            
        conn.commit()
    finally:
        conn.close()

def save_weather_response(location, api_data):
    """Store entire API response as JSONB"""
    conn = get_connection()
    try:
        with conn.cursor() as cursor:
            cursor.execute("""
                INSERT INTO weather_cache (location, api_response)
                VALUES (%s, %s)
            """, (location, json.dumps(api_data)))
        conn.commit()
    finally:
        conn.close()

def find_windy_days(min_wind_speed=20):
    """Query nested JSON data directly in SQL"""
    conn = get_connection()
    try:
        with conn.cursor() as cursor:
            cursor.execute("""
                SELECT 
                    location,
                    api_response->'main'->>'temp' as temperature,
                    api_response->'wind'->>'speed' as wind_speed,
                    timestamp
                FROM weather_cache
                WHERE (api_response->'wind'->>'speed')::numeric > %s
                ORDER BY timestamp DESC
            """, (min_wind_speed,))
            return cursor.fetchall()
    finally:
        conn.close()

# Example usage
api_response = {
    "main": {"temp": 15.5, "humidity": 72, "pressure": 1013},
    "wind": {"speed": 25, "deg": 180},
    "weather": [{"description": "windy"}]
}

save_weather_response('Dublin', api_response)

windy_days = find_windy_days(min_wind_speed=20)
for location, temp, wind, timestamp in windy_days:
    print(f"{location}: {temp}°C, wind {wind} km/h at {timestamp}")
JSONB Advantages

1. Flexible schema: Store any JSON structure without defining columns upfront. API changes don't require schema migrations.

2. Queryable: Use -> to access nested fields directly in SQL. No need to load the entire JSON into Python first.

3. Indexable: Create indexes on specific JSON paths for fast queries.

4. Binary storage: JSONB (not JSON) stores data in binary format for faster processing than text parsing.

5. Validation: PostgreSQL ensures stored data is valid JSON.

For the Music Time Machine (covered in the next section), JSONB is perfect for storing Spotify's track objects. Each track has 20+ fields including nested audio features. Rather than creating columns for each field, store the full track data as JSONB and query specific fields when needed.

Full-Text Search

SQLite's LIKE '%keyword%' searches work for simple cases, but they're slow and primitive. PostgreSQL offers full-text search with ranking, stemming (finding "running" when searching "run"), and stopword filtering.

Imagine users want to search weather conditions: "heavy rain", "light snow", "thunderstorm". Full-text search finds relevant results even with variations in wording.

Full-Text Search Implementation
Python
def add_fulltext_search():
    """Add tsvector column for full-text search"""
    conn = get_connection()
    try:
        with conn.cursor() as cursor:
            # Add tsvector column
            cursor.execute("""
                ALTER TABLE weather_history 
                ADD COLUMN IF NOT EXISTS search_vector tsvector
            """)
            
            # Create trigger to auto-update search index
            cursor.execute("""
                CREATE OR REPLACE FUNCTION update_search_vector() 
                RETURNS trigger AS $$
                BEGIN
                    NEW.search_vector := 
                        to_tsvector('english', 
                                    COALESCE(NEW.location, '') || ' ' || 
                                    COALESCE(NEW.conditions, ''));
                    RETURN NEW;
                END
                $$ LANGUAGE plpgsql
            """)
            
            cursor.execute("""
                CREATE TRIGGER weather_search_update 
                BEFORE INSERT OR UPDATE ON weather_history
                FOR EACH ROW EXECUTE FUNCTION update_search_vector()
            """)
            
            # Update existing rows
            cursor.execute("""
                UPDATE weather_history
                SET search_vector = to_tsvector('english', 
                                                location || ' ' || 
                                                COALESCE(conditions, ''))
            """)
            
            # Create GIN index for fast search
            cursor.execute("""
                CREATE INDEX IF NOT EXISTS idx_search_vector 
                ON weather_history USING GIN(search_vector)
            """)
            
        conn.commit()
        print("Full-text search configured")
    finally:
        conn.close()

def search_weather(query):
    """Search weather descriptions with ranking"""
    conn = get_connection()
    try:
        with conn.cursor() as cursor:
            cursor.execute("""
                SELECT 
                    location,
                    conditions,
                    timestamp,
                    ts_rank(search_vector, query) AS rank
                FROM weather_history,
                     to_tsquery('english', %s) query
                WHERE search_vector @@ query
                ORDER BY rank DESC, timestamp DESC
                LIMIT 10
            """, (query,))
            return cursor.fetchall()
    finally:
        conn.close()

# Example usage
results = search_weather('heavy & rain')  # '&' means AND
for location, conditions, timestamp, rank in results:
    print(f"{location}: {conditions} (relevance: {rank:.3f})")
Output
Dublin: Heavy rain with thunderstorms (relevance: 0.607)
London: Heavy rain (relevance: 0.455)
Cork: Light rain becoming heavy (relevance: 0.303)
Paris: Overcast with occasional rain (relevance: 0.152)
Full-Text Search Features

1. Stemming: Searching "rain" finds "raining", "rained", and "rainy".

2. Ranking: Results ordered by relevance, not just timestamp.

3. Boolean operators: Use & (AND), | (OR), ! (NOT) for complex queries.

4. Performance: GIN indexes make searches fast even with millions of rows.

5. Auto-update: Triggers keep the search index synchronized automatically.

For the Music Time Machine, full-text search enables searching track names, artists, and album titles with proper ranking and stemming. Users can search "acoustic guitar" and find tracks tagged "acoustic" or "guitar" in any field.

Connection Pooling

Opening a database connection is expensive: establishing network connection, authentication, allocating server resources. If your web application opens and closes connections for every request, you waste time and strain the database server.

Connection pooling solves this by maintaining a pool of reusable connections. When your application needs a database connection, it borrows one from the pool. When done, it returns the connection to the pool instead of closing it. This is dramatically faster for high-traffic applications.

Connection Pooling Implementation
Python
from psycopg2 import pool
import os

# Create connection pool once at application startup
connection_pool = None

def initialize_pool():
    """Create connection pool - call this once when app starts"""
    global connection_pool
    connection_pool = pool.ThreadedConnectionPool(
        minconn=2,          # Minimum connections to keep open
        maxconn=20,         # Maximum connections allowed
        host=os.getenv('DB_HOST', 'localhost'),
        database=os.getenv('DB_NAME', 'weather_db'),
        user=os.getenv('DB_USER'),
        password=os.getenv('DB_PASSWORD', '')
    )
    print("Connection pool initialized: 2-20 connections")

def get_connection():
    """Get connection from pool"""
    if connection_pool is None:
        raise Exception("Connection pool not initialized")
    return connection_pool.getconn()

def return_connection(conn):
    """Return connection to pool (don't close it!)"""
    if connection_pool is not None:
        connection_pool.putconn(conn)

def close_pool():
    """Close all connections - call on application shutdown"""
    global connection_pool
    if connection_pool is not None:
        connection_pool.closeall()
        connection_pool = None
        print("Connection pool closed")

# Usage in application code
def save_weather(location, temperature, conditions):
    """Use pooled connection"""
    conn = get_connection()
    try:
        with conn.cursor() as cursor:
            cursor.execute("""
                INSERT INTO weather_history 
                (location, temperature, conditions, timestamp)
                VALUES (%s, %s, %s, CURRENT_TIMESTAMP)
            """, (location, temperature, conditions))
        conn.commit()
    except Exception as e:
        conn.rollback()
        raise
    finally:
        return_connection(conn)  # Return to pool, don't close

# Initialize pool at startup
initialize_pool()

# Use in requests
save_weather('Dublin', 12.5, 'Cloudy')
save_weather('London', 15.0, 'Rainy')

# Close pool at shutdown
close_pool()
When to Use Connection Pooling

Web applications: Essential for Flask, Django, FastAPI applications where each request needs database access. Without pooling, you create and destroy connections hundreds of times per second.

Multi-threaded applications: When multiple threads access the database simultaneously, pooling prevents connection exhaustion.

Microservices: Services that handle bursts of traffic benefit from maintaining warm connections.

Don't use for: Simple scripts that run once and exit, CLI tools with infrequent database access, or single-threaded applications with low traffic.

For the Music Time Machine web dashboard, connection pooling is critical. When you deploy it, multiple workers handle requests simultaneously. Each worker needs database access, but creating connections on every request would be slow. Connection pooling ensures fast response times even under load.

Checkpoint Quiz

Test your understanding of PostgreSQL features and migration concepts before continuing to the project section.

Select question to reveal the answer:
When should you migrate from SQLite to PostgreSQL?

Migrate when you need concurrent writes (multiple processes writing simultaneously), network database access (database on different server than application), advanced features (JSONB, full-text search, PostGIS), or better performance at scale (databases approaching 100GB). Don't migrate if SQLite meets your needs. It's simpler to deploy and maintain.

Why does PostgreSQL require explicit commits while SQLite often doesn't?

PostgreSQL always uses transactions to ensure ACID compliance. Changes stay in a transaction until you call commit(), allowing you to rollback on errors. SQLite in autocommit mode (the default) commits after each statement automatically. Both approaches work, but PostgreSQL's explicit transactions prevent accidental data loss when errors occur mid-operation.

What is JSONB and when should you use it?

JSONB is PostgreSQL's binary JSON storage type. Use it for storing API responses, flexible schemas that change frequently, nested data structures, or when you need to query specific JSON fields efficiently. Unlike TEXT columns storing JSON strings, JSONB provides indexing and SQL operators for querying nested data without loading the entire JSON into Python.

Why is connection pooling important for web applications?

Opening database connections is slow. It requires network negotiation, authentication, and server resource allocation. Web applications handle dozens or hundreds of requests per second. Creating a new connection for each request wastes time and can exhaust database connection limits. Connection pooling maintains reusable connections, making requests faster and preventing connection exhaustion under load.

8. Automated Migrations with Alembic

Manually running CREATE TABLE and ALTER TABLE statements works for one-time migrations, but production applications need repeatable, version-controlled schema changes. Alembic is a database migration tool that tracks schema versions, generates migration scripts automatically, and applies changes safely across development, staging, and production environments.

Think of Alembic like Git for your database schema. Each migration is a commit that moves your database from one version to the next. You can upgrade to the latest version, downgrade to fix mistakes, and see the complete history of schema changes.

Installing and Configuring Alembic

Start by installing Alembic and initializing it in your project directory.

Setting Up Alembic
Terminal
# Install Alembic
pip install alembic

# Initialize Alembic in your project
alembic init alembic

# Creates this structure:
# alembic/
#   ├── env.py           # Configuration for connecting to database
#   ├── script.py.mako   # Template for migration scripts
#   └── versions/        # Directory for migration files
# alembic.ini            # Alembic configuration file

Configure Alembic to connect to your PostgreSQL database by editing alembic.ini:

alembic.ini Configuration
Configuration
# Find this line:
sqlalchemy.url = driver://user:pass@localhost/dbname

# Replace with your PostgreSQL connection:
sqlalchemy.url = postgresql://your_username@localhost/weather_db

# Or use environment variable (better for production):
# sqlalchemy.url = ${DATABASE_URL}

For production applications, use environment variables instead of hardcoding credentials. Edit alembic/env.py to read from environment:

alembic/env.py with Environment Variables
Python
# Near the top of env.py, add:
import os

# Find this section:
# config = context.config

# Add after it:
if os.getenv('DATABASE_URL'):
    config.set_main_option('sqlalchemy.url', os.getenv('DATABASE_URL'))

Creating Your First Migration

Alembic can generate migration scripts automatically by comparing your code's model definitions to the current database state. For now, we'll create a migration manually to understand how they work.

Creating a Migration
Terminal
# Create new migration
alembic revision -m "create weather history table"

# Creates file: alembic/versions/abc123_create_weather_history_table.py

This generates a migration file with upgrade() and downgrade() functions. The upgrade function applies the change, the downgrade function reverses it.

Migration File Structure
Python
"""create weather history table

Revision ID: abc123
Revises: 
Create Date: 2024-12-08 14:30:00.000000

"""
from alembic import op
import sqlalchemy as sa

# revision identifiers, used by Alembic
revision = 'abc123'
down_revision = None
branch_labels = None
depends_on = None

def upgrade():
    """Apply changes to database"""
    op.create_table(
        'weather_history',
        sa.Column('id', sa.Integer(), primary_key=True),
        sa.Column('location', sa.String(length=100), nullable=False),
        sa.Column('temperature', sa.Numeric(precision=5, scale=2)),
        sa.Column('conditions', sa.Text()),
        sa.Column('timestamp', sa.TIMESTAMP(timezone=True), nullable=False),
        sa.Column('created_at', sa.TIMESTAMP(timezone=True), 
                  server_default=sa.text('CURRENT_TIMESTAMP'))
    )
    
    # Create index
    op.create_index(
        'idx_location_timestamp',
        'weather_history',
        ['location', 'timestamp'],
        postgresql_ops={'timestamp': 'DESC'}
    )

def downgrade():
    """Reverse changes (for rollback)"""
    op.drop_index('idx_location_timestamp', table_name='weather_history')
    op.drop_table('weather_history')

Apply the migration to create the table:

Terminal
# Apply migration (upgrade to latest)
alembic upgrade head

# Output:
# INFO  [alembic.runtime.migration] Running upgrade  -> abc123, create weather history table

If you need to undo the migration:

Terminal
# Downgrade by 1 version
alembic downgrade -1

# Downgrade to beginning (empty database)
alembic downgrade base

Schema Evolution Example

The power of Alembic shows when your schema needs to change. Imagine you want to add a humidity column to track that measurement too.

Adding a Column with Alembic
Terminal
# Create migration for schema change
alembic revision -m "add humidity column"
Migration: Add Humidity Column
Python
"""add humidity column

Revision ID: def456
Revises: abc123
Create Date: 2024-12-08 15:00:00.000000

"""
from alembic import op
import sqlalchemy as sa

revision = 'def456'
down_revision = 'abc123'  # Points to previous migration
branch_labels = None
depends_on = None

def upgrade():
    """Add humidity column"""
    op.add_column(
        'weather_history',
        sa.Column('humidity', sa.Integer())
    )

def downgrade():
    """Remove humidity column"""
    op.drop_column('weather_history', 'humidity')
Terminal
# Apply new migration
alembic upgrade head

# Check current version
alembic current

# See migration history
alembic history
Why Alembic Matters

Version control: Every schema change is tracked, documented, and reversible.

Team coordination: Developers run migrations to sync their local databases with production schema.

Deployment safety: Migrations run automatically during deployment, ensuring production database matches application code.

Rollback capability: If a deployment fails, you can downgrade the database to match the previous code version.

Data preservation: Alembic handles schema changes without losing existing data.

Automatic Migration Generation

Writing migrations manually teaches you what's happening under the hood, but Alembic's real power comes from automatic migration generation. Alembic can compare your Python model definitions to your current database state and generate the migration code for you.

This requires defining your models using SQLAlchemy (Alembic's parent library). Here's a quick example of how this works in practice:

Defining Models with SQLAlchemy
Python (models.py)
from sqlalchemy import Column, Integer, String, Numeric, TIMESTAMP
from sqlalchemy.ext.declarative import declarative_base
from sqlalchemy.sql import func

Base = declarative_base()

class WeatherHistory(Base):
    __tablename__ = 'weather_history'
    
    id = Column(Integer, primary_key=True)
    location = Column(String(100), nullable=False)
    temperature = Column(Numeric(5, 2))
    conditions = Column(String)
    humidity = Column(Integer)  # New column we want to add
    timestamp = Column(
        TIMESTAMP(timezone=True),
        server_default=func.current_timestamp(),
        nullable=False
    )

Update your alembic/env.py to import your models:

Python (alembic/env.py)
# Add near the top of env.py
from models import Base

# Find this line:
# target_metadata = None

# Replace with:
target_metadata = Base.metadata

Now Alembic can detect schema changes automatically:

Autogenerate Migration
Terminal
# Alembic compares your models to current database and generates migration
alembic revision --autogenerate -m "add humidity column"

# Output shows what it detected:
# INFO  [alembic.autogenerate.compare] Detected added column 'weather_history.humidity'
# Generating /path/to/alembic/versions/xyz789_add_humidity_column.py
Generated Migration (autogenerated)
"""add humidity column

Revision ID: xyz789
Revises: def456
Create Date: 2024-12-08 16:30:00.000000

"""
from alembic import op
import sqlalchemy as sa

revision = 'xyz789'
down_revision = 'def456'

def upgrade():
    # Alembic generated this automatically!
    op.add_column('weather_history', 
                  sa.Column('humidity', sa.Integer(), nullable=True))

def downgrade():
    op.drop_column('weather_history', 'humidity')
Manual vs Autogenerate

Manual migrations (what we showed first): Best for learning, gives you full control, necessary for complex data migrations or when you don't use SQLAlchemy models.

Autogenerate (what most teams actually use): Faster, less error-prone for schema changes, requires SQLAlchemy models. Always review the generated migration before applying. Alembic can't detect everything (like renamed columns, which it sees as drop + add).

Best practice: Use autogenerate for schema changes, but always review and edit the generated file. For complex data transformations, write manual migrations. Most production teams use a hybrid approach: autogenerate creates the skeleton, developers refine it.

Apply the autogenerated migration the same way:

Terminal
# Apply migration
alembic upgrade head

# Check current database version
alembic current

# View full migration history
alembic history --verbose

9. Chapter Summary and Review

You've mastered database migration from SQLite to PostgreSQL. You can recognize when SQLite's architectural limits require migration, plan migrations using the four-phase workflow, write migration scripts with zero data loss, and use Alembic for schema version control.

These aren't just technical skills. They're professional capabilities that separate developers who prototype from engineers who migrate production systems safely.

Key Skills Mastered

In this chapter, you developed database migration expertise that demonstrates professional engineering capabilities:

1.

Recognize When SQLite Limitations Require PostgreSQL Migration

You can identify the five signals indicating migration time and assess which matter for your specific application. You understand that write concurrency errors affect web applications most critically, while team collaboration difficulties impact development workflows. You know when SQLite's simplicity provides value and when PostgreSQL's client-server architecture becomes essential. This architectural judgment separates developers who follow tutorials from engineers who make informed infrastructure decisions.

2.

Plan Four-Phase Migrations Minimizing Downtime and Preventing Data Loss

You can systematically plan migrations following the Preparation → Setup → Execution → Validation workflow. You create backups before starting, analyze schemas thoroughly, set up PostgreSQL infrastructure before touching data, migrate incrementally with verification, and test comprehensively before deployment. You understand why each phase matters and what happens when steps are skipped. This systematic approach prevents the data loss and production incidents that plague poorly planned migrations.

3.

Map SQLite Data Types to Appropriate PostgreSQL Equivalents

You can analyze SQLite schemas and choose optimal PostgreSQL types: SERIAL PRIMARY KEY for auto-incrementing IDs, VARCHAR with appropriate length constraints, NUMERIC for precision decimals, TIMESTAMP WITH TIME ZONE for proper timestamp handling. You understand the implications of each choice: how VARCHAR constraints improve query planning, how NUMERIC prevents floating-point errors, how timezone-aware timestamps prevent DST bugs. This type-level thinking demonstrates database design expertise beyond basic SQL knowledge.

4.

Write Migration Scripts with Progress Tracking and Error Handling

You can write Python scripts that migrate data safely: reading from SQLite, converting types appropriately, inserting into PostgreSQL with proper error handling, tracking progress for large datasets, and verifying row counts match. You know how to handle special cases like NULL values, empty strings, and timestamps in different formats. You can make migrations idempotent using ON CONFLICT clauses, allowing safe reruns after failures. These practical scripting skills enable zero-data-loss migrations.

5.

Convert Applications from sqlite3 to psycopg2 with Connection Pooling

You can update Python applications to use PostgreSQL: changing connection strings from file paths to network credentials, converting placeholder syntax from ? to %s, adding explicit transaction commits, and implementing connection pooling for production performance. You understand how connection pooling reduces overhead and prevents connection exhaustion. You can configure pool parameters (minconn, maxconn) appropriately for your application's load. This code-level migration skill completes the database transition.

6.

Use Alembic for Version-Controlled Schema Evolution

You can set up Alembic in projects, create initial migrations from existing schemas, write incremental schema changes, and apply migrations safely in development and production. You understand migration history, rollback capabilities, and the trade-offs between manual and autogenerated migrations. You know how Alembic enables team coordination by ensuring all developers and servers run the same schema version. This version control for databases demonstrates production engineering practices beyond ad-hoc SQL scripts.

Portfolio and Interview Value

Database migration skills prove you've worked with production systems facing real architectural constraints. When discussing this chapter in interviews, emphasize systematic planning (four-phase workflow), data integrity preservation (zero data loss), and production considerations (connection pooling, Alembic). Explain a specific migration challenge you solved and the technical decisions you made. This demonstrates problem-solving under production constraints. This demonstrates exactly what hiring managers seek in mid-level engineers.

Chapter Review

Test your understanding of database migration concepts with these comprehensive questions. Take time to formulate complete answers before checking the provided explanations. These questions mirror technical interview discussions about database architecture and migration strategy.

What are the five signals indicating it's time to migrate from SQLite to PostgreSQL, and which one matters most for web applications?

The five signals are: (1) Write concurrency errors where "database is locked" errors appear when multiple processes try to write simultaneously. (2) Network access requirements where your database needs to be on a separate server from your application. (3) Team collaboration difficulties where multiple developers need direct database access for debugging and migrations. (4) Advanced features needed like JSONB, full-text search, or PostGIS that SQLite doesn't provide. (5) Growing database size where performance degrades as your database approaches 100GB.

Write concurrency is most critical for web applications. When you deploy a Flask or Django app to production with Gunicorn or uWSGI, you typically run 3-5 worker processes to handle concurrent requests. Each worker is a separate Python process. When two users simultaneously create posts, update profiles, or save data, two workers try to write to the SQLite database simultaneously. SQLite allows only one writer at a time, so one worker succeeds while the other gets "OperationalError: database is locked" and the user sees an error page.

This problem doesn't affect development (single process) or read-heavy applications (no write conflicts). But for production web apps with multiple workers handling concurrent users making changes, it's a showstopper. PostgreSQL solves this by running as a separate server process that coordinates writes internally. Your three workers all connect to PostgreSQL simultaneously, each thinking it has exclusive access, while PostgreSQL manages concurrency behind the scenes using sophisticated locking mechanisms. Users never see locking errors because the database server handles them.

Real-world example: Your Music Time Machine works perfectly on localhost (one Flask process). Deploy to Railway with three Gunicorn workers and suddenly random users get errors when creating playlists. Those are write concurrency failures. Migrate to PostgreSQL and the errors disappear because PostgreSQL coordinates concurrent writes without exposing locking to your application.

Explain the four-phase migration workflow and why each phase is necessary.

The four-phase workflow is: Phase 1: Preparation (backup and analyze), Phase 2: Setup (install PostgreSQL and create schema), Phase 3: Execution (migrate data and update code), and Phase 4: Validation (test and deploy). Each phase builds on the previous one, creating a safe path from SQLite to PostgreSQL with minimal risk.

Phase 1 (Preparation) is necessary because you need to understand what you're migrating before touching any code or data. You backup your SQLite database (if anything goes wrong, you can restore), analyze your schema programmatically (documenting tables, columns, types, constraints), identify all queries your application runs (ensuring nothing breaks), and plan your PostgreSQL schema with appropriate type mappings. Skipping preparation leads to forgotten tables, incorrect type choices, and missing indexes that cause performance problems in production.

Phase 2 (Setup) creates the PostgreSQL infrastructure before migrating data. You install PostgreSQL locally for testing, create the production database on Railway/Render/RDS, write CREATE TABLE statements with proper PostgreSQL types, and set up Alembic for schema version control. This phase keeps PostgreSQL empty. You're building the structure to receive data. Skipping setup means migrating data with no destination or, worse, migrating to poorly designed schemas that require re-migration.

Phase 3 (Execution) is where data actually moves and code changes. You write migration scripts that read SQLite, convert types (especially timestamps), write to PostgreSQL with progress tracking, and verify row counts match. Then you update application code: change connection strings, convert placeholder syntax (? to %s), add explicit commits, and implement connection pooling. This phase requires careful testing. Migrating data incorrectly loses information, and incorrect code breaks production.

Phase 4 (Validation) ensures everything works before deployment. You run your test suite against PostgreSQL, manually test critical features, compare query results between SQLite and PostgreSQL versions, verify data integrity (row counts, sample records, relationship preservation), and test performance under realistic load. Only after validation passes do you deploy to production. Skipping validation means discovering bugs in production when users are affected.

Why the strict order matters: You can't migrate data (Phase 3) before creating the destination schema (Phase 2). You can't validate (Phase 4) before migrating (Phase 3). You shouldn't start any phase without completing preparation (Phase 1). This sequential workflow prevents the chaos of ad-hoc migrations where you're simultaneously debugging schema issues, data conversions, and code changes without clear separation. Professional migrations follow this workflow because it minimizes risk and enables rollback at each stage.

Why must you use SERIAL PRIMARY KEY in PostgreSQL instead of INTEGER PRIMARY KEY AUTOINCREMENT?

SERIAL PRIMARY KEY is PostgreSQL's standard, idiomatic way to create auto-incrementing integer primary keys. While you can use INTEGER PRIMARY KEY with a DEFAULT sequence, SERIAL is cleaner, more readable, and automatically creates the underlying sequence for you.

What SERIAL does: When you write id SERIAL PRIMARY KEY, PostgreSQL automatically: (1) Creates a sequence named tablename_id_seq, (2) Sets the column default to nextval('tablename_id_seq'), (3) Makes the column an INTEGER type, (4) Sets NOT NULL constraint, (5) Creates primary key constraint. This is equivalent to writing much more verbose SQL manually.

Why not INTEGER PRIMARY KEY AUTOINCREMENT? Because AUTOINCREMENT is SQLite-specific syntax that doesn't exist in PostgreSQL. If you try to use it, PostgreSQL raises a syntax error. SQLite's AUTOINCREMENT has subtle behavior differences (it prevents rowid reuse) that PostgreSQL sequences don't replicate, and usually you don't want that behavior anyway because it wastes ID space and provides no real benefit.

Practical impact: Using SERIAL makes your schema idiomatic and readable to other PostgreSQL developers. It's the pattern they expect. More importantly, SERIAL automatically handles sequence creation and management. If you manually define sequences and defaults, you risk errors in sequence naming, permissions, or ownership that cause subtle bugs (like sequences not advancing after bulk imports).

Migration tip: Every SQLite INTEGER PRIMARY KEY AUTOINCREMENT should map to PostgreSQL SERIAL PRIMARY KEY. Your migration script doesn't need to do anything special. When you INSERT without specifying the id column, PostgreSQL automatically calls the sequence and assigns the next value, exactly like SQLite's autoincrement behavior.

What is TIMESTAMP WITH TIME ZONE and why is it superior to storing timestamps as TEXT?

TIMESTAMP WITH TIME ZONE (often abbreviated TIMESTAMPTZ) is PostgreSQL's timezone-aware timestamp type. It stores the absolute point in time (internally as UTC) while preserving the timezone context. When you query the data, PostgreSQL converts it to your session's timezone automatically. This prevents the timezone bugs that plague applications storing timestamps as TEXT strings.

The TEXT timestamp problem: SQLite stores timestamps as TEXT like "2024-12-09 14:30:00". But what timezone is that? Eastern? Pacific? UTC? If you save "14:30:00" in Los Angeles and read it in New York, did the event happen at 2:30pm Eastern (same absolute time) or 11:30am Eastern (wrong time)? With TEXT timestamps, you have no way to know. Worse, daylight saving time changes break everything. "2024-03-10 02:30:00" doesn't exist in US timezones because clocks spring forward at 2am.

TIMESTAMPTZ advantages: (1) Unambiguous storage: PostgreSQL stores the absolute UTC time internally. "2024-12-09 14:30:00-08" (Pacific) and "2024-12-09 17:30:00-05" (Eastern) are the same moment. PostgreSQL knows this. (2) Automatic conversion: Query from any timezone and PostgreSQL converts to your local time automatically. No Python datetime gymnastics needed. (3) DST handling: PostgreSQL understands daylight saving rules. It knows "2024-03-10 02:30:00" is invalid and handles it appropriately. (4) Arithmetic: You can add intervals (INTERVAL '2 hours') and PostgreSQL handles timezone transitions correctly. With TEXT, you must parse to datetime, add, then serialize back.

Migration conversion: Your SQLite TEXT timestamps like "2024-12-09 14:30:00" need timezone context. If they were stored in UTC (best case), parse them as UTC during migration. If they were local times without timezone info (common), you must decide: treat them as UTC (probably wrong), treat them as server timezone (fragile if server moves), or accept data ambiguity. This is why starting with TIMESTAMPTZ from day one prevents migration headaches.

Real example: Your weather cache stores "2024-12-09 14:30:00" as a TEXT timestamp. Is that UTC? Local? You migrate to TIMESTAMP WITH TIME ZONE assuming UTC. Later you realize some timestamps were local time. Now half your data has 7-hour offsets (depending on timezone). With TIMESTAMPTZ from the start, this never happens because timezone is part of the data.

How do you make migration scripts idempotent and why does this matter?

Idempotent migration scripts produce the same result whether run once or multiple times. You make them idempotent using ON CONFLICT clauses that handle duplicate inserts gracefully. The primary pattern is INSERT ... ON CONFLICT DO NOTHING which says "if this row already exists (violates UNIQUE constraint), skip it silently."

Example: Your migration script inserts 1,872 tracks. On the first run, all 1,872 insert successfully. You run the script again (maybe testing, maybe the first run failed partway through). Without ON CONFLICT, PostgreSQL raises "duplicate key error" for all 1,872 tracks and the script crashes. With ON CONFLICT DO NOTHING, PostgreSQL checks each insert against the UNIQUE constraint on spotify_id, sees the row exists, skips it silently, and continues. The script completes successfully with zero duplicates.

Why idempotence matters for debugging: Migrations rarely work perfectly on the first attempt. Maybe you forgot a column, mapped a type incorrectly, or the script crashes on row 1,234 of 10,000 due to unexpected NULL values. With idempotent scripts, you fix the bug and rerun. The first 1,233 rows (already migrated) are skipped via ON CONFLICT. The script continues from row 1,234 with your fix applied. Without idempotence, you must manually DELETE the 1,233 partial rows before rerunning (error-prone) or restore from backup and start over (time-consuming).

Why idempotence matters for multi-table migrations: You migrate three tables in order: artists, tracks, playlist_tracks. The tracks migration fails due to a foreign key issue. You fix it and rerun the migration script. With idempotence, the artists table (already complete) is skipped instantly via ON CONFLICT. The script proceeds directly to tracks with your fix. Without idempotence, you must comment out the artists migration code, run only tracks, then uncomment for the next run. Fragile and error-prone.

Alternative: ON CONFLICT DO UPDATE: Instead of skipping duplicates, you can update them: ON CONFLICT (spotify_id) DO UPDATE SET name = EXCLUDED.name. This overwrites existing rows with new data. Useful when your source data changes and you want to refresh PostgreSQL. But for one-time migrations, DO NOTHING is safer. It preserves data that's already correct.

Production scenario: You're migrating a live application with minimal downtime. You run the migration script to copy production data to PostgreSQL. A few more records are created in SQLite during testing. You run the migration script again to catch the new records. Idempotence means the script processes only the new records (old ones skipped via ON CONFLICT), completing in seconds instead of re-processing gigabytes of data.

Explain connection pooling: what problem does it solve and how do minconn/maxconn parameters work?

The problem: Opening a PostgreSQL connection is expensive. Typically 20-40 milliseconds for network handshake, authentication, and server resource allocation. If every HTTP request opens a connection, executes one query (5ms), then closes the connection, you're spending 80% of request time on connection overhead. For 100 requests per minute, you create and destroy 100 connections. This wastes time, overwhelms the database with connection requests, and exhausts connection limits (PostgreSQL defaults to 100 max connections).

The solution: Connection pooling maintains a pool of open, authenticated connections. When a request needs database access, it borrows a connection from the pool, executes queries, then returns the connection (doesn't close it). The next request reuses that connection immediately. Zero connection overhead. Instead of 100 connection create/destroy cycles per minute, you have 5-10 persistent connections serving hundreds of requests.

minconn parameter (minimum connections): The pool maintains at least this many open connections at all times, even during idle periods. With minconn=2, two connections are opened when your application starts and stay open forever (until shutdown). When the first request arrives, a connection is immediately available. No 30ms connection overhead. The request executes in 5ms total instead of 35ms. minconn=2 is appropriate for small applications. Larger applications might use minconn=5 or minconn=10 to ensure connections are always available.

maxconn parameter (maximum connections): The pool creates at most this many connections, preventing your application from overwhelming the database. With maxconn=10, if all 10 connections are currently in use (serving requests) and an 11th request arrives, it waits in a queue until a connection becomes available. This prevents scenarios where 100 simultaneous requests try to open 100 connections, hitting PostgreSQL's connection limit and crashing the database server. maxconn=10 is appropriate for 3-5 web workers. Scale it with your worker count: 3 workers × 5 max connections per worker = 15 total max connections.

Real performance numbers: Without pooling, average request time = 50ms (query) + 30ms (connection overhead) = 80ms. With pooling (minconn=2, maxconn=10), average request time = 50ms (query) + 0ms (connection from pool) = 50ms. That's 37% faster. More importantly, throughput increases dramatically: without pooling you serve ~12 requests/second (limited by connection overhead), with pooling you serve 20+ requests/second (limited only by query execution time).

Pool behavior under load: (1) Application starts: pool creates minconn=2 connections immediately. (2) First request arrives: borrows connection 1, executes query, returns connection 1 to pool. (3) Spike of 8 simultaneous requests: pool creates 6 more connections (up to maxconn=10 limit), all 8 requests execute concurrently. (4) Load drops: 8 connections sit idle in pool (already authenticated, ready). (5) Next request: reuses existing connection instantly.

What is Alembic and how does it improve team coordination for schema changes?

Alembic is a database migration tool for SQLAlchemy that version-controls schema changes. Instead of ad-hoc SQL scripts that developers run manually (hoping they remember), Alembic tracks which migrations have run, applies new migrations automatically, and enables safe rollbacks when deployments fail. Think of it as Git for your database schema. Every change is a commit (migration), changes are applied in order, and you can roll back to previous versions.

The manual SQL problem: Without Alembic, schema changes are chaotic. Developer A adds a column locally, sends teammates a SQL file via Slack: "Hey everyone run this: ALTER TABLE tracks ADD COLUMN genre VARCHAR(100);". Developer B runs it. Developer C forgets. Developer D runs it twice (error!). Production database is behind because no one remembers to run it during deployment. A week later, the app crashes in production because it expects a genre column that doesn't exist. No one knows which schema changes have run where.

How Alembic solves this: Alembic stores a alembic_version table in your database with one row indicating the current migration version (like "abc123"). When you run alembic upgrade head, Alembic: (1) Checks the current version, (2) Finds all migration files more recent than that version, (3) Applies them in order, (4) Updates alembic_version to the latest migration. This happens automatically. Developers don't need to remember which migrations they've run. The database itself tracks this.

Team coordination benefits: (1) Developer onboarding: New developer clones the repo and runs alembic upgrade head. Alembic applies all migrations in correct order, creating a local database matching production schema. No manual SQL needed. (2) Deployment automation: Your CI/CD pipeline runs alembic upgrade head before deploying new code. If migrations fail, deployment halts (preventing broken production). If migrations succeed, the database schema matches the new code. (3) Rollback capability: Deploy fails? Run alembic downgrade -1 to undo the last migration, then rollback code. Database and code stay synchronized.

Migration workflow example: Developer A adds a genre column. She runs alembic revision -m "add genre column", creating abc123_add_genre_column.py with upgrade() and downgrade() functions. She commits this file to Git. Developer B pulls the repo and runs alembic upgrade head. Alembic sees abc123 hasn't run yet (checks alembic_version table), runs the upgrade() function (adds genre column), updates version to abc123. Developer C repeats identically. Production deployment runs alembic upgrade head automatically. Everyone's database reaches the same state without manual coordination.

Version control for databases: Just as Git tracks code changes with commits you can revert, Alembic tracks schema changes with migrations you can roll back. Each migration has an upgrade (apply change) and downgrade (undo change) function. This reversibility enables safe deployments: if a new feature breaks production, you can roll back both code and database schema to the previous working state. Without Alembic, rolling back schema changes means manually writing reverse SQL (error-prone and often forgotten until production breaks).

Compare manual migrations vs autogenerated migrations: when should you use each approach?

Manual migrations are Python files you write by hand, explicitly calling Alembic operations like op.add_column(), op.create_table(), or op.execute() with custom SQL. You create them with alembic revision -m "description" and write the upgrade/downgrade logic yourself. Autogenerated migrations are created by Alembic comparing your SQLAlchemy models to your current database schema, detecting differences, and generating migration code automatically with alembic revision --autogenerate -m "description".

When to use manual migrations: (1) Data transformations: You're not just changing schema but also transforming existing data. Example: splitting a full_name column into first_name and last_name requires custom SQL to parse existing values. Autogenerate can't do this; it only handles schema. (2) Complex operations: Creating indexes concurrently, adding constraints with validation steps, or multi-step migrations that must execute in specific order. (3) Learning Alembic: Manual migrations teach you what's happening under the hood. Write a few manually before trusting autogenerate. (4) No SQLAlchemy models: If you're using raw psycopg2 without SQLAlchemy ORM, you don't have model definitions for autogenerate to compare against.

When to use autogenerated migrations: (1) Simple schema changes: Adding columns, changing types, creating tables, adding indexes, modifying constraints. Autogenerate handles these perfectly and saves time. (2) Using SQLAlchemy models: If your application defines database schema through SQLAlchemy models (declarative base classes), autogenerate compares models to database and generates migrations automatically. (3) Reducing errors: Manual migrations risk typos in table names, column names, or types. Autogenerate reads directly from your model definitions. No transcription errors. (4) Team velocity: Most production teams use autogenerate because it's faster and less error-prone for routine schema changes.

The hybrid approach (recommended): Use autogenerate to create the migration skeleton, then review and edit the generated file before applying. Example: You add a created_at column to your User model and run autogenerate. Alembic generates op.add_column('users', sa.Column('created_at', sa.DateTime())). You review the migration and realize existing users need a created_at value. You manually add op.execute("UPDATE users SET created_at = NOW() WHERE created_at IS NULL") after the column creation. Now the migration handles both schema and data correctly.

Autogenerate limitations: Alembic can't detect these: (1) Column renames: It sees a dropped column and a new column (generates DROP + ADD instead of RENAME). You must manually edit to op.alter_column(). (2) Table renames: Same issue: Alembic generates DROP + CREATE. (3) Complex constraint changes: Adding foreign keys with specific behaviors requires manual review. (4) Data migrations: Never autogenerated; they always require manual SQL. This is why the hybrid approach (autogenerate + review/edit) is standard practice.

Real workflow: 95% of your migrations will be autogenerated (add columns, change types, create indexes). You run alembic revision --autogenerate -m "add email to users", review the generated file (takes 30 seconds), verify it looks correct, and apply it. The remaining 5% require manual intervention: data transformations during schema changes, complex multi-step operations, or fixing autogenerate's mistakes (like rename detection). This hybrid workflow combines autogenerate's speed with manual control where needed.

Looking Forward

You've mastered database migration from SQLite to PostgreSQL. You know when migration provides value, how to plan and execute migrations safely, and how to use PostgreSQL's powerful features like proper timestamp handling, connection pooling, and Alembic for schema evolution. These skills separate hobby projects from production applications.

In the next chapter, Chapter 25: Migrating the Music Time Machine to PostgreSQL, you'll apply these exact patterns to a significantly more complex application — the OAuth-enabled Flask application you built in Chapters 14-18. You'll handle three interconnected tables with foreign keys, implement JSONB for audio features, add full-text search capabilities, and deploy with connection pooling.

The progression is deliberate: simple example first (weather cache), then real-world complexity (Music Time Machine). Chapter 25 proves you can migrate production applications with multiple tables, complex data types, and user authentication. You'll document every decision for portfolio presentation and technical interviews, demonstrating the systematic problem-solving that separates junior developers from mid-level engineers.

By the end of Chapter 25, your Music Time Machine will run on PostgreSQL, handle hundreds of concurrent users without "database is locked" errors, and demonstrate production-grade database patterns. You'll have concrete interview material: "I migrated a three-table OAuth application from SQLite to PostgreSQL with zero data loss, implemented JSONB for queryable JSON data, added full-text search with GIN indexes, and deployed with connection pooling." That's the kind of specific, technical accomplishment that proves production experience.