Chapter 22: Webhooks and Real-Time APIs

From Polling to Events: Building a GitHub Activity Notifier

1. The Webhook Vision

Polling's over. Real-time starts here.

Through 21 chapters, you've been the one starting conversations with APIs. Need Spotify data? Make a request. Want GitHub issues? Query the endpoint. This pull model works perfectly when you control the timing. But some integrations demand the opposite pattern. Payment processors need to tell you instantly when charges succeed. GitHub wants to notify you the moment someone opens a pull request. Stripe can't wait 30 seconds for you to poll and ask if anything happened.

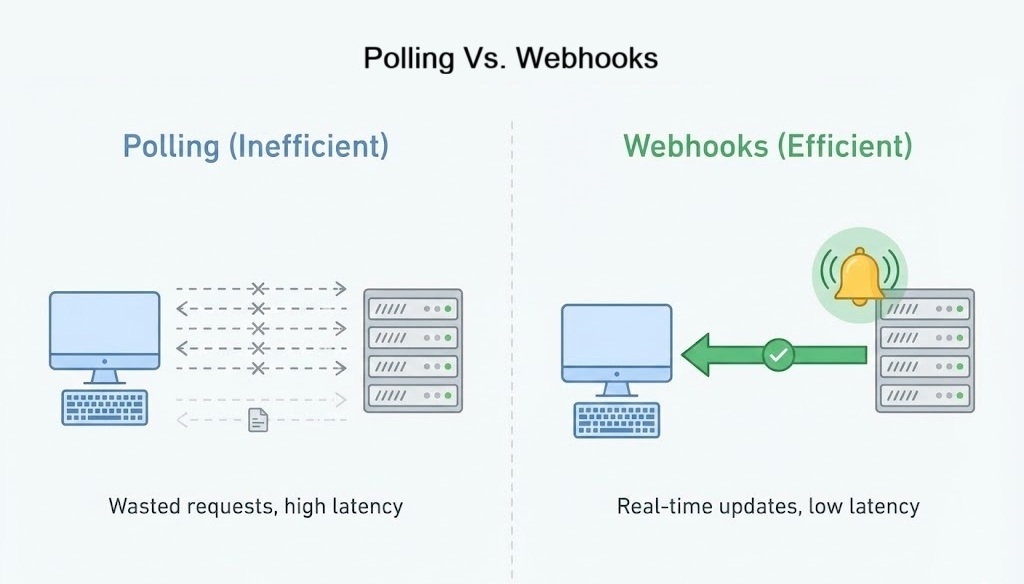
Webhooks flip the entire model. Instead of you calling APIs repeatedly, APIs call you when events occur. The provider sends an HTTP POST to your endpoint with event details. No polling loops, no wasted requests, no artificial delays. The moment something interesting happens, you know about it.

This chapter teaches you to build webhook receivers that are secure, reliable, and production-ready. You'll build a complete GitHub Activity Notifier that sends real-time Slack alerts for repository events. By the end, APIs won't just respond to you. They'll talk back to you.

What is a Webhook?

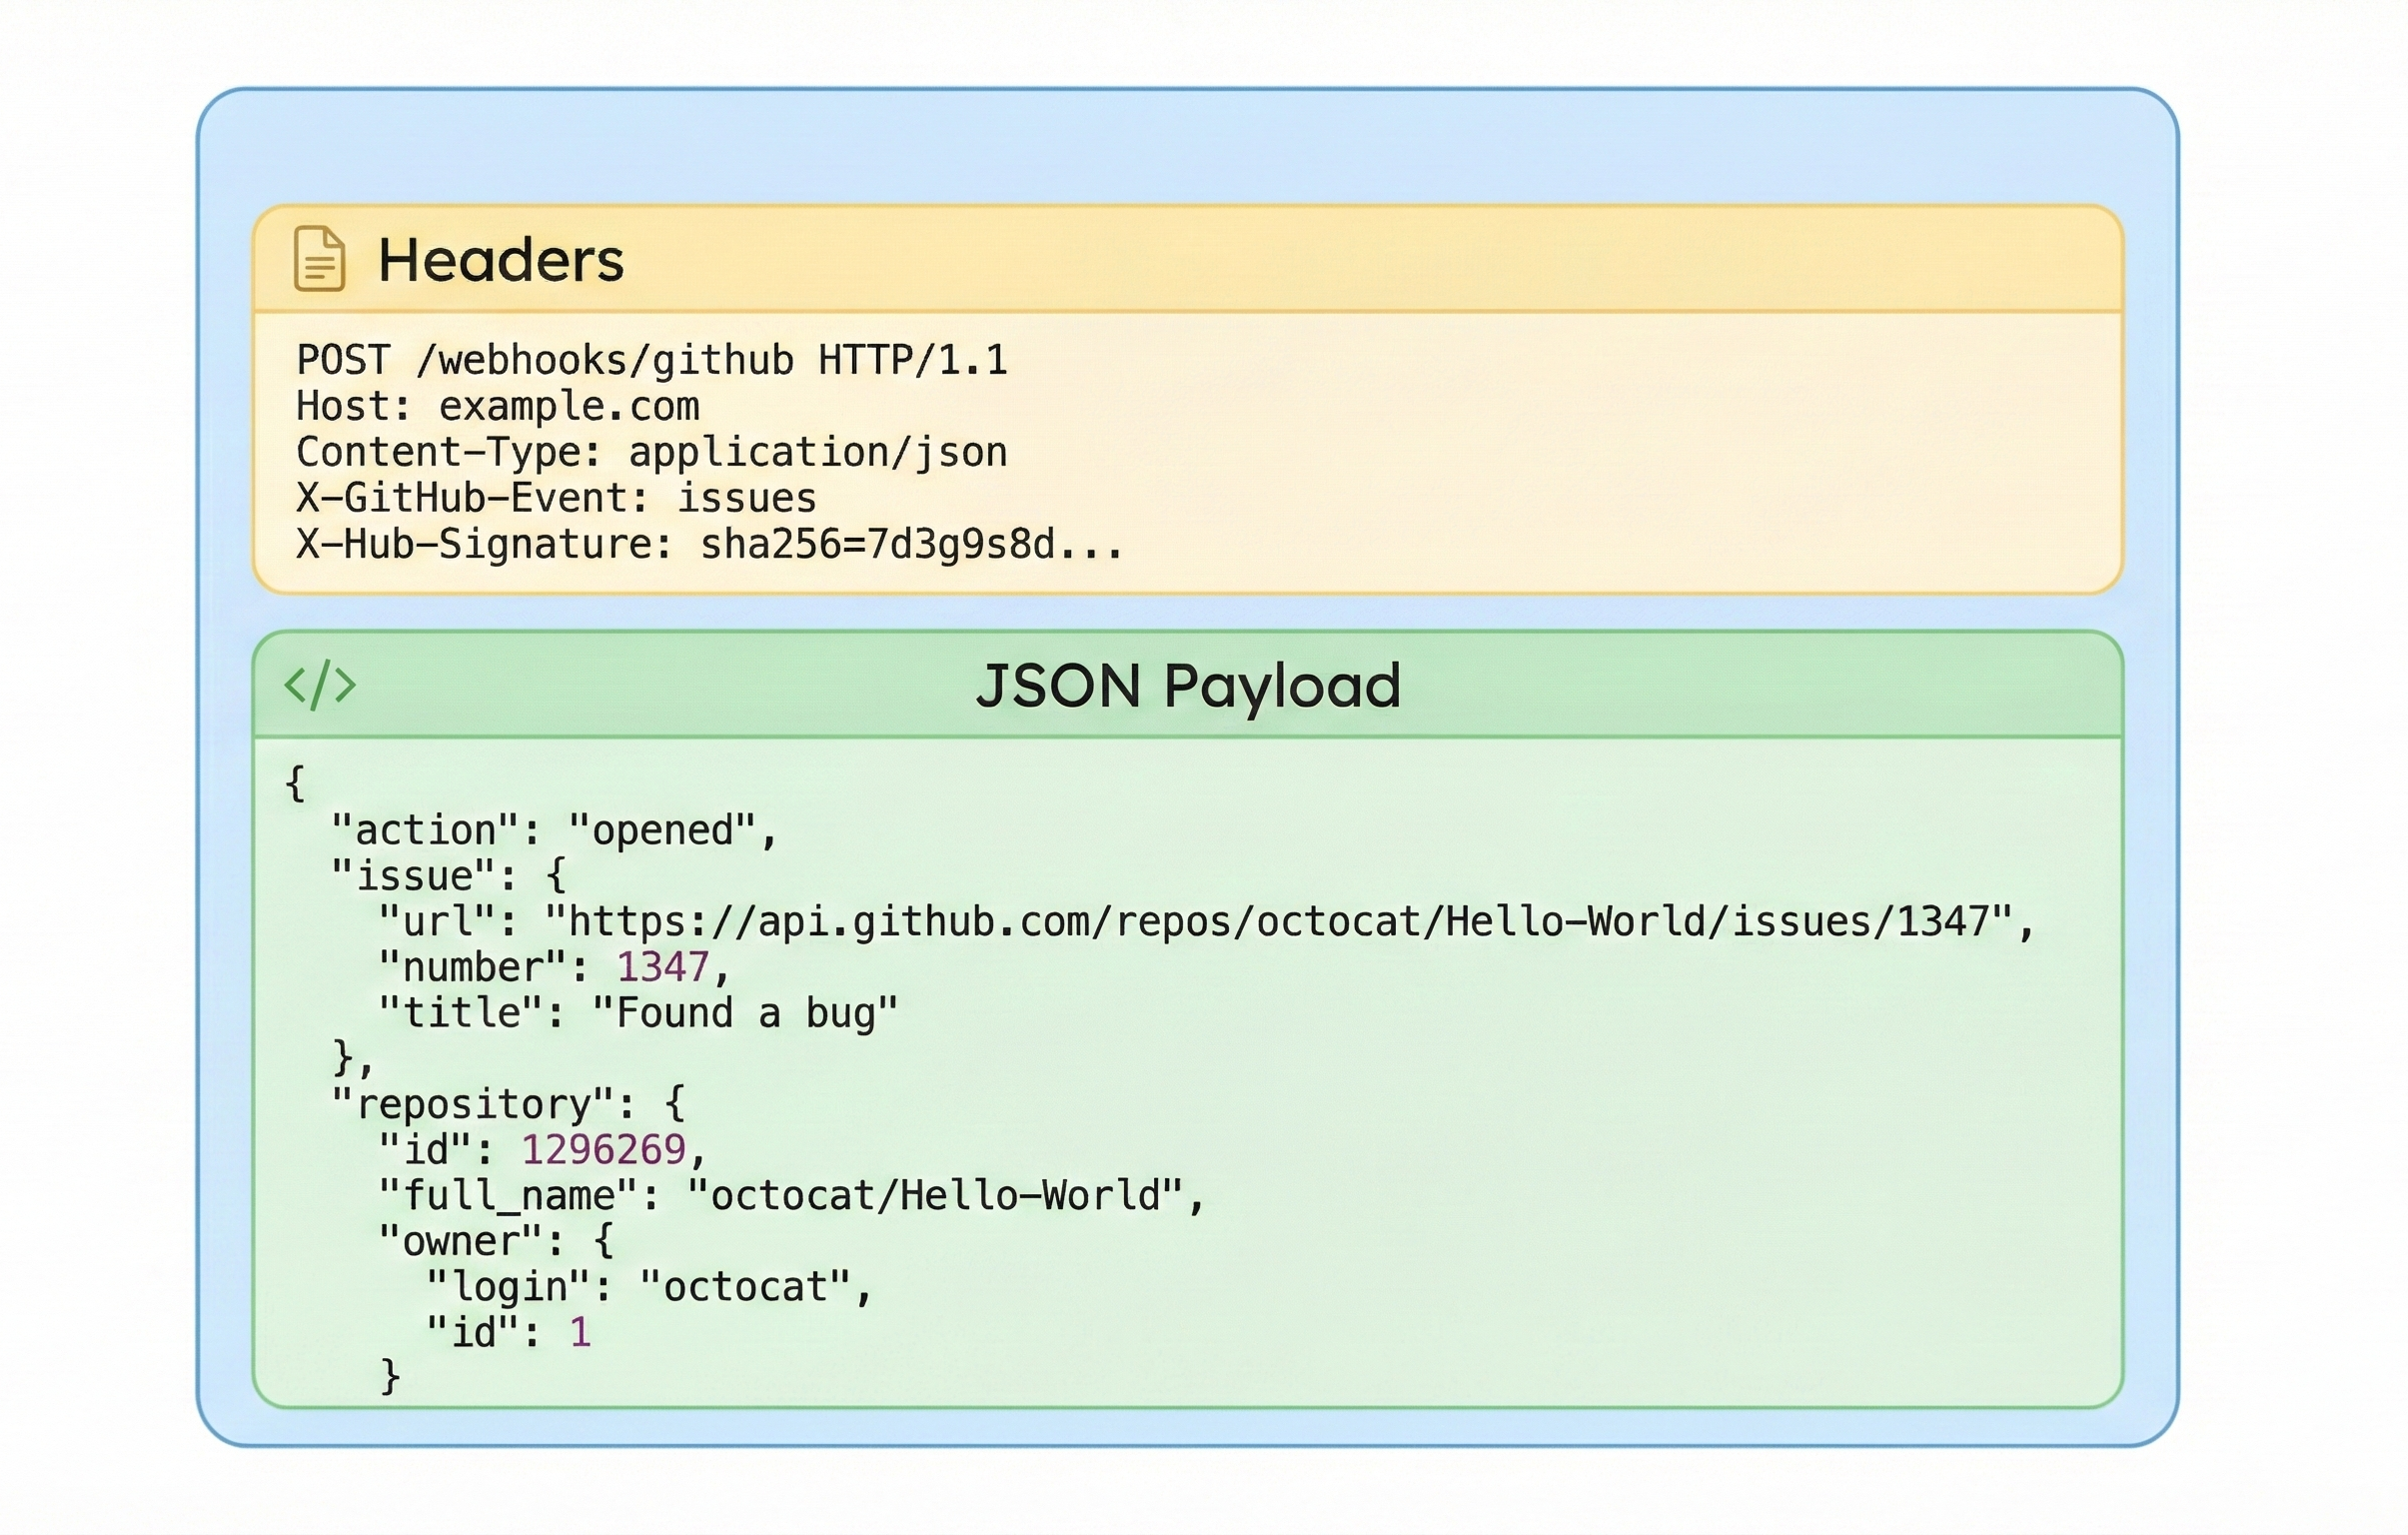
A webhook is an HTTP callback. When something happens in a service (GitHub, Stripe, Slack), that service makes an HTTP POST request to a URL you control. The POST includes a JSON payload describing what happened. Your application receives the request, processes the event, and returns a response. That's it.

The name "webhook" suggests hooking into events, but technically it's just the provider POSTing to your endpoint. GitHub doesn't know or care what your endpoint does with the data. It just sends the POST and moves on. The pattern works because HTTP is universal and POST requests are simple.

What You'll Build: GitHub Activity Notifier

The GitHub Activity Notifier monitors your repositories and sends instant Slack notifications for important events. Four core features demonstrate different webhook integration patterns:

1.

Real-Time Issue Alerts

Get notified instantly when issues open in your repositories. Your webhook receiver captures the event, extracts issue details (title, number, author), and posts a formatted Slack message within seconds. No polling delays, no missed notifications. The system proves webhooks eliminate the gap between event and awareness.

2.

Pull Request Tracking

Monitor the entire PR lifecycle: opens, merges, closures, review requests. Each state change triggers a targeted notification. When teammates merge code at 2am, you see it immediately. When critical reviews await, Slack alerts you. This feature shows how webhook event types map to business logic and demonstrates conditional notification routing based on event metadata.

3.

Repository Activity Feed

Track organic repository growth through stars, forks, and watchers. When developers star your projects, you celebrate wins in real-time. The system aggregates low-frequency events that would be wasteful to poll but valuable to know about. This proves webhooks handle both high-volume critical events and sparse vanity metrics efficiently.

4.

Custom Event Routing and Filtering

Not every webhook deserves attention. Your system filters noise, routes different event types to different Slack channels, and marks uninteresting events as skipped rather than processed. This demonstrates production-grade webhook handling where intelligent filtering prevents alert fatigue and keeps notification channels focused on what matters.

Why This Matters for Your Portfolio

These aren't toy features. Real-time issue alerts prove you understand event-driven architectures. Pull request tracking demonstrates you can parse complex JSON payloads and route events conditionally. Repository activity feeds show you handle both critical and informational events. Custom filtering proves you build systems that stay useful at scale, not alert factories that train teams to ignore notifications.

More importantly, webhooks are infrastructure-level skills. Payment processors (Stripe, PayPal), communication platforms (Slack, Discord, Twilio), version control (GitHub, GitLab, Bitbucket), and monitoring systems (Datadog, PagerDuty) all use webhooks. Master the pattern once, apply it everywhere.

The Polling Problem

To understand why webhooks matter, start with the alternative. Imagine you want notifications when someone opens issues in your GitHub repositories. The naive solution: poll the GitHub API every 30 seconds and check for new issues.

Naive Polling Loop
Python
import time
import requests

API_URL = "https://api.github.com/repos/your-user/your-repo/issues"

def poll_new_issues(poll_interval=30):
    last_seen_id = None

    while True:
        print("Checking for new issues...")
        response = requests.get(
            API_URL,
            params={"state": "open", "per_page": 1},
            timeout=10,
        )
        response.raise_for_status()
        issues = response.json()

        if issues:
            newest = issues[0]
            issue_id = newest["id"]

            if issue_id != last_seen_id:
                print(f"New issue: #{newest['number']} - {newest['title']}")
                last_seen_id = issue_id

        time.sleep(poll_interval)

if __name__ == "__main__":
    poll_new_issues()

This script works, but it fails in production:

  • Waste: 2,880 requests per day per repository whether anything happened or not. Most return empty results.
  • Delay: Issues opened 1 second after your last poll won't be seen for 29 more seconds. Average notification latency: 15 seconds.
  • Scale: Monitor 10 repositories? 28,800 daily requests. GitHub's rate limit (5,000 requests per hour for authenticated users) gets consumed by polling, not real work.
  • Fragility: Script crashes? Events missed permanently unless you manually audit GitHub's history and backfill.
  • Cost: Serverless deployments charge per execution. 28,800 daily Lambda invocations add up fast.

Polling makes sense for learning and prototypes. But production systems need efficiency and reliability. Webhooks provide both.

The Webhook Mental Model

A webhook is an HTTP callback. Instead of your code calling an API repeatedly, the API calls your URL when events occur. The provider POSTs to your endpoint with headers describing the event and a JSON payload containing full details.

Webhook integrations have three components:

  • Event source: The service where events happen (GitHub, Stripe, Twilio).
  • Webhook receiver: Your HTTP endpoint that accepts POSTs and validates authenticity.
  • Event consumer: Your application logic that turns events into actions (send Slack messages, update databases, trigger workflows).
Side by side timeline comparing polling versus webhooks. Left: repeated requests from your app to an API with many empty responses. Right: a quiet line where only when events occur the API sends HTTP POST requests to your app.
Polling: Your app asks constantly. Webhooks: The API pushes events only when they occur.

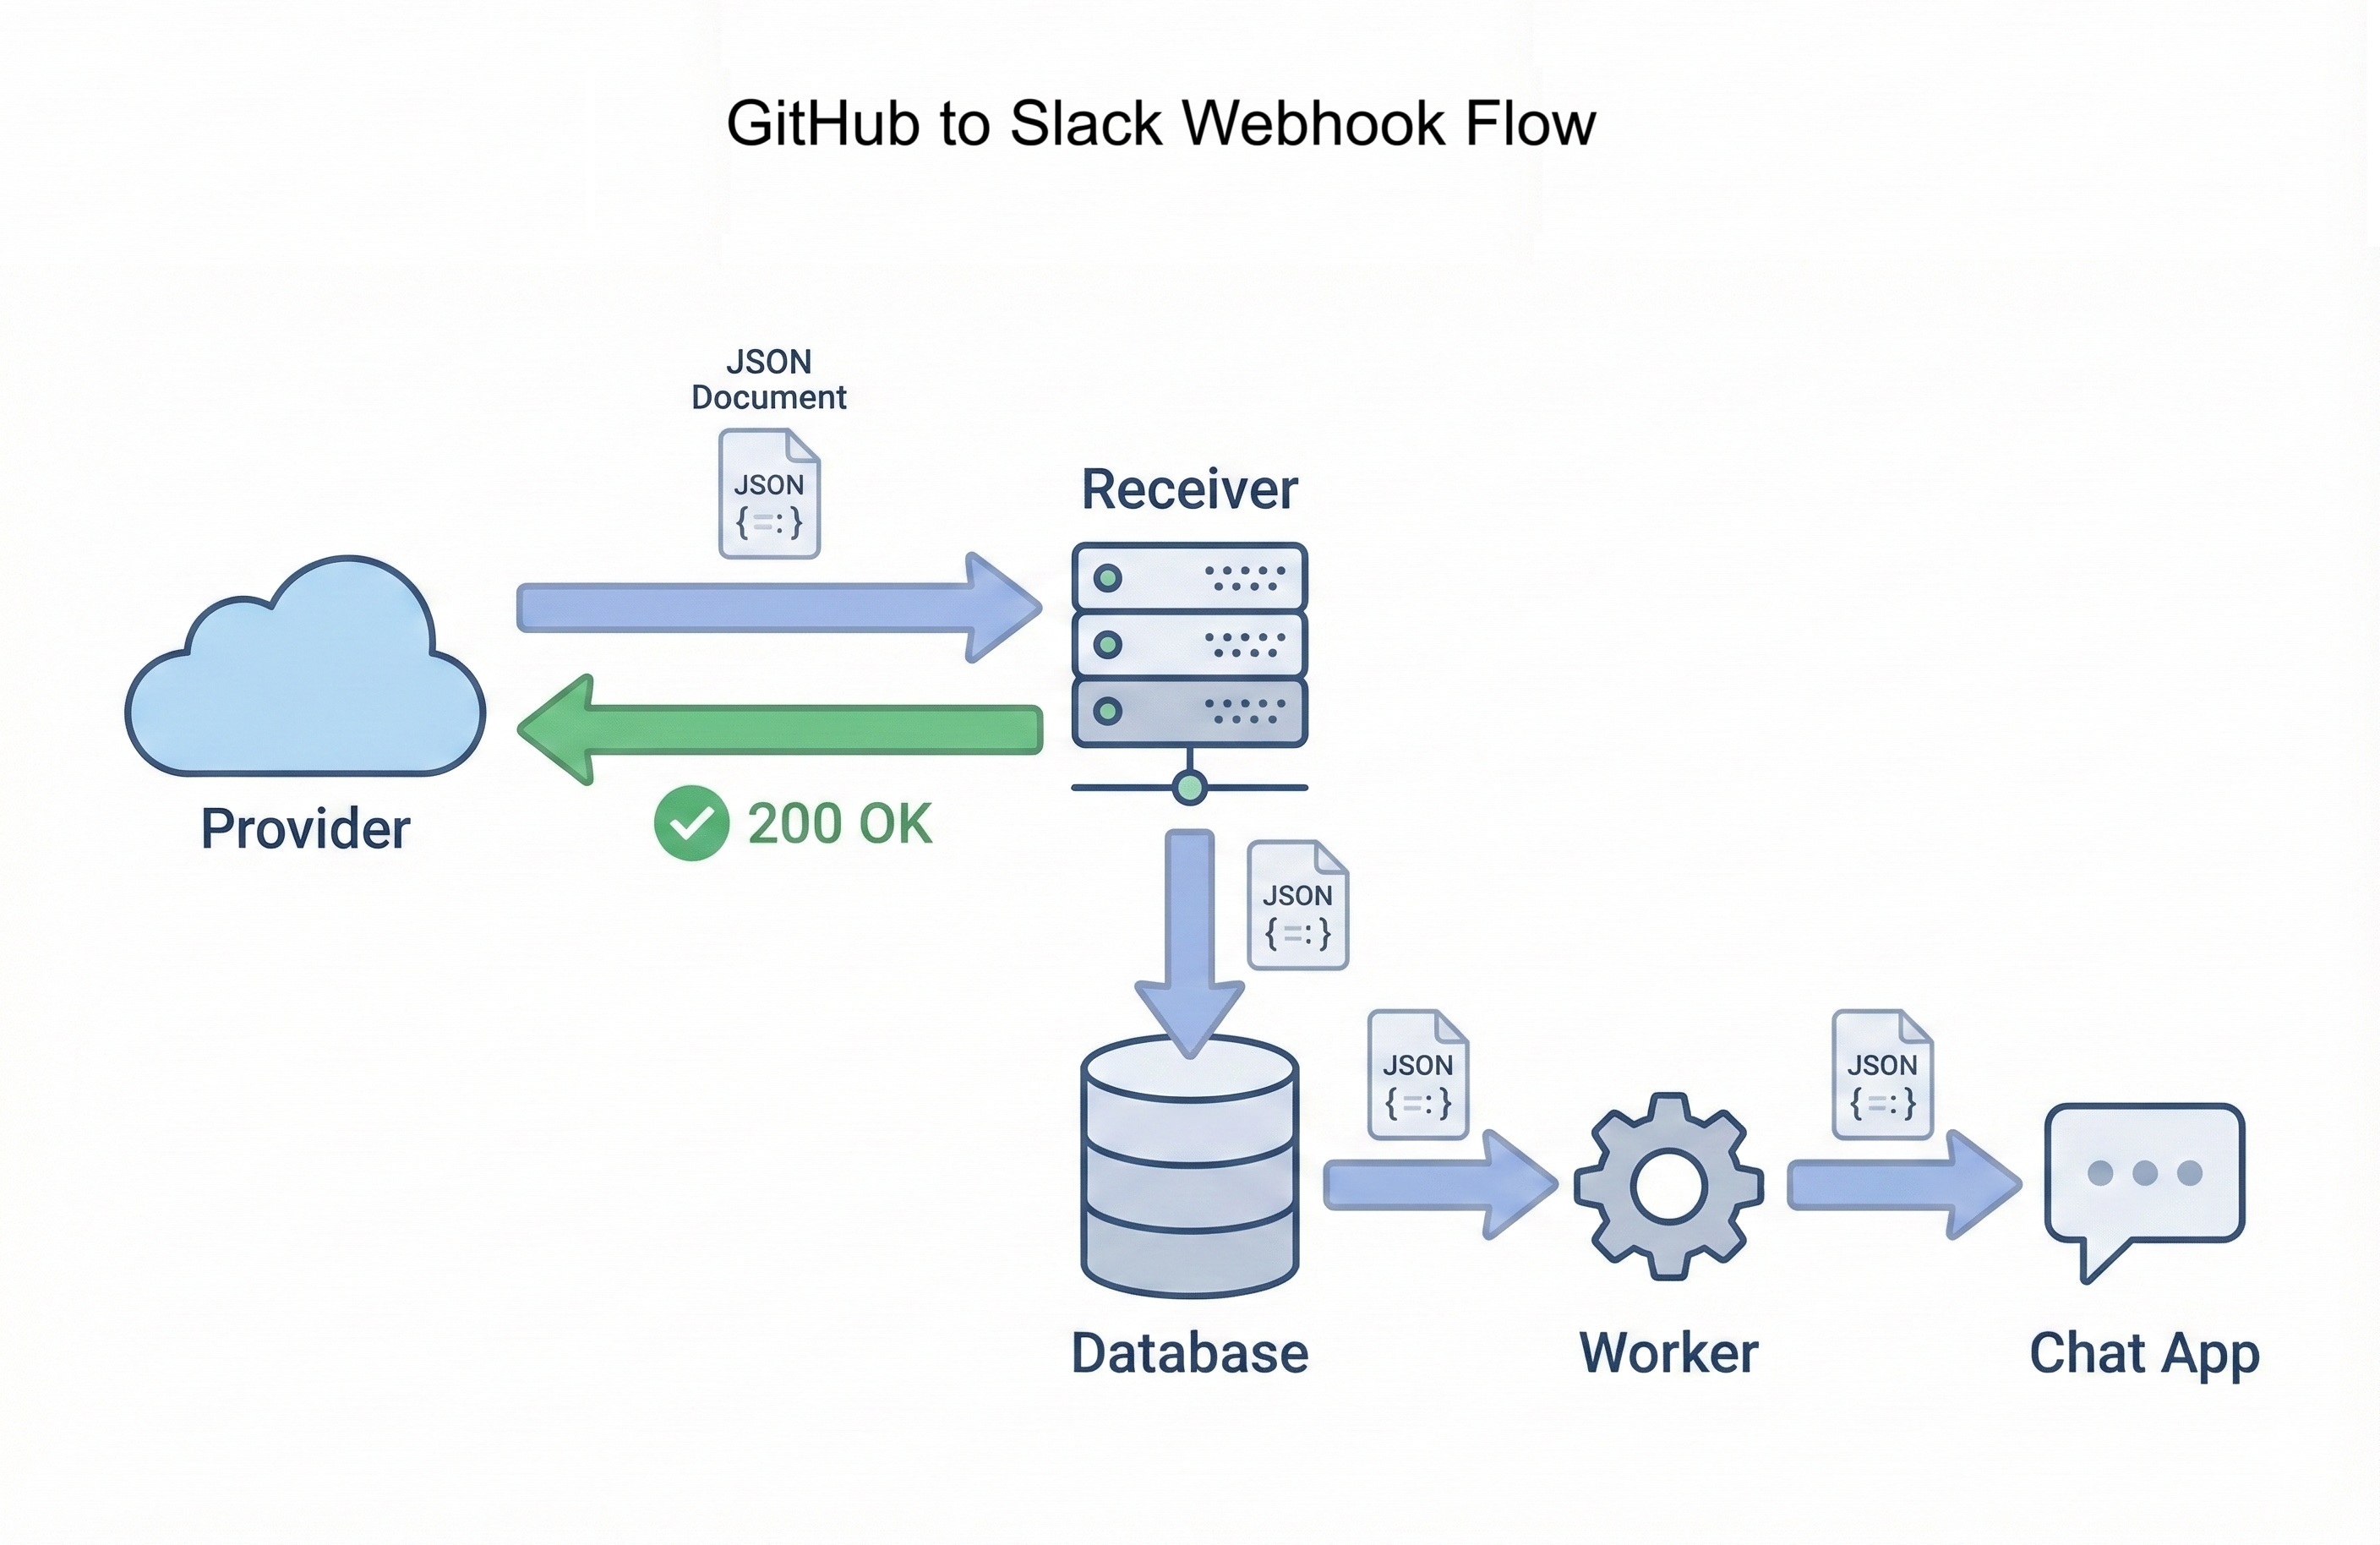
When GitHub detects a new issue, it immediately POSTs to your webhook URL. Your Flask endpoint receives the request, validates the signature, stores the event in your database, and returns 200 OK within milliseconds. A background worker picks up the stored event, extracts issue details, formats a Slack message, and posts the notification. Total time from event to notification: typically under 2 seconds.

Contrast this with polling: average 15-second delay, 2,880 wasted requests per day, constant rate limit pressure. Webhooks eliminate all three problems. Events arrive immediately, your app only responds when needed, and rate limits apply to real work rather than empty checks.

Why Webhooks Matter Professionally

Webhook integration skills separate developers who consume APIs from developers who build production integrations. Companies hiring for backend, infrastructure, or integration engineering roles expect candidates to understand event-driven architectures. Webhooks are the foundational pattern.

Every major platform uses webhooks for critical workflows:

  • Payment processing: Stripe, PayPal, and Square notify you when charges succeed, subscriptions renew, or disputes open. You can't poll payment APIs fast enough to provide instant checkout confirmation pages.
  • Communication platforms: Slack, Discord, and Twilio use webhooks to notify your apps when messages arrive, calls complete, or SMS messages get delivered.
  • Version control: GitHub, GitLab, and Bitbucket send webhooks for every push, pull request, issue, and release. CI/CD pipelines depend on these hooks to trigger builds.
  • Monitoring and alerting: Datadog, PagerDuty, and Sentry webhook your on-call systems when incidents occur. Response time matters.
Common Interview Question

"How would you design a system to notify users instantly when payments succeed?"

Wrong answer: "Poll the payment API every few seconds to check payment status."

Strong answer: "Configure a webhook endpoint that Stripe POSTs to when payment events occur. The endpoint validates the HMAC signature, stores the event in a database for audit trails, returns a fast 200 OK to avoid timeouts, then a background worker processes the event and sends the user notification. This eliminates polling waste, provides instant notifications, and creates a reliable audit log of all payment events."

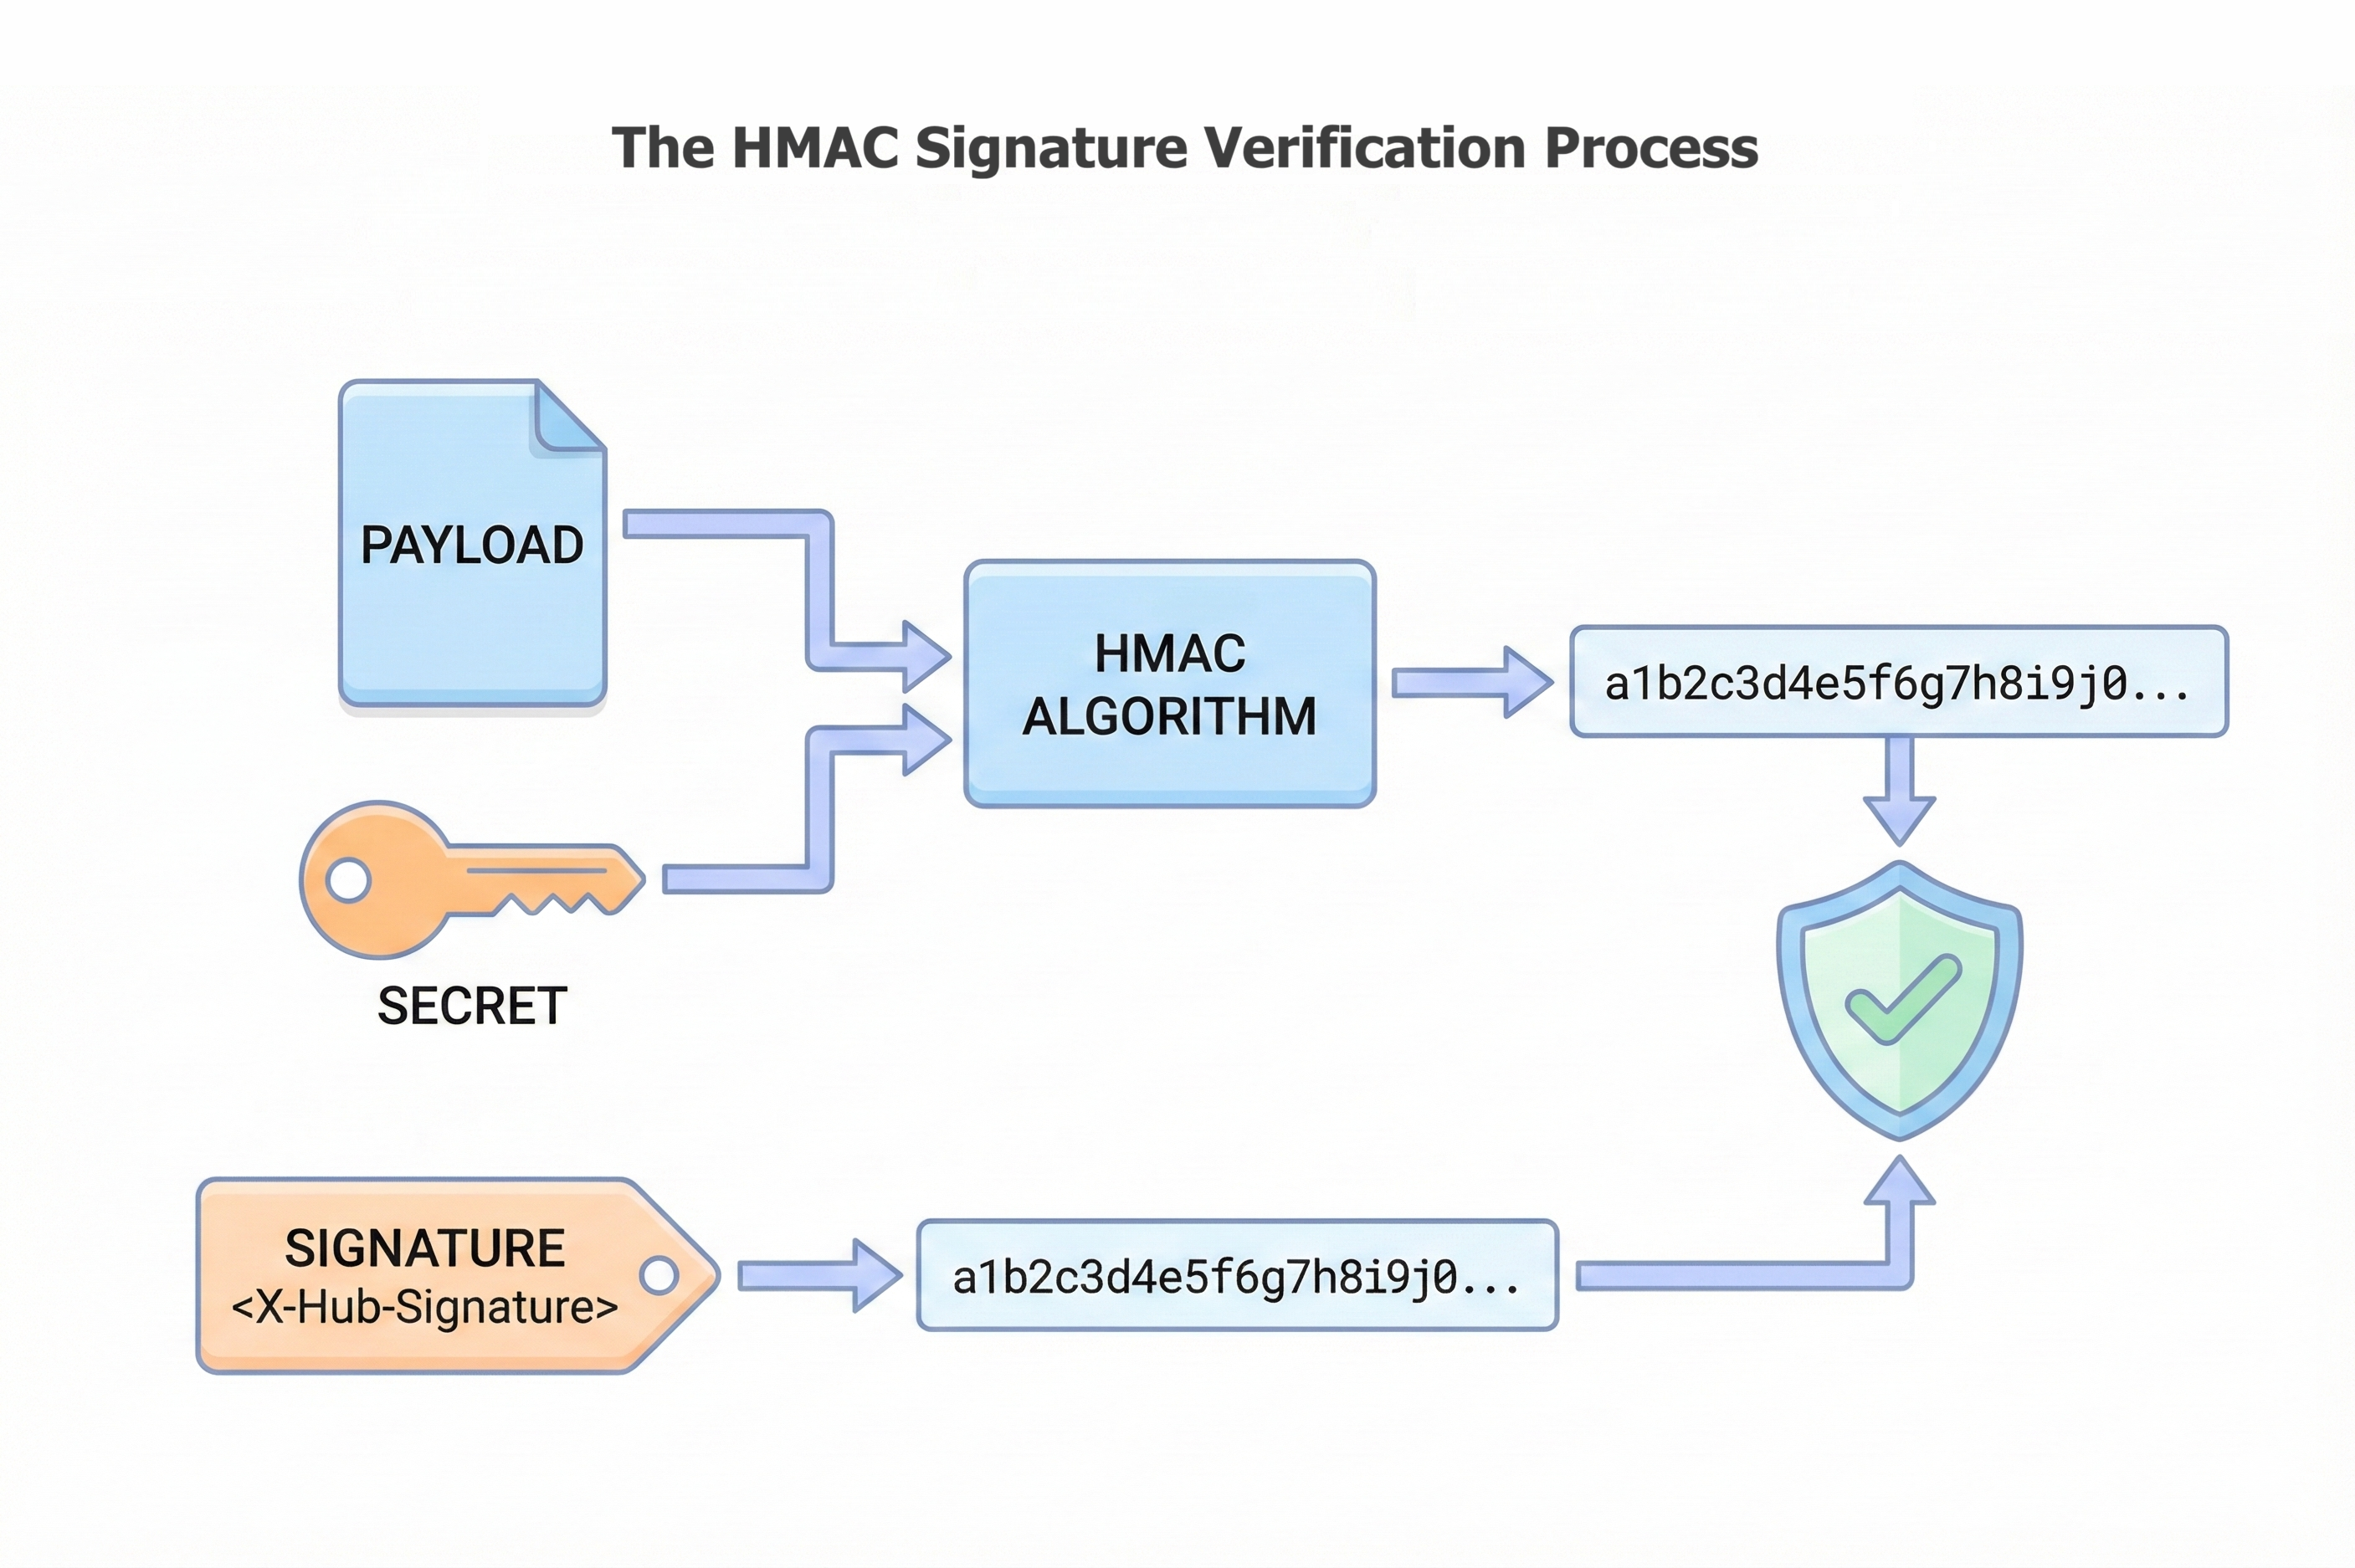
The GitHub Activity Notifier demonstrates all the patterns interviewers expect: signature verification (HMAC + shared secrets), idempotent processing (handle duplicate deliveries safely), fast response times (acknowledge quickly, process slowly), and event normalization (decouple provider-specific JSON from business logic). These patterns apply to every webhook integration you'll build professionally.

Learning Objectives

By the end of this chapter, you'll be able to:

  • Explain why polling doesn't scale and when webhooks are the better choice.
  • Build Flask endpoints that receive webhook POSTs and respond within timeout constraints.
  • Verify webhook authenticity using HMAC SHA-256 signatures with shared secrets.
  • Design idempotent handlers that tolerate duplicate deliveries safely.
  • Implement fast-acknowledge, slow-process patterns with database queues and background workers.
  • Test webhook receivers locally with ngrok and debug production failures using delivery logs.
  • Deploy a complete GitHub Activity Notifier that sends real-time Slack alerts.

2. Chapter Roadmap

This chapter builds your webhook integration skills through seven progressive stages: rapid prototype, conceptual foundation, production patterns, security hardening, complete notifier implementation, testing strategies, and deployment. Here's the journey:

1

Your First Webhook in 10 Minutes

Section 3 • Quick Start

Build a minimal Flask receiver, expose it with ngrok, and watch GitHub events arrive in real-time. This quick win proves the concept before diving into production patterns.

Flask Endpoint ngrok Tunnel Live Events
2

Anatomy of a Webhook Request

Section 4 • HTTP Deep Dive

Dissect webhook HTTP requests: headers, JSON payloads, and metadata. Understanding request structure prevents debugging mysteries later.

HTTP Headers JSON Parsing Request Structure
3

Building Robust Webhook Receivers

Section 5 • Production Patterns

Store events in SQLite, respond fast, process slowly. Build background workers that handle queued events reliably even when external services fail.

Fast Response Database Queue Idempotency
4

Webhook Security and Verification

Section 6 • HMAC Signatures

Implement HMAC SHA-256 signature verification using shared secrets. Secure your endpoint against forged requests and replay attacks.

HMAC Verification Shared Secrets Replay Protection
5

GitHub Activity Notifier

Section 7 • Complete Integration

Connect all concepts into a complete notifier. Normalize GitHub events, format Slack messages, route event types, and filter noise intelligently.

Event Normalization Slack Integration Smart Filtering

Key strategy: You'll build incrementally. Section 3 proves webhooks work with a 10-minute prototype. Section 4 establishes the mental model of webhook requests. Section 5 adds production reliability patterns. Section 6 hardens security. Section 7 builds the complete notifier. Section 8 synthesizes everything with comprehensive review and prepares you for Chapter 23. Each stage builds on the previous, teaching you how production webhook systems evolve from proof-of-concept to reliable infrastructure.

3. Your First Webhook in 10 Minutes

Before diving into theory, let's prove webhooks work. You'll build a minimal Flask receiver, expose it to the internet with ngrok, and watch GitHub send real events to your laptop. Ten minutes from now, you'll see webhook payloads arriving in your terminal.

The Minimal Receiver

Create webhook_receiver.py with this code:

Minimal Webhook Receiver
Python
from flask import Flask, request

app = Flask(__name__)

@app.post("/webhooks/github")
def github_webhook():
    event_type = request.headers.get("X-GitHub-Event", "unknown")
    payload = request.get_json(silent=True) or {}
    
    print(f"\n🎉 Webhook received: {event_type}")
    print(f"Payload keys: {list(payload.keys())}\n")
    
    return "", 200

if __name__ == "__main__":
    app.run(port=5000)

That's it. Eleven lines. This receiver accepts GitHub POSTs, extracts the event type from headers, prints a summary, and returns 200 OK. Start it:

Shell
python webhook_receiver.py

Your Flask app is running locally on port 5000. GitHub can't reach it yet. That's where ngrok comes in.

Expose Your Server with ngrok

ngrok creates a secure tunnel from the internet to your laptop. Install it (ngrok.com/download), then run:

Shell
ngrok http 5000

ngrok displays a public URL like https://abc123.ngrok-free.app. Copy it. This URL routes to your local Flask server for the next few hours.

ngrok Alternatives

Don't want to install ngrok? Try localtunnel (npx localtunnel --port 5000) or cloudflared. All work the same way: public URL → your laptop.

Configure GitHub Webhook

Open any GitHub repository you own. Go to Settings → Webhooks → Add webhook. Configure:

  • Payload URL: Your ngrok URL + /webhooks/github
    Example: https://abc123.ngrok-free.app/webhooks/github
  • Content type: application/json
  • Secret: Leave blank for now (you'll add security later)
  • Events: Select "Send me everything" or just "Issues"

Click Add webhook. GitHub immediately sends a ping event to verify the endpoint works.

See It Work

Check your Flask terminal. You should see:

Output
🎉 Webhook received: ping
Payload keys: ['zen', 'hook_id', 'hook', 'repository', 'sender']

127.0.0.1 - - [01/Feb/2026 14:23:45] "POST /webhooks/github HTTP/1.1" 200 -

The ping event confirms connectivity. Now trigger a real event. Open a new issue in your repository. Within seconds:

Output
🎉 Webhook received: issues
Payload keys: ['action', 'issue', 'repository', 'sender']

127.0.0.1 - - [01/Feb/2026 14:24:12] "POST /webhooks/github HTTP/1.1" 200 -

GitHub just called your laptop. No polling, no delays. The event arrived the moment you clicked "Submit new issue."

What Just Happened

When you opened the issue, GitHub's servers detected the event, looked up registered webhooks for that repository, and HTTP POSTed to your ngrok URL. ngrok tunneled the request to localhost:5000, Flask routed it to your handler, you printed the summary, and returned 200 OK. GitHub logged the successful delivery. The entire round trip took under 2 seconds.

What's Missing

This prototype proves webhooks work, but it's not production-ready:

  • No signature verification (any HTTP client can POST fake events to your endpoint)
  • No persistence (events disappear when Flask restarts)
  • No duplicate handling (GitHub retries failed deliveries, causing duplicates)
  • No background processing (slow work blocks the HTTP response)

The next sections fix all four problems. You'll add HMAC signature verification, store events in SQLite, design idempotent handlers, and separate fast acknowledgment from slow processing. But first, let's understand what GitHub actually sent you.

4. Anatomy of a Webhook Request

Dissecting a Webhook HTTP Request

Before you build webhook receivers, it helps to see what an actual webhook looks like on the wire. Under the hood, a webhook is just an HTTP POST request from the provider to your application.

Here is a simplified example of a GitHub webhook delivery for an issues event:

Example Webhook Request (Conceptual)
HTTP
POST /webhooks/github HTTP/1.1
Host: example.com
User-Agent: GitHub-Hookshot/123abc
Content-Type: application/json
X-GitHub-Event: issues
X-GitHub-Delivery: 123e4567-e89b-12d3-a456-426614174000
X-Hub-Signature-256: sha256=abcdef1234567890...

{
  "action": "opened",
  "issue": {
    "number": 42,
    "title": "Bug report: login button not working"
  },
  "repository": {
    "full_name": "your-user/your-repo"
  },
  "sender": {
    "login": "octocat"
  }
}
Visual breakdown of an HTTP POST webhook request showing two sections: Headers section containing POST line, Host, Content-Type, X-GitHub-Event, and X-Hub-Signature; JSON Payload section showing the nested structure with action, issue details, repository, and sender information.
A webhook is just an HTTP POST request with metadata in headers and event details in the JSON body.

There are three important parts here:

  • URL: The path /webhooks/github is the route in your application that will handle GitHub events.
  • Headers: Custom headers such as X-GitHub-Event, X-GitHub-Delivery, and X-Hub-Signature-256 tell you what happened, identify this delivery, and allow you to verify that the request is genuine.
  • JSON body: The payload contains the full event details: the issue that was opened, the repository it belongs to, and the user who triggered it.

Your job as a webhook receiver is to read all three: route the request by URL, understand the headers, and parse the JSON payload. In the next subsection you will build a small Flask application that does exactly that.

Your First Webhook Receiver in Flask

Let us build the smallest useful webhook receiver using Flask. This application will expose a /webhooks/github endpoint, read a few headers, parse the JSON body, and log everything to the console.

Minimal GitHub Webhook Receiver
Python
from flask import Flask, request, jsonify

app = Flask(__name__)

@app.post("/webhooks/github")
def github_webhook():
    # Headers that describe the event
    event_name = request.headers.get("X-GitHub-Event", "unknown")
    delivery_id = request.headers.get("X-GitHub-Delivery", "no-delivery-id")

    # JSON payload (may be empty if something went wrong)
    payload = request.get_json(silent=True) or {}

    print(f"Received GitHub event: {event_name} (delivery {delivery_id})")
    print("Payload:", payload)

    # Respond quickly to acknowledge receipt
    return "", 200


if __name__ == "__main__":
    # Run the app for local testing
    app.run(debug=True, port=5000)

This handler does three simple things:

  • Reads metadata from headers so you know what type of event it is and which delivery you are processing.
  • Parses the JSON payload with request.get_json(silent=True) and falls back to an empty dictionary if parsing fails.
  • Logs everything, then returns a fast 200 OK with an empty body.

Even at this early stage, notice the pattern: the handler does not do any heavy work before returning. Later in the chapter you will move the real processing into background code and add signature verification, but the basic shape of the route will stay the same.

Testing Your Webhook Endpoint Locally

Before involving GitHub, you can test this endpoint using curl or an API client. Make sure your Flask app is running on http://localhost:5000, then send a fake webhook event:

Send a Test Webhook with curl
Shell
curl -X POST "http://localhost:5000/webhooks/github" \
  -H "Content-Type: application/json" \
  -H "X-GitHub-Event: issues" \
  -H "X-GitHub-Delivery: test-delivery-123" \
  -d '{
    "action": "opened",
    "issue": {
      "number": 42,
      "title": "Bug report: login button not working"
    },
    "repository": {
      "full_name": "your-user/your-repo"
    },
    "sender": {
      "login": "octocat"
    }
  }'

In your Flask console you should see output similar to:

Output
Received GitHub event: issues (delivery test-delivery-123)
Payload: {'action': 'opened', 'issue': {'number': 42, 'title': 'Bug report: login button not working'}, 'repository': {'full_name': 'your-user/your-repo'}, 'sender': {'login': 'octocat'}}
Local First, Then Provider

Always get your webhook endpoint working locally with test requests before you connect a real provider. Once this route behaves the way you expect, you can introduce GitHub and tools like ngrok to expose your local server to the internet. That way, when something goes wrong, you will know whether the problem is in your code or in the external configuration.

In the next section, you will strengthen this basic receiver by storing events in a database, handling duplicates safely, and preparing it for production traffic from GitHub.

5. Building Robust Webhook Receivers

Fast Acknowledge, Slow Work

A webhook provider expects one thing above all else from your endpoint: a quick and reliable response. When GitHub sends a webhook, it does not want to wait while you talk to Slack, update a database, and generate a PDF. If your handler is slow or fails with a 500 error, GitHub will retry the delivery and may eventually disable the webhook.

A robust webhook receiver follows a simple pattern:

  • Receive: Accept the HTTP request, read the headers and body.
  • Validate: Check that the request is genuine and well formed.
  • Store: Persist the event somewhere durable (for example, a database).
  • Acknowledge: Return a fast 200 OK to the provider.
  • Process: Do the slower work (notify Slack, update state) in the background.

This pattern reduces the chance of timeouts, makes retries safe, and gives you a clear audit trail of what happened. In the rest of this section you will implement the "store and acknowledge" part using SQLite and then add a simple background processor.

Storing Webhook Events in SQLite

You will reuse the database skills you learned earlier in the book. Create a small webhook_events table that records each delivery from GitHub. This gives you a permanent log that you can inspect when something goes wrong.

Database Schema for Webhook Events
SQL
CREATE TABLE IF NOT EXISTS webhook_events (
    id INTEGER PRIMARY KEY AUTOINCREMENT,
    source TEXT NOT NULL,
    event_type TEXT NOT NULL,
    delivery_id TEXT NOT NULL UNIQUE,
    payload_json TEXT NOT NULL,
    received_at TEXT NOT NULL,
    processed_at TEXT,
    status TEXT NOT NULL
);

Each row represents one delivery from a provider. The delivery_id column is marked UNIQUE, which you will use later to ignore duplicate deliveries safely.

Next, update your Flask application so that it stores incoming events in this table before acknowledging GitHub.

Flask Receiver That Stores Events
Python
import json
import sqlite3
from datetime import datetime
from flask import Flask, request

DB_FILE = "webhooks.db"

app = Flask(__name__)

def get_db_connection():
    conn = sqlite3.connect(DB_FILE)
    conn.row_factory = sqlite3.Row
    return conn

def init_db():
    with get_db_connection() as conn:
        conn.execute(
            """
            CREATE TABLE IF NOT EXISTS webhook_events (
                id INTEGER PRIMARY KEY AUTOINCREMENT,
                source TEXT NOT NULL,
                event_type TEXT NOT NULL,
                delivery_id TEXT NOT NULL UNIQUE,
                payload_json TEXT NOT NULL,
                received_at TEXT NOT NULL,
                processed_at TEXT,
                status TEXT NOT NULL
            );
            """
        )
        conn.commit()

def store_webhook_event(source, event_type, delivery_id, payload_dict):
    payload_json = json.dumps(payload_dict)
    received_at = datetime.utcnow().isoformat(timespec="seconds")

    with get_db_connection() as conn:
        cursor = conn.cursor()
        try:
            cursor.execute(
                """
                INSERT INTO webhook_events
                    (source, event_type, delivery_id, payload_json, received_at, processed_at, status)
                VALUES
                    (?, ?, ?, ?, ?, NULL, ?)
                """,
                (source, event_type, delivery_id, payload_json, received_at, "unprocessed"),
            )
            conn.commit()
            return cursor.lastrowid
        except sqlite3.IntegrityError:
            # A row with this delivery_id already exists
            return None

@app.post("/webhooks/github")
def github_webhook():
    event_name = request.headers.get("X-GitHub-Event", "unknown")
    delivery_id = request.headers.get("X-GitHub-Delivery", "no-delivery-id")

    payload = request.get_json(silent=True) or {}

    event_id = store_webhook_event(
        source="github",
        event_type=event_name,
        delivery_id=delivery_id,
        payload_dict=payload,
    )

    if event_id is None:
        print(f"Ignoring duplicate delivery: {delivery_id}")
    else:
        print(f"Stored event {event_id} from delivery {delivery_id} ({event_name})")

    # Acknowledge receipt quickly
    return "", 200

if __name__ == "__main__":
    init_db()
    app.run(debug=True, port=5000)

Now every webhook delivery is recorded in the database. If a request fails later in your processing pipeline or a Slack notification does not send, you still have a copy of the original payload and a clear record of what was received.

Handling Duplicate Deliveries (Idempotency)

Webhook providers retry deliveries when they see errors or timeouts. This is good for reliability, but it means you must assume that the same event may arrive more than once. If your handler sends a Slack message or charges a customer each time it sees an event, duplicates become a serious problem.

The solution is idempotency. An idempotent handler can safely process the same delivery multiple times without changing the end result after the first successful run. In practice, this usually means:

  • Each delivery has a unique identifier (for example, X-GitHub-Delivery).
  • You store that identifier in your database.
  • If you see the same identifier again, you treat it as a duplicate and skip the work.

The webhook_events table enforces this behaviour using a UNIQUE constraint on delivery_id. When store_webhook_event tries to insert a duplicate delivery, SQLite raises IntegrityError and the function returns None. Your webhook handler logs the duplicate and still returns 200 OK to GitHub.

Later, when you add background processing, you will use the status and processed_at columns to mark which events have been handled. That gives you a complete picture: what was received, what has been processed, and what is still pending.

A Simple Background Processor

In a production system you would use a dedicated task queue such as Celery, RQ, or a message broker to process webhook events in the background. To keep this chapter focused, you will build a simpler pattern that still demonstrates the idea: a separate script that polls the database for unprocessed events and handles them one by one.

Background Worker That Processes Events
Python
import json
import sqlite3
import time
from datetime import datetime

DB_FILE = "webhooks.db"

def get_db_connection():
    conn = sqlite3.connect(DB_FILE)
    conn.row_factory = sqlite3.Row
    return conn

def fetch_unprocessed_events(limit=10):
    with get_db_connection() as conn:
        rows = conn.execute(
            """
            SELECT id, source, event_type, delivery_id, payload_json
            FROM webhook_events
            WHERE status = 'unprocessed'
            ORDER BY received_at ASC
            LIMIT ?
            """,
            (limit,),
        ).fetchall()
    return rows

def mark_event_processed(event_id, status="processed"):
    processed_at = datetime.utcnow().isoformat(timespec="seconds")
    with get_db_connection() as conn:
        conn.execute(
            """
            UPDATE webhook_events
            SET status = ?, processed_at = ?
            WHERE id = ?
            """,
            (status, processed_at, event_id),
        )
        conn.commit()

def handle_event(row):
    payload = json.loads(row["payload_json"])
    event_type = row["event_type"]
    delivery_id = row["delivery_id"]

    # For now, just print a summary. Later you will send Slack notifications here.
    print(f"[{row['id']}] Handling event {event_type} (delivery {delivery_id})")
    print("Payload keys:", list(payload.keys()))

def run_worker(loop_delay=5):
    print("Starting webhook worker. Press Ctrl+C to stop.")
    try:
        while True:
            events = fetch_unprocessed_events()
            if not events:
                print("No unprocessed events. Sleeping...")
                time.sleep(loop_delay)
                continue

            for row in events:
                try:
                    handle_event(row)
                    mark_event_processed(row["id"], status="processed")
                except Exception as exc:
                    print(f"Error processing event {row['id']}: {exc}")
                    mark_event_processed(row["id"], status="error")

    except KeyboardInterrupt:
        print("Worker stopped.")

if __name__ == "__main__":
    run_worker()

Run this worker in a separate terminal while your Flask app is receiving webhooks. The receiver writes events into the database and returns quickly. The worker picks up unprocessed events, handles them, and marks them as processed. In the next sections, you will replace the placeholder handle_event logic with real behaviour, such as sending Slack notifications for GitHub activity.

Checkpoint Quiz

Before you move on to security and signatures, check that you understand the core patterns of a robust webhook receiver:

Select question to reveal the answer:
Why should a webhook handler respond quickly instead of doing all the work inline?

If your handler is slow, the provider may hit timeouts, retry deliveries, or disable the webhook. A quick response keeps the HTTP side of the integration stable while you move the heavy work into the background. It also makes your system easier to scale, since processing can be spread across workers instead of blocking a single request thread.

How does the webhook_events table support idempotent processing?

The table stores each delivery with a unique delivery_id. If a provider retries the same delivery, the insert fails with a unique constraint violation and your code treats it as a duplicate. You can also track status and processed_at to make sure each event is handled at most once, even if it appears multiple times.

Why is it useful to keep a database log of all received webhook events?

A database log gives you an audit trail. When something goes wrong, you can inspect exactly which events were received, which were processed, and which failed. It makes troubleshooting much easier, allows you to re-run processing for specific events if needed, and helps you prove what happened if you need to debug issues with the provider.

6. Webhook Security and Verification

Why Webhook Security Matters

When you create a webhook endpoint, you are exposing a URL that can be called by anyone on the internet. GitHub will send genuine events to this URL, but nothing stops a random script from sending a fake HTTP POST request to the same place and pretending to be GitHub.

If you trust every request blindly, several bad things can happen:

  • Attackers can send fake events to trigger actions in your system, such as sending Slack spam or creating fake records.
  • Bots can flood your endpoint with garbage payloads and cause performance problems.
  • Your logs and metrics become polluted with events that did not come from the provider.

To prevent this, most providers include a way for you to verify that a webhook really came from them. GitHub uses a shared secret and an HMAC signature that you can recompute on your side. In this section you will add that verification step to your Flask app so that untrusted requests are rejected before they reach your business logic.

Shared Secrets and HMAC Signatures

When you configure a webhook in GitHub, you can set a secret string that only you and GitHub know. GitHub never shows this secret to anyone else. On each webhook delivery, GitHub takes the raw request body, signs it with this secret using HMAC SHA 256, and puts the result in the X-Hub-Signature-256 header.

On your side, you reuse the same secret and the same algorithm. You compute your own HMAC over the raw request body and compare it to the signature in the header. If they match, the request is very likely to be genuine. If they do not match, you treat the request as untrusted and return an error.

The high level flow looks like this:

  1. You and GitHub agree on a shared secret (configured once in the GitHub settings page).
  2. GitHub signs each payload with HMAC SHA 256 using that secret and sends the signature in the header.
  3. Your code recomputes the signature using the same secret and compares the two values.
  4. If they match, you continue. If not, you reject the request.
Diagram showing HMAC signature verification: payload and shared secret feed into HMAC algorithm to generate a signature hash, which is compared with the signature from the X-Hub-Signature header. If they match, a green shield with checkmark indicates verification success.
The security gate: Your application re-calculates the signature using the shared secret. If it matches the header, the gate opens.

You will keep the secret in an environment variable in your application (for example GITHUB_WEBHOOK_SECRET) so that it never appears in source control.

Implementing Signature Verification in Flask

To verify signatures you need access to the raw request body bytes exactly as GitHub sent them. You cannot rely on the parsed JSON alone because even small changes in whitespace would change the HMAC result.

The following code adds a verify_github_signature helper and updates the Flask route to reject requests with invalid signatures.

HMAC Verification for GitHub Webhooks
Python
import hmac
import hashlib
import os
import json
import sqlite3
from datetime import datetime
from flask import Flask, request

DB_FILE = "webhooks.db"
GITHUB_WEBHOOK_SECRET = os.environ.get("GITHUB_WEBHOOK_SECRET", "")

app = Flask(__name__)

def get_db_connection():
    conn = sqlite3.connect(DB_FILE)
    conn.row_factory = sqlite3.Row
    return conn

def init_db():
    with get_db_connection() as conn:
        conn.execute(
            """
            CREATE TABLE IF NOT EXISTS webhook_events (
                id INTEGER PRIMARY KEY AUTOINCREMENT,
                source TEXT NOT NULL,
                event_type TEXT NOT NULL,
                delivery_id TEXT NOT NULL UNIQUE,
                payload_json TEXT NOT NULL,
                received_at TEXT NOT NULL,
                processed_at TEXT,
                status TEXT NOT NULL
            );
            """
        )
        conn.commit()

def store_webhook_event(source, event_type, delivery_id, payload_dict):
    payload_json = json.dumps(payload_dict)
    received_at = datetime.utcnow().isoformat(timespec="seconds")

    with get_db_connection() as conn:
        cursor = conn.cursor()
        try:
            cursor.execute(
                """
                INSERT INTO webhook_events
                    (source, event_type, delivery_id, payload_json, received_at, processed_at, status)
                VALUES
                    (?, ?, ?, ?, ?, NULL, ?)
                """,
                (source, event_type, delivery_id, payload_json, received_at, "unprocessed"),
            )
            conn.commit()
            return cursor.lastrowid
        except sqlite3.IntegrityError:
            return None  # duplicate delivery_id

def verify_github_signature(secret, body_bytes, signature_header):
    """
    Verify GitHub's HMAC SHA-256 signature.

    signature_header looks like:
        'sha256=abcdef1234...'
    """
    if not secret:
        # No secret configured: treat all requests as unverified
        return False

    if not signature_header or not signature_header.startswith("sha256="):
        return False

    try:
        their_sig = signature_header.split("=", 1)[1]
    except (IndexError, AttributeError):
        return False

    mac = hmac.new(secret.encode("utf-8"), body_bytes, hashlib.sha256)
    expected_sig = mac.hexdigest()

    # Use compare_digest to avoid timing attacks
    return hmac.compare_digest(their_sig, expected_sig)

@app.post("/webhooks/github")
def github_webhook():
    event_name = request.headers.get("X-GitHub-Event", "unknown")
    delivery_id = request.headers.get("X-GitHub-Delivery", "no-delivery-id")
    signature = request.headers.get("X-Hub-Signature-256", "")

    # Get raw body bytes exactly as GitHub sent them
    raw_body = request.get_data(cache=True)

    if not verify_github_signature(GITHUB_WEBHOOK_SECRET, raw_body, signature):
        print(f"Invalid signature for delivery {delivery_id}. Rejecting.")
        return "", 401

    payload = request.get_json(silent=True) or {}

    event_id = store_webhook_event(
        source="github",
        event_type=event_name,
        delivery_id=delivery_id,
        payload_dict=payload,
    )

    if event_id is None:
        print(f"Ignoring duplicate delivery: {delivery_id}")
    else:
        print(f"Stored verified event {event_id} from delivery {delivery_id} ({event_name})")

    return "", 200

if __name__ == "__main__":
    init_db()
    app.run(debug=True, port=5000)

This version of the route only stores events after the signature has been verified. Unverified requests never reach your database and receive a simple 401 response. In a real system you would also monitor these failures in your logs or metrics to spot configuration issues or suspicious traffic.

Replay Protection and Hardening

HMAC signatures prove that a request was created by someone who knows the shared secret, but they do not stop an attacker from replaying an old request that they have captured. For example, if someone records a valid webhook and sends it to your endpoint again, the HMAC will still be valid.

There are a few simple techniques that help reduce this risk:

  • Use the unique delivery identifier (for example X-GitHub-Delivery) and ignore duplicate deliveries after the first time you process them.
  • Prefer providers that include a timestamp header and reject events that are too old. (GitHub does not include a timestamp header today, but other providers such as Stripe do.)
  • When your provider publishes a fixed set of IP ranges, combine signature checks with an IP allowlist at your reverse proxy or firewall. That way requests must both come from a known network range and carry a valid HMAC signature.
  • Log suspicious patterns, such as many failed signature checks from the same IP address, and add basic rate limiting at the HTTP layer.

Your current design already handles one important part of replay protection. Because the webhook_events table has a unique constraint on delivery_id, any attempt to reinsert the same delivery will be treated as a duplicate and ignored. Combined with HMAC verification, this gives you a strong baseline for most applications.

Testing Secure Webhooks with ngrok

So far you have tested your webhook receiver with local curl calls. To test a real integration, GitHub needs to reach your Flask app from the internet. A simple way to do this during development is to run your app locally and expose it using a tunneling tool such as ngrok or localtunnel.

  1. Start your Flask app on http://localhost:5000.
  2. Run ngrok http 5000 in a separate terminal.
  3. Copy the public URL that ngrok prints, for example https://abc123.ngrok.io.
  4. In your GitHub repository settings, create or update a webhook with:
    • Payload URL: https://abc123.ngrok.io/webhooks/github
    • Content type: application/json
    • Secret: the same value as GITHUB_WEBHOOK_SECRET in your environment
    • Events: start with Just the push event or Send me everything

Trigger an event in GitHub, such as opening an issue or pushing a commit. You should see a new delivery in the GitHub web interface, a matching log line from your Flask app, and a verified row in your webhook_events table.

Keep Secrets in Sync

If you change the secret in GitHub, make sure you update the corresponding environment variable in your application. Signature verification will fail if the two values do not match, and GitHub will show your endpoint as returning 401 errors until you fix the mismatch.

You now have a webhook receiver that is not only robust but also secure. In the next section you will turn these verified events into real notifications by connecting your GitHub webhook to Slack.

Checkpoint Quiz

Before you move on, make sure you are comfortable with the security model behind webhooks:

Select question to reveal the answer:
Why is a shared secret plus HMAC safer than trusting the request's IP address?

IP addresses can be spoofed, change over time, or be shared by many services behind proxies. A shared secret plus HMAC ties each request to knowledge that only you and the provider have. As long as the secret stays private, an attacker cannot forge a valid signature even if they can reach your endpoint from any IP address.

Why do you need the raw request body bytes to verify the signature?

HMAC works on the exact sequence of bytes that were sent. If you reserialize the JSON, change whitespace, or alter encoding, the bytes change and the HMAC result changes. Reading the raw body with request.get_data() ensures that you are hashing the same bytes that GitHub used, so the signatures can match.

How does the delivery_id column help protect against replay attacks?

Each webhook delivery has a unique identifier, which you store in the delivery_id column with a unique constraint. If someone replays the same request, your insert will fail and you treat it as a duplicate instead of running the action again. This does not stop someone replaying the HTTP request itself, but it prevents your business logic from acting on it more than once.

7. GitHub Activity Notifier – From Events to Slack

Designing the GitHub Activity Notifier

You now have a webhook receiver that can accept, verify, and store GitHub events, and a worker process that can pick up unprocessed events from the database. The final step is to turn those events into useful notifications.

In this section you will build a GitHub Activity Notifier that sends Slack messages when important events occur in your repository, such as:

  • New issues being opened.
  • Pull requests being opened or merged.
  • Other events you choose to watch later.

The architecture looks like this:

Diagram showing GitHub sending webhook events to your Flask app, which stores them in a database. A background worker reads events from the database, formats a message, and sends it to Slack.
GitHub pushes events to your webhook receiver. The receiver stores them, and a background worker turns those events into Slack notifications.

The same pattern shows up with many other providers. Stripe uses webhooks to tell your application when a payment succeeds or a subscription changes. Slack and Discord both accept incoming webhooks that you can post messages to, just like your notifier does. Tools such as RequestBin and webhook.site let you inspect raw webhook deliveries in a browser, which is extremely useful when you are debugging or exploring a new provider.

Normalising GitHub Events

GitHub can send many different webhook event types, each with its own JSON structure. To avoid scattering GitHub specific details throughout your code, you will normalise the events into a simple internal format and then format messages from that.

Start with a helper that takes an event_type (from X-GitHub-Event) and the JSON payload, and returns a dictionary with the fields your notifier cares about:

Normalising GitHub Events
Python
def normalize_github_event(event_type, payload):
    """
    Convert a raw GitHub event into a simple internal representation.

    Returns a dict with keys:
      - kind: high level type ("issue_opened", "pr_opened", "pr_merged", "repo_starred", ...)
      - actor: who triggered the event
      - repository: "owner/name"
      - title: issue or PR title (if applicable)
      - url: link to the GitHub resource
      - extra: small dict with extra details (optional)
    Or returns None if this event type is not interesting.
    """
    repo_full_name = (payload.get("repository") or {}).get("full_name", "unknown/unknown")
    sender_login = (payload.get("sender") or {}).get("login", "someone")

    if event_type == "issues":
        action = payload.get("action")
        issue = payload.get("issue") or {}
        if action == "opened":
            return {
                "kind": "issue_opened",
                "actor": sender_login,
                "repository": repo_full_name,
                "title": issue.get("title", "(no title)"),
                "url": issue.get("html_url"),
                "extra": {"number": issue.get("number")},
            }

    if event_type == "pull_request":
        action = payload.get("action")
        pr = payload.get("pull_request") or {}
        is_merged = pr.get("merged", False)

        if action == "opened":
            return {
                "kind": "pr_opened",
                "actor": sender_login,
                "repository": repo_full_name,
                "title": pr.get("title", "(no title)"),
                "url": pr.get("html_url"),
                "extra": {"number": pr.get("number")},
            }

        if action == "closed" and is_merged:
            return {
                "kind": "pr_merged",
                "actor": sender_login,
                "repository": repo_full_name,
                "title": pr.get("title", "(no title)"),
                "url": pr.get("html_url"),
                "extra": {"number": pr.get("number")},
            }

    if event_type == "star":
        action = payload.get("action")
        # We only notify when someone stars the repo, not when they unstar it.
        if action == "created":
            return {
                "kind": "repo_starred",
                "actor": sender_login,
                "repository": repo_full_name,
                "title": f"{repo_full_name} starred",
                "url": (payload.get("repository") or {}).get("html_url"),
                "extra": {},
            }

    # You can add more event types here over time.

    # Not an event we care about for Slack notifications
    return None

This helper focuses on a small subset of events and ignores the rest. That is deliberate. In a real application you will add more cases over time, but it is better to start with a tiny set of high signal events rather than trying to handle everything at once.

Sending Messages to Slack

Slack provides Incoming Webhooks that accept simple JSON payloads. You post a message to a special URL, and Slack delivers it into a channel. This fits perfectly with the way your worker already makes HTTP requests.

At a high level you will:

  1. Create a Slack app with an incoming webhook.
  2. Copy the webhook URL and store it in an environment variable (for example SLACK_WEBHOOK_URL).
  3. Use requests.post in your worker to send JSON payloads to that URL.
Slack Notification Helper
Python
import os
import requests

SLACK_WEBHOOK_URL = os.environ.get("SLACK_WEBHOOK_URL", "")

def send_slack_notification(text):
    """
    Send a notification to Slack via incoming webhook.
    
    Raises requests.RequestException if the notification fails.
    """
    if not SLACK_WEBHOOK_URL:
        print("SLACK_WEBHOOK_URL is not set. Skipping Slack notification.")
        return

    response = requests.post(
        SLACK_WEBHOOK_URL,
        json={"text": text},
        timeout=5,
    )
    response.raise_for_status()
    print("Sent Slack notification.")

Slack supports rich formatting (bold, links, emojis, and more) using a simple markup. For now you will send plain text with a bit of structure; later you can improve formatting without changing the rest of your pipeline.

Creating a Slack Incoming Webhook

In your Slack workspace, create a new app or use an existing one. Enable the Incoming Webhooks feature and add a webhook to the channel where you want notifications to appear. Copy the Webhook URL and set it as the SLACK_WEBHOOK_URL environment variable in your development and production environments.

Updating the Worker to Notify Slack

Now connect everything together. You will update the background worker from Section 3 so that it:

  • Fetches unprocessed events from the database.
  • Normalises GitHub events into a simple internal structure.
  • Formats a Slack message.
  • Sends the notification.
  • Marks the event as processed or error.
GitHub → Slack Worker
Python
import json
import sqlite3
import time
from datetime import datetime

import requests
import os

DB_FILE = "webhooks.db"
SLACK_WEBHOOK_URL = os.environ.get("SLACK_WEBHOOK_URL", "")

def get_db_connection():
    conn = sqlite3.connect(DB_FILE)
    conn.row_factory = sqlite3.Row
    return conn

def fetch_unprocessed_events(limit=10):
    with get_db_connection() as conn:
        rows = conn.execute(
            """
            SELECT id, source, event_type, delivery_id, payload_json
            FROM webhook_events
            WHERE status = 'unprocessed'
            ORDER BY received_at ASC
            LIMIT ?
            """,
            (limit,),
        ).fetchall()
    return rows

def mark_event_processed(event_id, status="processed"):
    processed_at = datetime.utcnow().isoformat(timespec="seconds")
    with get_db_connection() as conn:
        conn.execute(
            """
            UPDATE webhook_events
            SET status = ?, processed_at = ?
            WHERE id = ?
            """,
            (status, processed_at, event_id),
        )
        conn.commit()

def normalize_github_event(event_type, payload):
    """
    Convert a raw GitHub event into a simple internal representation.

    Returns a dict with keys:
      - kind: high level type ("issue_opened", "pr_opened", "pr_merged", "repo_starred", ...)
      - actor: who triggered the event
      - repository: "owner/name"
      - title: issue or PR title (if applicable)
      - url: link to the GitHub resource
      - extra: small dict with extra details (optional)
    Or returns None if this event type is not interesting.
    """
    repo_full_name = (payload.get("repository") or {}).get("full_name", "unknown/unknown")
    sender_login = (payload.get("sender") or {}).get("login", "someone")

    if event_type == "issues":
        action = payload.get("action")
        issue = payload.get("issue") or {}
        if action == "opened":
            return {
                "kind": "issue_opened",
                "actor": sender_login,
                "repository": repo_full_name,
                "title": issue.get("title", "(no title)"),
                "url": issue.get("html_url"),
                "extra": {"number": issue.get("number")},
            }

    if event_type == "pull_request":
        action = payload.get("action")
        pr = payload.get("pull_request") or {}
        is_merged = pr.get("merged", False)

        if action == "opened":
            return {
                "kind": "pr_opened",
                "actor": sender_login,
                "repository": repo_full_name,
                "title": pr.get("title", "(no title)"),
                "url": pr.get("html_url"),
                "extra": {"number": pr.get("number")},
            }

        if action == "closed" and is_merged:
            return {
                "kind": "pr_merged",
                "actor": sender_login,
                "repository": repo_full_name,
                "title": pr.get("title", "(no title)"),
                "url": pr.get("html_url"),
                "extra": {"number": pr.get("number")},
            }

    if event_type == "star":
        action = payload.get("action")
        # We only notify when someone stars the repo, not when they unstar it.
        if action == "created":
            return {
                "kind": "repo_starred",
                "actor": sender_login,
                "repository": repo_full_name,
                "title": f"{repo_full_name} starred",
                "url": (payload.get("repository") or {}).get("html_url"),
                "extra": {},
            }

    # You can add more event types here over time.

    # Not an event we care about for Slack notifications
    return None

def format_slack_message(event):
    kind = event["kind"]
    actor = event["actor"]
    repo = event["repository"]
    title = event["title"]
    url = event["url"]
    number = event["extra"].get("number")

    if kind == "issue_opened":
        return f"🐛 New issue in *{repo}*: #{number} *{title}* opened by @{actor}\n{url}"
    if kind == "pr_opened":
        return f"🔀 New pull request in *{repo}*: #{number} *{title}* opened by @{actor}\n{url}"
    if kind == "pr_merged":
        return f"✅ Pull request merged in *{repo}*: #{number} *{title}* merged by @{actor}\n{url}"
    if kind == "repo_starred":
        return f"⭐️ Repository *{repo}* was starred by @{actor}\n{url}"

    # Fallback, should not normally be reached
    return f"ℹ️ Activity in *{repo}* by @{actor}: {title}\n{url}"

def send_slack_notification(text):
    """
    Send a notification to Slack via incoming webhook.
    
    Raises requests.RequestException if the notification fails.
    """
    if not SLACK_WEBHOOK_URL:
        print("SLACK_WEBHOOK_URL is not set. Skipping Slack notification.")
        return

    response = requests.post(
        SLACK_WEBHOOK_URL,
        json={"text": text},
        timeout=5,
    )
    response.raise_for_status()
    print("Sent Slack notification.")

def handle_event(row):
    if row["source"] != "github":
        print(f"Skipping non-GitHub event {row['id']}")
        mark_event_processed(row["id"], status="skipped")
        return

    payload = json.loads(row["payload_json"])
    normalized = normalize_github_event(row["event_type"], payload)

    if normalized is None:
        print(f"Skipping uninteresting event {row['id']} ({row['event_type']})")
        mark_event_processed(row["id"], status="skipped")
        return

    text = format_slack_message(normalized)

    try:
        send_slack_notification(text)
        mark_event_processed(row["id"], status="processed")
    except Exception as exc:
        print(f"Error sending Slack notification for event {row['id']}: {exc}")
        mark_event_processed(row["id"], status="error")

def run_worker(loop_delay=5):
    print("Starting GitHub → Slack worker. Press Ctrl+C to stop.")
    try:
        while True:
            events = fetch_unprocessed_events()
            if not events:
                print("No unprocessed events. Sleeping...")
                time.sleep(loop_delay)
                continue

            for row in events:
                handle_event(row)

    except KeyboardInterrupt:
        print("Worker stopped.")

if __name__ == "__main__":
    run_worker()

Run this worker in a separate terminal while your Flask app receives webhook events from GitHub. When you open or merge pull requests or create issues, you should see new rows in the database and matching notifications arriving in Slack.

Checkpoint Quiz

Before moving to the chapter wrap up, check your understanding of the end-to-end notifier:

Select question to reveal the answer:
Why is it useful to normalise provider specific events into your own internal format?

Normalisation decouples your application logic from one provider's JSON shape. If GitHub changes its payload format or you later add another source of events, only the normalisation layer needs to change. Your Slack formatting and downstream logic can stay the same, which keeps the rest of your code simpler and more stable over time.

Why does the worker sometimes mark events as "skipped"?

Not every webhook needs a Slack notification. Some events may be noise for your use case. Marking them as skipped makes it clear that they were received and considered but intentionally not acted on. This helps with debugging and keeps your Slack channels focused on the events that actually matter.

How would you add support for a new GitHub event type, such as stars?

First, extend normalize_github_event with a new branch that understands the payload for the event (for example, the star event) and returns a normalised dictionary with kind, actor, repository, and so on. Then add a new case in format_slack_message that turns that normalised event into a Slack message. You do not need to change the worker loop or the database schema.

8. Chapter Summary and Review

In this chapter you moved from pull based integrations, where your code polls APIs for changes, to push based integrations, where APIs call your application as soon as something happens. You saw how webhooks flip the direction of communication and let you react to events in near real time without burning through rate limits.

You dissected a real webhook request and built a minimal Flask receiver that accepts POST requests, reads headers, and parses JSON payloads. From there you made the receiver robust by persisting each delivery in a database, enforcing idempotency with a unique delivery identifier, and separating fast acknowledgement from slower background processing.

You then secured the endpoint. Using a shared secret and HMAC signatures, you verified that incoming requests really came from GitHub before storing or acting on them. You saw how a database of webhook events, combined with delivery identifiers and status fields, gives you an audit trail that is invaluable when something goes wrong.

Finally, you turned these building blocks into a practical tool: a GitHub Activity Notifier that sends Slack messages for important repository events. GitHub pushes events to your webhook receiver, your application stores and normalises them, and a worker formats human friendly notifications for Slack. This is the same pattern that many production systems use to connect external events to internal workflows.

The important part is not the specific combination of GitHub and Slack. It is the set of habits you have developed: respond quickly, store events durably, verify signatures, design idempotent handlers, and keep provider specific details isolated in a small part of your code. These habits will carry over to any webhook based integration you build in the future.

Key Skills Mastered

1.

Pull vs Push Mental Model

You can explain the difference between polling and webhooks, and you know when each pattern is appropriate. You understand why constant polling does not scale well and how push based events reduce wasted requests and latency.

2.

Anatomy of a Webhook Request

You can read and interpret a webhook HTTP request: URL routing, headers that describe the event, and the JSON payload that carries the details. You know how to build a Flask route that receives webhook POSTs, accesses headers, and parses the request body safely.

3.

Robust Webhook Receivers and Idempotency

You can design webhook receivers that store events in a database, acknowledge quickly, and tolerate duplicate deliveries. You used a unique delivery identifier and status fields to make your processing idempotent so that retries do not cause duplicate work.

4.

Webhook Security with HMAC Signatures

You learned how to use a shared secret and HMAC SHA 256 to verify webhook signatures. You know why you must hash the raw request body, how to compare signatures safely, and how this protects your endpoint from fake events that do not come from the real provider.

5.

Background Processing for Events

You can separate the quick HTTP acknowledgement from the heavier work of handling events. You implemented a background worker that polls the database for unprocessed events, runs your business logic, and updates status fields, which is the first step toward more advanced task queue architectures.

6.

End to End Event Pipelines (GitHub to Slack)

You built an end to end pipeline that connects GitHub webhooks to Slack notifications. You normalised provider specific events into a simple internal format, formatted clear Slack messages, and wired everything together through your webhook receiver and background worker. You now have a template for building similar pipelines between other services.

Chapter Review Quiz

Use these questions to check your understanding. If you can answer them confidently, you have mastered webhooks at the level needed for this book:

Select question to reveal the answer:
When are webhooks a better choice than polling an API?

Webhooks are a better choice when you care about specific events as soon as they happen, and when constant polling would waste requests or hit rate limits. Examples include payments succeeding, pull requests being opened or merged, or users signing up. The provider pushes a webhook only when something has changed, which gives you faster updates with fewer calls.

Why must a webhook handler respond quickly instead of doing all the work inline?

Providers expect a fast and reliable response. If your handler is slow, requests may time out, the provider may retry deliveries, and in some cases the webhook can be disabled. Returning a quick 200 OK after storing the event keeps the integration stable while a background worker handles the slower tasks such as sending notifications or updating databases.

How does HMAC plus a shared secret help you verify webhook authenticity?

You and the provider share a secret value that never leaves your systems. The provider computes an HMAC over the raw request body with this secret and sends the result in a signature header. Your code recomputes the HMAC using the same secret and compares it to the header. If they match, it is very likely that the request came from the provider and has not been tampered with in transit.

What is idempotency in the context of webhook processing, and why is it important?

An idempotent webhook handler can safely see the same delivery more than once without changing the final outcome after the first successful run. This is important because providers retry deliveries when they see errors or timeouts. By storing a unique delivery identifier and skipping duplicates, you avoid sending duplicate notifications, charging customers twice, or applying the same update multiple times.

How would you debug a webhook that GitHub reports as failing?

First, check the webhook delivery logs in GitHub to see the status codes and any error messages. Then inspect your application logs around the same time to look for exceptions or signature verification failures. You can replay a specific delivery from GitHub's interface while watching your logs to reproduce the problem. Because you store events in the webhook_events table, you can also inspect the payload and status for that delivery directly in the database.

Looking Forward

You've mastered event-driven integrations where external services push data to your application. In the next chapter, Chapter 23: Asynchronous APIs and Performance Optimization, you'll flip this around again and learn how to make your own applications faster by handling multiple API requests concurrently.

Webhooks solve the "when to fetch" problem (the API tells you). Async solves the "how fast to fetch" problem (your code fetches many things simultaneously). You'll use Python's asyncio and aiohttp to transform slow sequential API calls into blazing-fast concurrent operations. When you need to fetch data from 50 repositories, or aggregate results from 10 different APIs, or process batch uploads, async techniques make the difference between 30-second runtimes and 3-second runtimes.

The webhook patterns you learned here (fast response, background workers, event queues) combine naturally with async techniques. You'll see how production systems use both: webhooks for inbound events, async for outbound aggregation.