Chapter 17: Flask Web Development & Building Your Dashboard

Building Your First Web Interface Without the Full-Stack Burden

1. Why Your Data Needs a Face

Your Data Needs a Face

The terminal is where projects go to hide.

Your Music Time Machine works. The database fills with listening history. OAuth handles authentication smoothly. The playlist generation algorithms surface forgotten gems and create mood-based collections. Everything functions correctly from the command line.

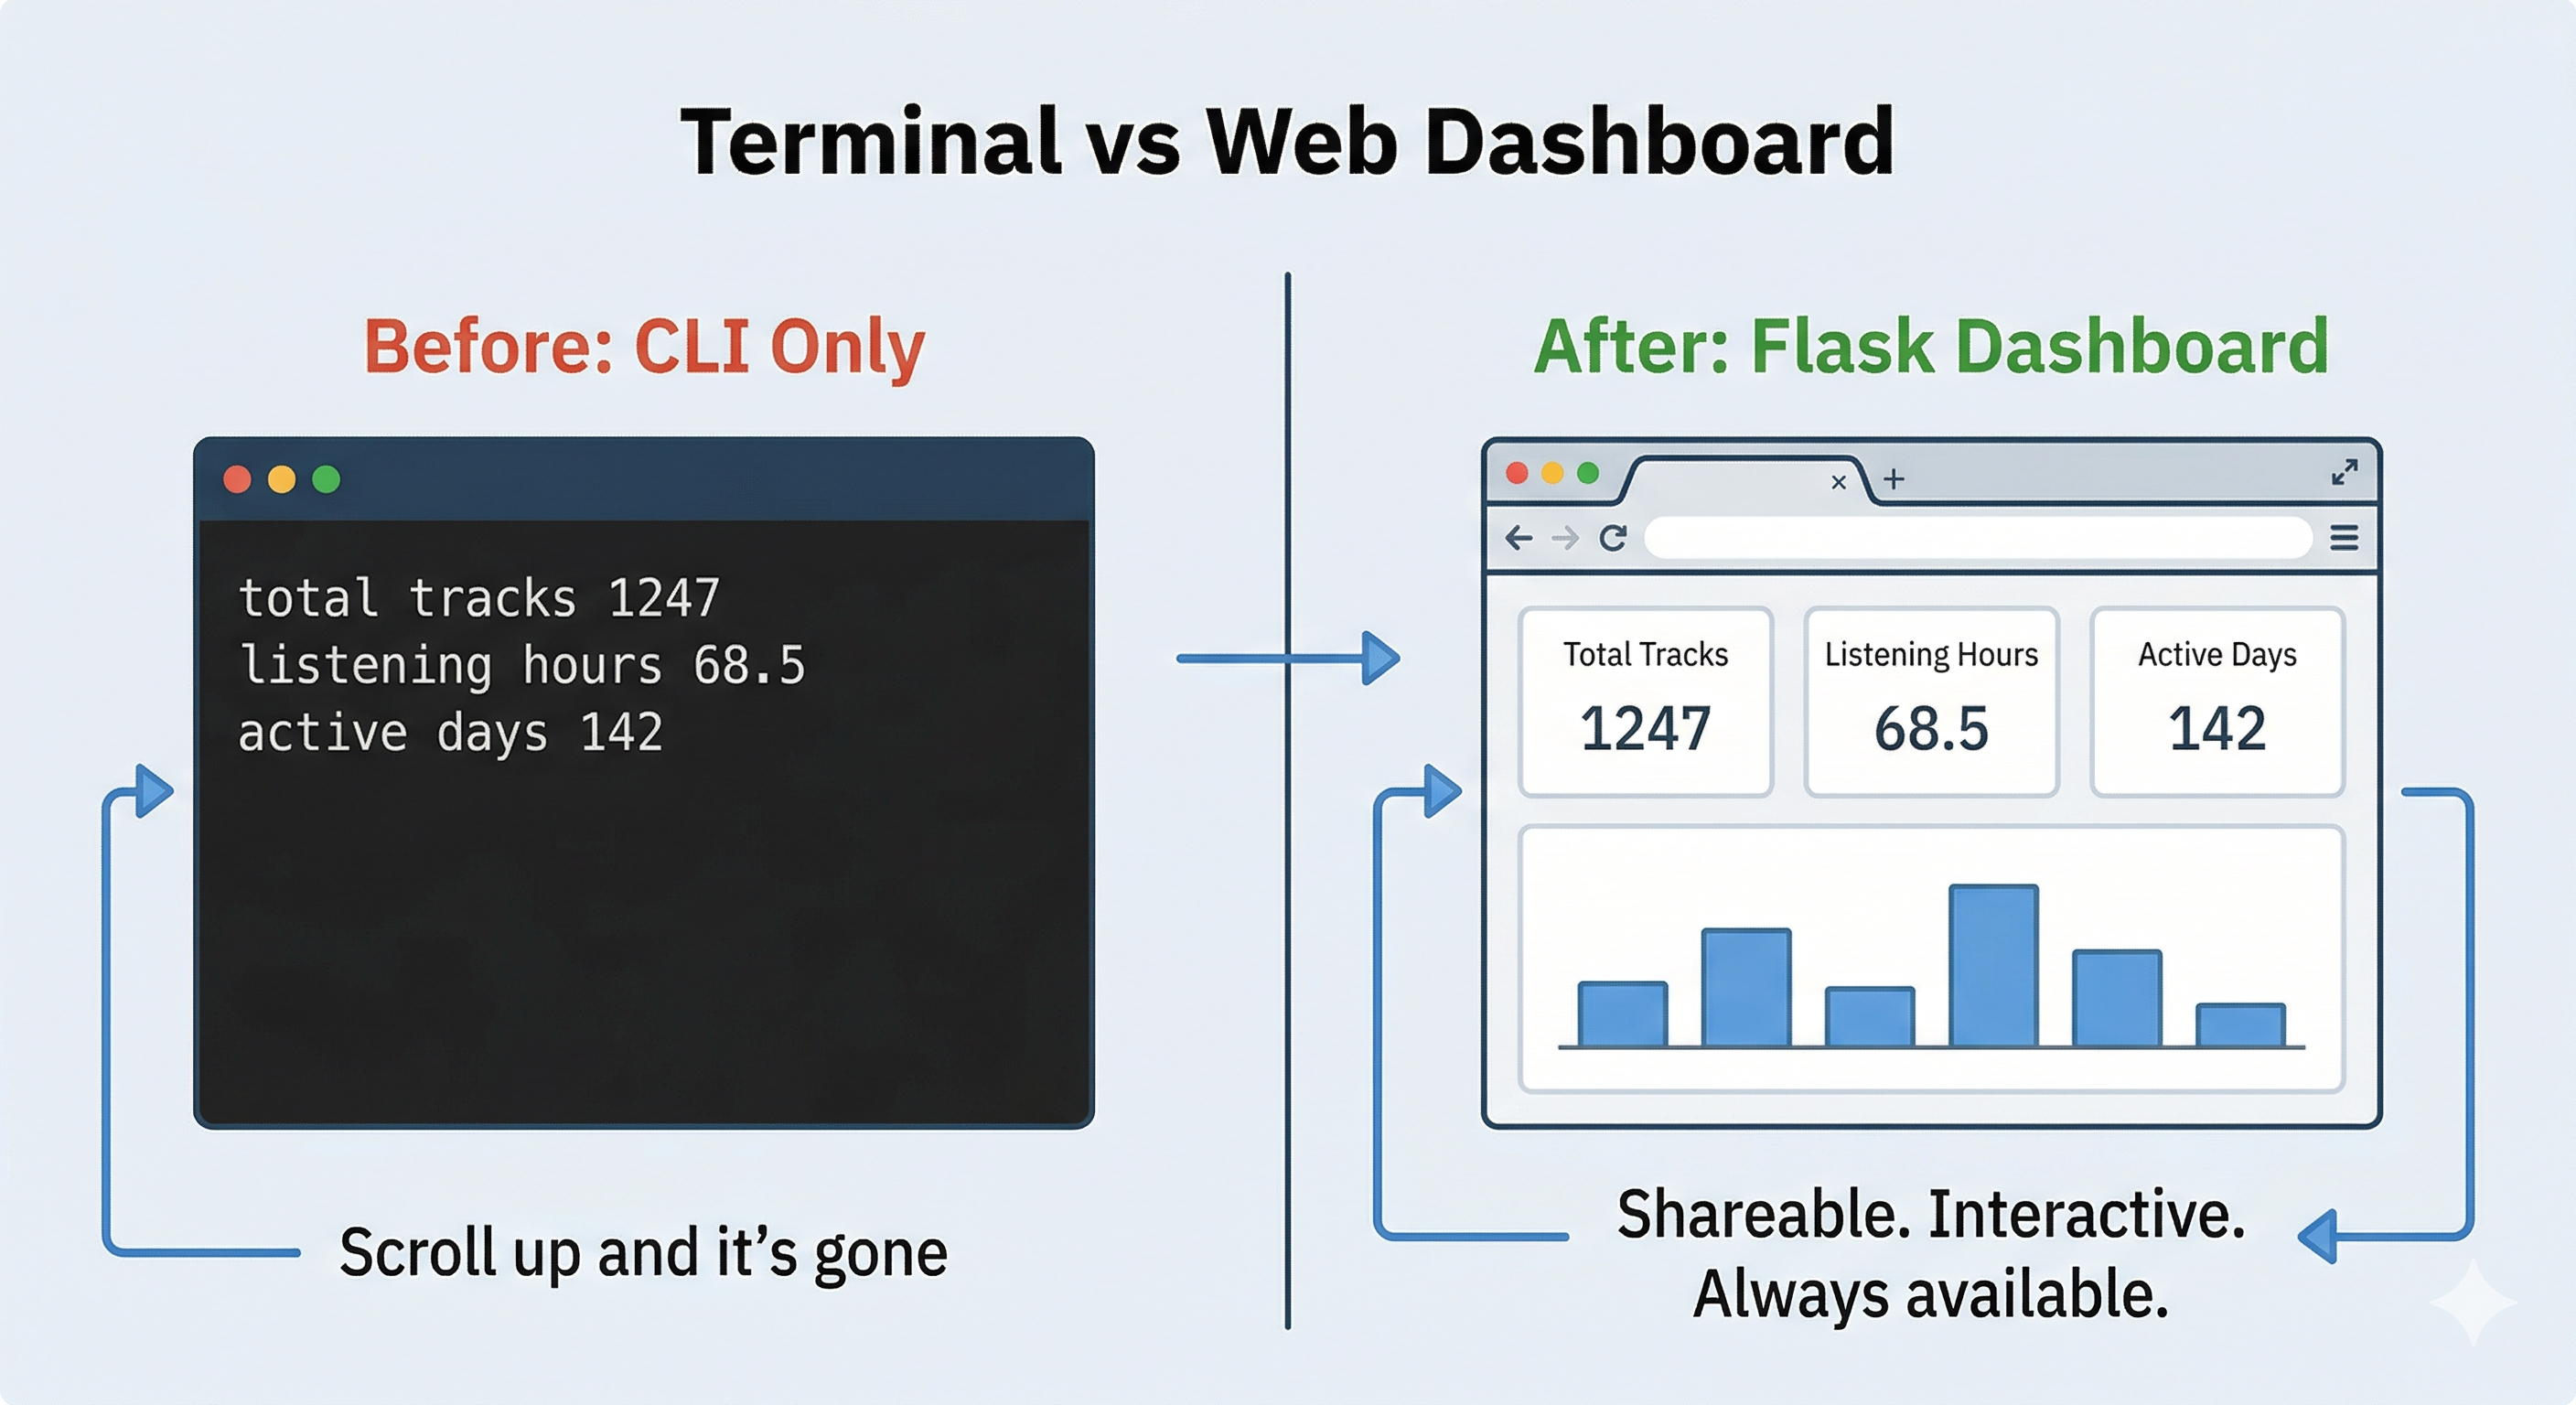
But here's the problem: command-line tools make value easy to miss. When you run the analytics feature and get text output showing your track turnover rate, genre evolution, and listening patterns, that information exists for about thirty seconds before you move on. The insights don't stick. The patterns don't reveal themselves. You can't see your musical evolution at a glance.

More importantly, you can't show it to anyone. Try explaining your portfolio project to a recruiter: "It's a command-line tool that creates Spotify playlists based on historical listening data stored in SQLite." Their eyes glaze over. Now imagine showing them a live dashboard with interactive charts displaying your musical journey over months. They get it immediately.

Diagram titled 'Terminal vs Web Dashboard'. Left panel labelled 'Before: CLI Only' shows a dark terminal window with plain text output: total tracks 1247, listening hours 68.5, active days 142, with the caption 'Scroll up and it's gone'. Right panel labelled 'After: Flask Dashboard' shows a browser window with three stat cards and a bar chart, with the caption 'Shareable. Interactive. Always available.'
The same data. One version disappears when you scroll. The other is always there, interactive, and shareable.

This chapter transforms your command-line application into a web dashboard. You'll add Flask, a lightweight Python web framework, to handle HTTP requests, design clean interfaces that work on mobile and desktop, create interactive visualizations with Chart.js, and connect everything to the SQLite database you built in Chapter 16. The functionality stays the same, but the presentation makes all the difference.

Avoiding the "Full Stack" Trap

Building a dashboard usually forces you to become a designer, a frontend engineer, and a backend developer all at once. For a Python developer focused on data and APIs, this is often a recipe for burnout and abandoned projects.

You didn't buy this book to learn CSS Grid debugging or to spend three hours centering a navigation bar. You want to build meaningful projects that showcase your API and database skills, not get lost in frontend minutiae.

To keep this manageable while still delivering a professional result, this chapter uses a "Backend-First" strategy:

1.

The CSS Starter Kit

You won't waste time typing 300 lines of CSS manually. I've provided a professional stylesheet (dashboard.css) that handles responsive layouts, cards, buttons, and chart containers. You'll import it as an asset and focus on connecting your data, not debugging margins and padding. The starter kit gives you professional results in minutes, not hours.
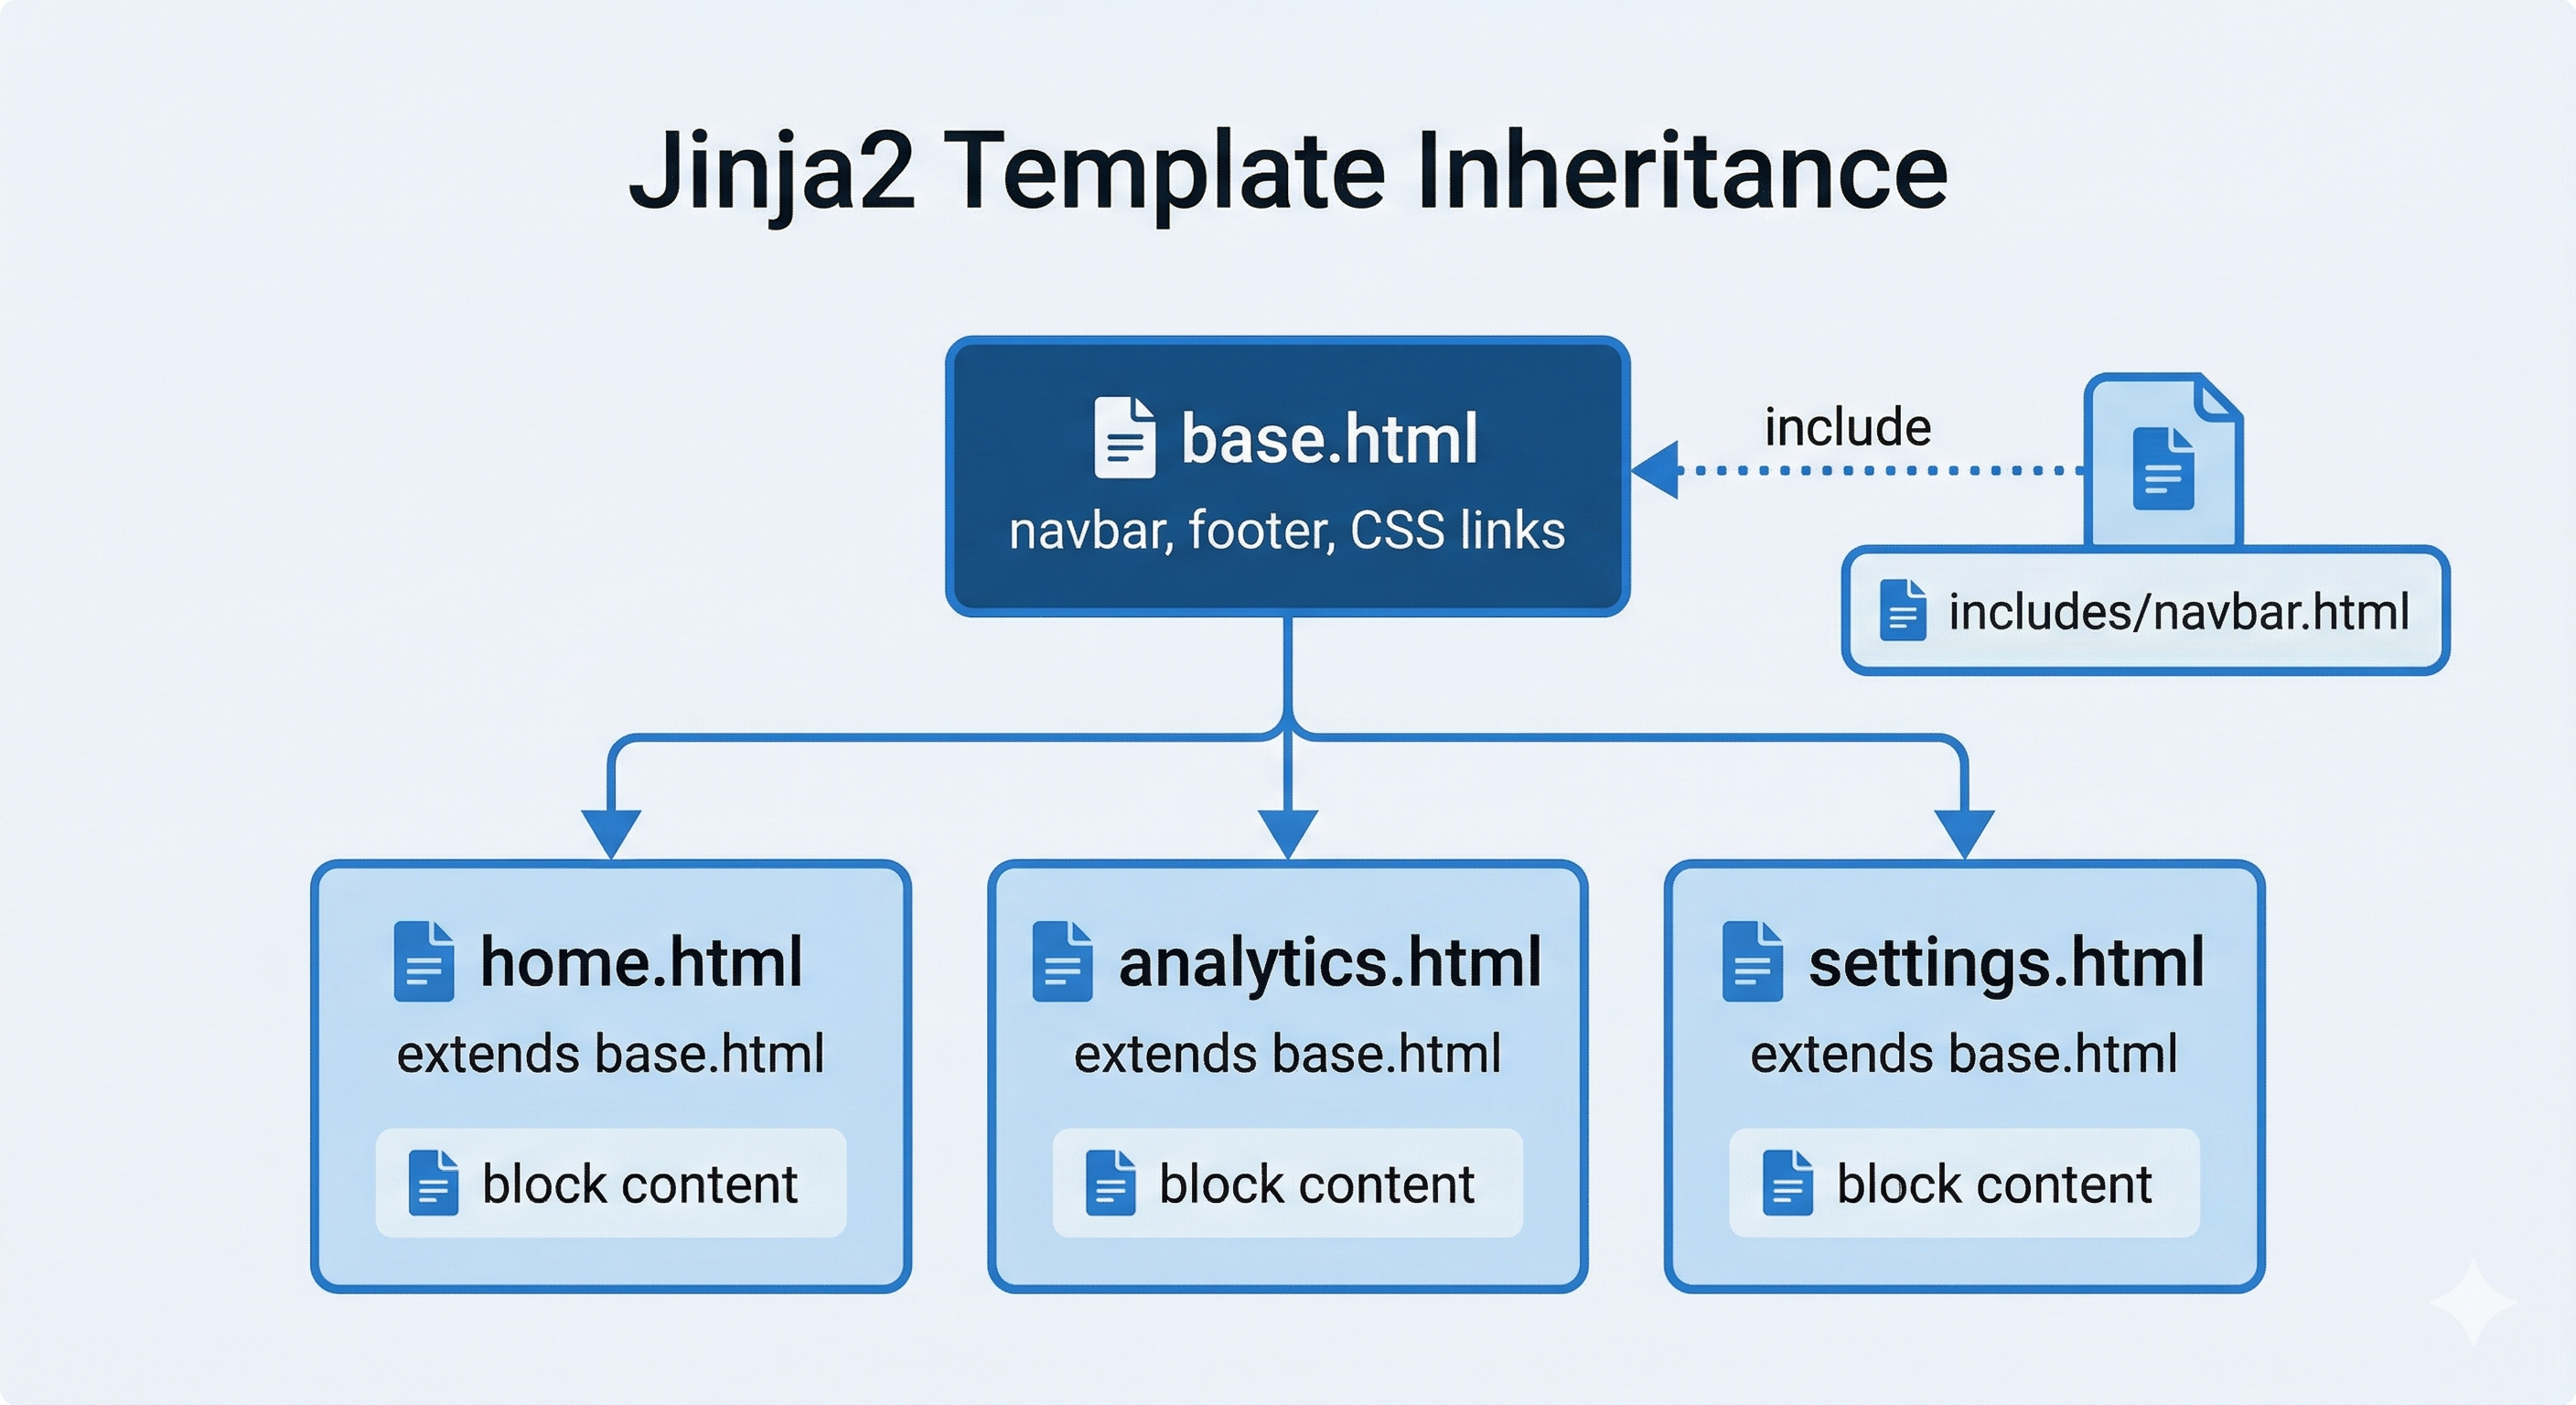
2.

Modular Templates

You'll break HTML into small, reusable pieces using Jinja2's {% include %} feature. Create the navigation bar once, include it everywhere. Change one file, update every page. This approach eliminates copy-paste errors and makes maintenance effortless. You'll never repeat the same 50 lines of navigation HTML across five different files.

3.

Progressive Enhancement

You'll build features using simple HTML forms first, then upgrade them to modern interactive buttons (AJAX) only when necessary. This approach ensures your application works even if JavaScript fails, provides better accessibility, and lets you focus on backend logic before adding frontend polish. HTML forms get you working functionality in five minutes. AJAX enhancement comes later.

Why This Strategy Works

Professional developers don't write everything from scratch. They use component libraries (Bootstrap, Tailwind), template systems (Jinja2, Django templates), and progressive enhancement to ship products faster. This chapter teaches you real-world development workflows, not academic exercises.

The Backend-First strategy mirrors how actual product teams work: designers provide CSS, backend engineers connect data, frontend specialists add interactivity. You're learning the backend engineer's role, which means focusing on Flask, database queries, and API integration, not becoming a CSS expert.

Chapter Roadmap

This chapter takes you from terminal-only Python to a working web dashboard. Here's the journey:

1

Flask Fundamentals & Project Setup

Section 2 • Foundation

Install Flask, write your first route, and learn how URLs map to Python functions. Master routing with URL parameters, the request/response cycle, url_for(), and custom error pages — the core mechanics behind every Flask application.

Routes URL Parameters Request/Response Error Pages
2

CSS Starter Kit & Template System

Section 3 • Presentation Layer

Set up the provided dashboard.css stylesheet, organize static files, then build a reusable template system with Jinja2 — template inheritance, modular components, and flash messages that eliminate repetition across pages.

Static Files Jinja2 Templates Template Inheritance Flash Messages
3

Building the Home Dashboard

Section 4 • Core Implementation

Plan, route, and build the complete Home Dashboard page — stat cards, a Chart.js timeline visualization, and responsive layout. This is where Flask concepts come together into a real, working interface.

Dashboard Route Chart.js Responsive Design
4

Connecting to Chapter 16 Modules

Section 5 • Integration

Wire your dashboard to the existing backend — import your database and API modules, add session-based OAuth for the browser, implement the full Spotify web flow, and add defensive error handling so routes never crash.

Module Integration OAuth Web Flow Session Management Error Handling
5

Testing & Looking Forward

Sections 6–7 • Completion

Run the development server, debug with browser dev tools, solve the most common Flask errors, then review what you've built and preview how Chapter 18 extends these patterns to three more dashboard pages.

Dev Server Browser Debugging Common Errors

What You'll Build in This Chapter

This chapter focuses on building one complete dashboard page: the Home Dashboard. You'll learn every Flask concept needed to build web applications: routing, templates, static files, sessions, and database integration, by creating a single, polished page that works perfectly.

The complete Music Dashboard will eventually have four pages, but you'll build the remaining three in Chapter 18 using the same patterns you master here. This focused approach prevents overwhelm while ensuring you understand the fundamentals deeply.

1.

Home Dashboard (Built in This Chapter)

The landing page shows your musical identity at a glance. Current stats display your total listening time, track count, and active listening days. A timeline chart visualizes your monthly listening patterns over the past year. Quick action buttons let you navigate to analytics and playlist pages. This page answers "What's happening with my music?" in five seconds.

2.

Evolution Analytics (Chapter 18)

This page reveals how your taste changes over time. Interactive line charts plot your audio feature preferences (energy, valence, danceability) month by month. A genre distribution pie chart shows shifts in your listening categories. You'll learn advanced Chart.js techniques and data filtering patterns.

3.

Playlist Manager (Chapter 18)

Generate and manage all your Time Machine playlists from one interface. Create Forgotten Gems playlists with adjustable time ranges. Build mood-based playlists by adjusting sliders for energy, valence, and tempo. You'll learn HTML form handling and AJAX-based progressive enhancement.

4.

Settings & Data Management (Chapter 18)

Control how the Time Machine operates. View and manage your OAuth connection to Spotify. Configure data collection schedules. Export your database for backup. You'll learn to handle destructive operations safely with confirmation flows and proper security practices.

By the end of this chapter, you'll have a working Home Dashboard that demonstrates all core Flask concepts. Chapter 18 applies these same patterns to build the remaining pages, no new fundamental concepts, just practice and refinement.

Flask: Turning Python Scripts Into Websites

You've written Python programs that run in the terminal. You type python analytics.py, it fetches data, prints results, and stops. That works fine for you. But what if you want other people to use your work? What if you want to see your data in a browser, click buttons instead of typing commands, view charts instead of reading text output?

That's what Flask does. Flask is a Python library that turns your existing Python code into something browsers can talk to. It's a translator between web requests and your Python functions.

1.

Before Flask: Terminal-Only

Your Music Time Machine scripts work in the terminal. You run python analytics.py --time-range 6months and get text output showing listening statistics. Functional, but isolated. Nobody else can use it. You can't visualize the data. It's trapped in the command line.

2.

With Flask: Web-Accessible

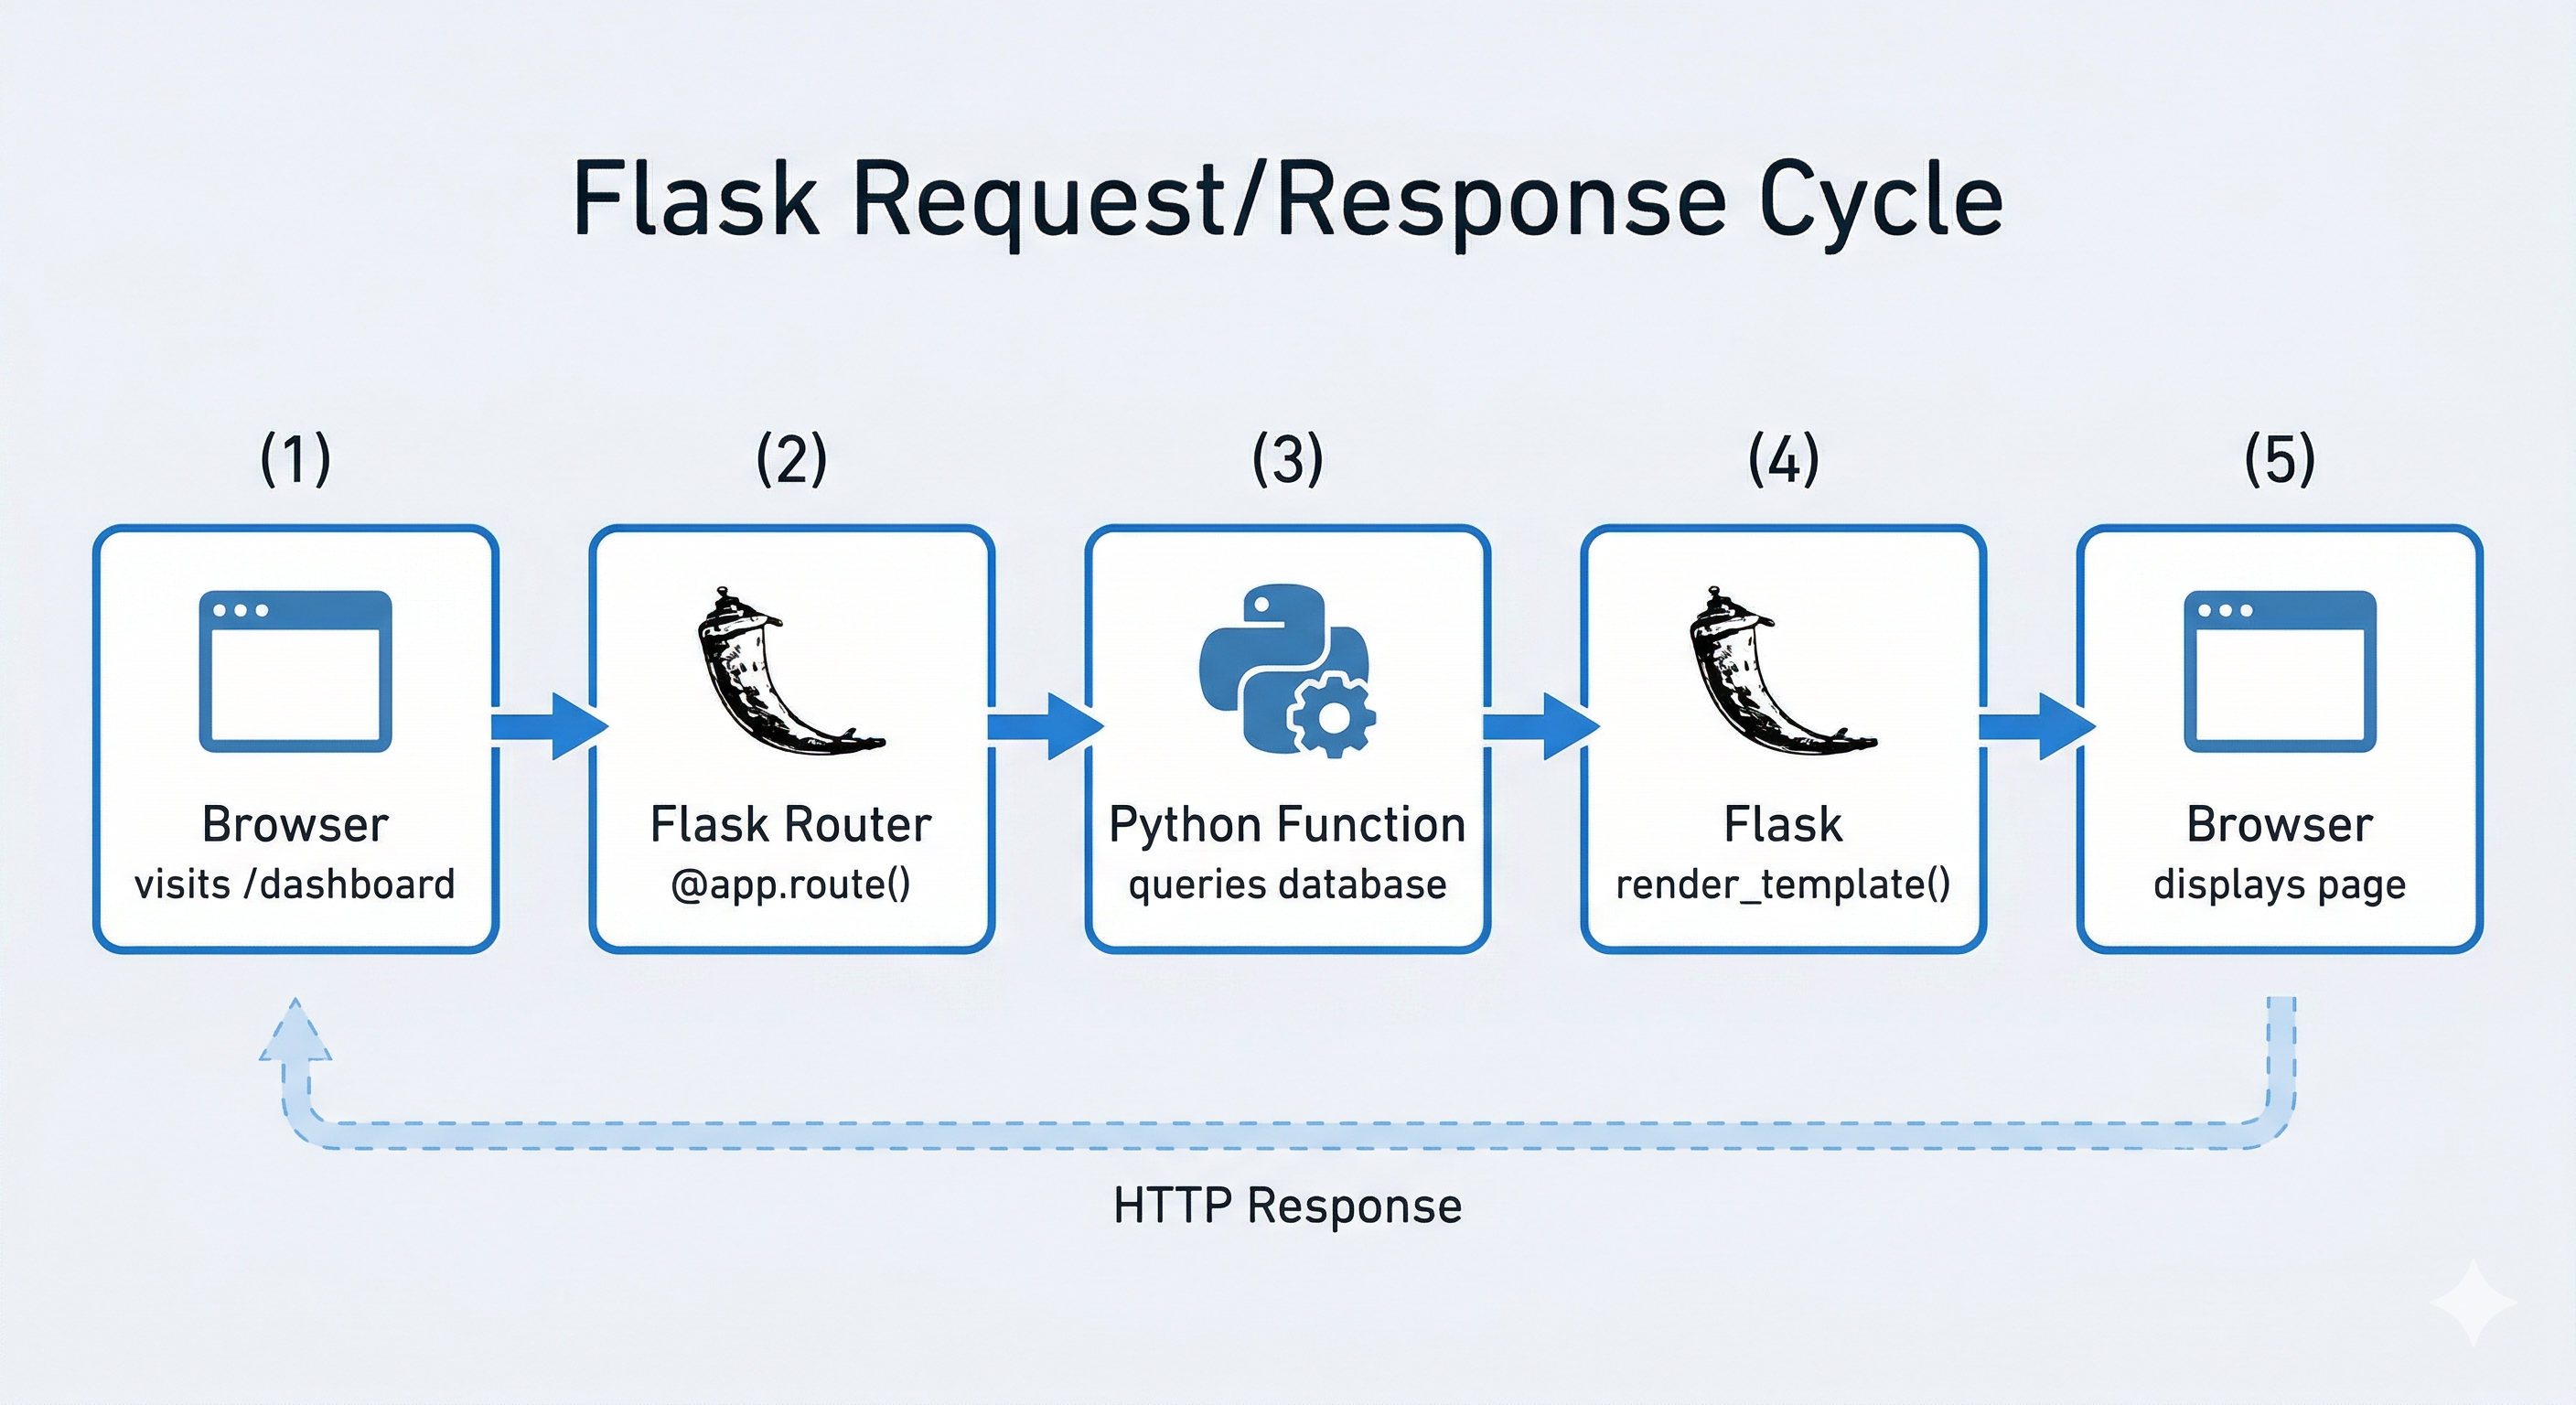
Your analytics function becomes @app.route('/analytics'). Someone visits yoursite.com/analytics in their browser. Flask notices the request, calls your analytics function, and sends back an HTML page with interactive charts. Same logic, different interface.

Flask acts as a receptionist for your Python code. When a browser requests a URL, Flask checks: "Which Python function handles this?" It calls that function, takes whatever the function returns (HTML, JSON, a redirect), and sends it to the browser. That's the entire job. Everything else (database queries, API calls, calculations) is just regular Python code you already know how to write.

Why Flask Instead of Django or FastAPI?

Python has several web frameworks. Django gives you everything: admin panels, authentication systems, database management, form handling. It's powerful but opinionated. You build applications "the Django way." FastAPI excels at building modern APIs with automatic documentation and type validation, perfect for backend services.

Flask is deliberately minimal. It handles HTTP routing (mapping URLs to functions), template rendering (HTML with dynamic data), and session management (keeping users logged in). That's it. You add what you need, when you need it. This makes Flask:

  • Faster to learn: Fewer concepts, less framework-specific knowledge required
  • More transparent: When you write @app.route('/home'), you understand exactly what's happening
  • Perfect for dashboards and APIs: You control the complexity, not the framework
  • Production-ready: Companies like Pinterest, LinkedIn, and Netflix use Flask for real applications

For this project, Flask hits the sweet spot: powerful enough for a professional dashboard, simple enough to master in one chapter. You're learning production patterns, not building academic exercises.

How This Connects to Your Existing Code

You're not rewriting your backend. The modules you built in Chapter 16 (spotify_client.py for API calls, database.py for queries, playlist_generator.py for creating playlists) contain pure business logic. That code doesn't change.

Flask sits on top as a presentation layer. Your database queries now power chart data instead of terminal output. Your OAuth flow becomes browser redirects instead of copy-pasted tokens. Your playlist generation gets triggered by button clicks instead of command-line arguments. Same functions, different interface.

This architectural separation (business logic independent of presentation) is how professional applications work. The core logic stays stable. The user interface can evolve. Web dashboard today, mobile app tomorrow, Slack bot next month. Same Python functions powering everything.

By the end of this chapter, you'll understand Flask well enough to build any web application. The patterns you learn here (routing, templates, sessions, database integration) apply universally. Whether you're building a personal dashboard, a team tool, or a client project, these fundamentals don't change.

Learning Objectives

By the end of this chapter, you'll be able to:

  • Build Flask web applications with proper routing, template rendering, and static file serving following production patterns
  • Design responsive layouts using a CSS starter kit and Jinja2 modular templates that work on mobile, tablet, and desktop
  • Pass data securely from Python backend to JavaScript frontend using the JSON handoff pattern with proper type conversion
  • Create interactive data visualizations with Chart.js using data from your SQLite database, including proper configuration and responsive behavior
  • Implement Flask session management to maintain OAuth state across requests and keep users authenticated
  • Debug frontend issues using the Browser Console (F12) instead of relying solely on the Python terminal
  • Structure web projects with clear separation between routes, templates, static files, and business logic modules

These skills transfer directly to other web frameworks and professional development environments. Flask teaches fundamental web concepts that apply to Django, FastAPI, Express.js, and any other framework you might encounter in your career.

2. Flask Fundamentals & Project Setup

Installing Flask

Flask is a third-party package available through pip. Install it in the same virtual environment where you've been working on the Music Time Machine project:

Terminal - Install Flask
# Make sure your virtual environment is activated
# Then install Flask
pip install flask

# Verify installation
python -c "import flask; print(flask.__version__)"
# Should print something like: 3.0.0

Flask has minimal dependencies. It pulls in Werkzeug (HTTP utilities), Jinja2 (templating), and Click (command-line interface). You don't need to install these separately; pip handles dependencies automatically.

Version Compatibility

This chapter uses Flask 3.0+, which requires Python 3.8 or newer. If you started the Music Time Machine project with an older Python version, you're likely already on 3.8+ (Chapter 15 OAuth work recommended 3.8+). Flask 3.0 introduced improved type hints and async support, but the core concepts remain identical to Flask 2.x.

If you see deprecation warnings about import flask versus from flask import Flask, don't worry. Both work. This chapter uses the explicit import style (from flask import Flask, render_template) for clarity.

Your First Flask Route

Before building the full dashboard, understand Flask's core concept: routes map URLs to Python functions. Create a minimal Flask application to see this in action.

In your Music Time Machine project directory (the same directory containing spotify_client.py and database.py), create a new file called app.py:

Python - Minimal Flask App
# app.py
from flask import Flask

# Create the Flask application instance
app = Flask(__name__)

# Define a route: map the URL "/" to this function
@app.route('/')
def home():
    return "Hello from Music Time Machine!"

# Run the development server
if __name__ == '__main__':
    app.run(debug=True)

Run this file and Flask starts a local web server:

Terminal - Run Flask App
python app.py

# Output:
#  * Serving Flask app 'app'
#  * Debug mode: on
# WARNING: This is a development server. Do not use it in production.
#  * Running on http://127.0.0.1:5000
# Press CTRL+C to quit

Open a browser and navigate to http://127.0.0.1:5000 (or http://localhost:5000 (they're equivalent). You'll see "Hello from Music Time Machine!" displayed.

Here's what happened: Flask listened on port 5000 for HTTP requests. When your browser requested /, Flask found the function decorated with @app.route('/') and executed it. The function returned a string, which Flask sent back to your browser as HTML.

The Mental Model: Flask as a Traffic Director

Think of Flask as a traffic director at a busy intersection. Incoming HTTP requests (cars) arrive at different URLs (street addresses). Flask checks its route map (@app.route() decorators) and directs each request to the appropriate function (destination).

The function processes the request, maybe querying a database, calling an API, or performing calculations), and returns a response. Flask packages this response (HTML, JSON, file download) and sends it back to the browser. The browser displays the result.

Every web framework works this way: Django, FastAPI, Express.js. Flask makes the pattern explicit and obvious, which is why it's an excellent teaching tool.

The debug=True parameter enables Flask's development mode. This provides automatic reloading (save your file, Flask restarts automatically) and detailed error pages when something breaks. Never use debug mode in production. It exposes internal code details that could be security risks. For local development, it's invaluable.

Flask Project Structure

As your Flask application grows beyond "Hello World," you need organization. Flask expects specific directory names for templates and static files. Follow this structure:

Project Structure
music-time-machine/
├── app.py                      # Flask application and routes
├── spotify_client.py           # Existing OAuth and API client (Chapter 15)
├── database.py                 # Existing database operations (Chapter 16)
├── playlist_generator.py       # Existing playlist logic (Chapter 16)
├── music_time_machine.db       # SQLite database file
├── .env                        # Environment variables (secrets)
├── templates/                  # HTML templates (Jinja2)
│   ├── base.html               # Base template (layout)
│   ├── home.html               # Home dashboard page
│   └── includes/               # Reusable template parts
│       └── navbar.html         # Navigation bar
└── static/                     # Static files (CSS, JS, images)
    ├── css/
    │   └── dashboard.css       # Provided CSS starter kit
    └── js/
        └── charts.js           # Chart.js configuration

Create these directories now:

Terminal - Create Directory Structure
# Run these commands from your project root
mkdir templates
mkdir templates/includes
mkdir static
mkdir static/css
mkdir static/js

Flask looks for templates in the templates/ directory by default. When you call render_template('home.html'), Flask searches for templates/home.html. Similarly, static files in static/ become accessible via URLs like /static/css/dashboard.css.

You can change these default directory names, but there's no reason to. Every Flask developer expects templates/ and static/. Following conventions makes your code immediately understandable to other developers (and to your future self six months from now).

Why This Structure Scales

This directory structure mirrors how professional Flask applications organize code. Small projects might put everything in one app.py file. Medium projects split routes into separate modules. Large projects use Flask Blueprints for complete feature separation.

The structure you're creating now supports growth without requiring rewrites. When you add user authentication, you'll create auth.py for routes and templates/auth/ for login pages. When you add an API, you'll create api.py and return JSON instead of HTML. The foundation remains the same.

Routing and URL Parameters

Flask routes can be static (/home), dynamic (/artist/<artist_id>), or accept query parameters (/search?q=jazz). Understanding when to use each pattern is essential.

Static routes map fixed URLs to functions. These are straightforward:

Python
@app.route('/')
def home():
    return render_template('home.html')

@app.route('/analytics')
def analytics():
    return render_template('analytics.html')

@app.route('/playlists')
def playlists():
    return render_template('playlists.html')

Dynamic routes capture parts of the URL as variables. Use angle brackets to define parameters:

Python - Basic Route Patterns
@app.route('/artist/')
def artist_detail(artist_id):
    # artist_id captured from URL
    # /artist/6sFIWsNpZYqfjCBa6REqMZ gives artist_id = "6sFIWsNpZYqfjCBa6REqMZ"
    artist_data = get_artist_from_database(artist_id)
    return render_template('artist.html', artist=artist_data)

@app.route('/playlist//')
def monthly_playlist(year, month):
    # Type converters:  ensures year is an integer
    # /playlist/2024/3 gives year=2024, month=3
    playlist = get_monthly_snapshot(year, month)
    return render_template('playlist.html', playlist=playlist)

Flask supports type converters in dynamic routes: <int:id> converts to integer, <float:amount> converts to float, <path:filename> accepts slashes (for file paths). If conversion fails (e.g., letters in <int:id>), Flask returns a 404 error automatically.

Query parameters use Flask's request object to access optional parameters after ? in URLs:

Python - Query Parameters
from flask import request

@app.route('/search')
def search():
    # Query parameters: /search?q=jazz&genre=instrumental
    query = request.args.get('q', '')  # Empty string if not provided
    genre = request.args.get('genre', 'all')  # Default to 'all'
    
    results = search_tracks(query, genre)
    return render_template('search.html', results=results)

@app.route('/analytics')
def analytics():
    # Optional filters: /analytics?period=6months&feature=energy
    period = request.args.get('period', '12months')
    feature = request.args.get('feature', 'all')
    
    data = get_analytics_data(period, feature)
    return render_template('analytics.html', data=data)
When to Use Each Pattern

Use dynamic routes (/artist/<artist_id>) when the parameter identifies a resource. Think of it as "Show me details about THIS artist" or "Display THIS playlist." The parameter is required; without it, the page has no meaning. Dynamic routes create clean, bookmarkable URLs.

Use query parameters (/search?q=jazz) for optional filters, search terms, or settings that modify behavior. The page works without them (shows defaults), but they customize the results. Query parameters are perfect for filtering, sorting, pagination, and search. Anything where you want users to be able to share customized links.

The Music Dashboard uses dynamic routes for artist/playlist details and query parameters for analytics filtering. This combination gives users intuitive URLs and flexible filtering without URL clutter.

Generating URLs the Flask Way: url_for()

When you hardcode URLs in your templates like <a href="/analytics">, you create maintenance problems. If you later change the route from @app.route('/analytics') to @app.route('/stats'), you must manually update every link. Miss one, and your navigation breaks. Flask provides url_for() to generate URLs dynamically based on function names, not hardcoded paths.

This isn't just about convenience. It's about maintainability. Professional Flask applications change routes frequently during development. URL patterns shift as features evolve. Deployment environments add prefixes like /app/dashboard instead of /dashboard. Hardcoded URLs break in all these scenarios. The url_for() handles them automatically.

1.

The Problem with Hardcoded URLs

Here's what happens when you hardcode paths:

Fragile Approach
Python - app.py
from flask import Flask, render_template, redirect

app = Flask(__name__)

@app.route('/')
def home():
    return render_template('home.html')

@app.route('/analytics')
def analytics():
    return render_template('analytics.html')

@app.route('/sync-data')
def sync_data():
    # Sync Spotify data...
    return redirect('/analytics')  # Hardcoded URL
HTML - home.html
<nav>
  <a href="/">Home</a>
  <a href="/analytics">Analytics</a>  <!-- Hardcoded path -->
  <a href="/playlists">Playlists</a>
</nav>

The breaking point: You decide to rename the analytics route to @app.route('/stats') for clarity. Now you must search through every Python file (for redirect('/analytics') calls) and every HTML template (for href="/analytics" links). Miss one occurrence, and your navigation breaks. Testing catches some errors, but not all. You might miss a rarely-used redirect in an error handler.

2.

Basic url_for() Usage

url_for() solves this by referencing function names instead of URL paths:

Maintainable Approach
Python - app.py
from flask import Flask, render_template, redirect, url_for

app = Flask(__name__)

@app.route('/')
def home():
    return render_template('home.html')

@app.route('/analytics')
def analytics():
    return render_template('analytics.html')

@app.route('/sync-data')
def sync_data():
    # Sync Spotify data...
    return redirect(url_for('analytics'))  # References function name
HTML - home.html


<nav>
  <a href="{{ url_for('home') }}">Home</a>
  <a href="{{ url_for('analytics') }}">Analytics</a>
  <a href="{{ url_for('playlists') }}">Playlists</a>
</nav>

The benefit: Change the route to @app.route('/stats'), and every url_for('analytics') call automatically generates /stats. No template changes needed. No risk of broken links. The function name stays the same, the URL can change freely.

3.

Passing Parameters to url_for()

Routes often include dynamic segments like /playlist/<playlist_id>. url_for() handles parameters elegantly:

Python - Route with Parameter
@app.route('/playlist/<playlist_id>')
def view_playlist(playlist_id):
    playlist = get_playlist_from_db(playlist_id)
    return render_template('playlist.html', playlist=playlist)
HTML - Generating Links with Parameters


<ul>
  {% for playlist in playlists %}
    <li>
      <a href="{{ url_for('view_playlist', playlist_id=playlist.id) }}">
        {{ playlist.name }}
      </a>
    </li>
  {% endfor %}
</ul>

<!-- Generates: /playlist/abc123, /playlist/xyz789, etc. -->

For query parameters (like ?range=short&limit=50), pass them as additional keyword arguments:

HTML - Query Parameters


<a href="{{ url_for('analytics', range='short', limit=50) }}">
  Short-term Analytics (50 tracks)
</a>

<!-- Generates: /analytics?range=short&limit=50 -->

Flask automatically URL-encodes the parameters, handles special characters, and formats the query string correctly. You never construct URLs manually with string concatenation.

4.

url_for() with Static Files

Static files (CSS, JavaScript, images) require special handling. Flask serves them from the /static directory, but you should still use url_for() to reference them:

HTML - Linking Static Files


<!-- CSS -->
<link rel="stylesheet" href="{{ url_for('static', filename='css/dashboard.css') }}">

<!-- JavaScript -->
<script src="{{ url_for('static', filename='js/charts.js') }}"></script>

<!-- Images -->
<img src="{{ url_for('static', filename='images/logo.png') }}" alt="Logo">

Why not just write <link href="/static/css/dashboard.css">? Because deployment environments might change the static file location. Some hosting platforms use CDNs, others add path prefixes. url_for('static', ...) adapts to these environments automatically. Your templates stay portable.

When to Use url_for()

Always use url_for() for:

  • Internal application links ( href="{{ url_for('analytics') }}" )
  • Redirects after form submissions (redirect(url_for('home')))
  • Static file references (url_for('static', filename='...'))
  • Links with dynamic parameters (url_for('view_playlist', playlist_id=id))

Don't use url_for() for:

  • External links (<a href="https://spotify.com">)
  • Anchor links on the same page (<a href="#section-2">)
  • mailto: or tel: links (<a href="mailto:alice@example.com">)

From this point forward, every link in the Music Time Machine dashboard will use url_for(). This habit, referencing function names instead of paths, is one of the markers that separates beginner Flask code from production Flask code. It costs you nothing to implement, saves hours of refactoring pain, and demonstrates professional development practices to anyone reviewing your portfolio.

Flask's Request/Response Cycle

Every web interaction follows the same pattern: browser sends request, server processes request, server sends response, browser displays result. Flask provides three main ways to return responses.

Diagram titled 'Flask Request/Response Cycle'. Five numbered steps connected by blue arrows: (1) Browser visits /dashboard, (2) Flask Router matches @app.route(), (3) Python Function queries the database, (4) Flask calls render_template(), (5) Browser displays the page. A dashed return arrow underneath is labelled 'HTTP Response'.
Every time a user visits a URL, Flask routes the request to your Python function, runs your code, and sends the result back as a web page.

Returning HTML with render_template(): The most common pattern for web pages. Flask combines your data with an HTML template and sends the result to the browser:

Python - Rendering HTML Templates
from flask import render_template

@app.route('/')
def home():
    # Query database for statistics
    stats = {
        'total_tracks': 1247,
        'listening_hours': 68.5,
        'active_days': 142
    }
    
    # Pass data to template
    # Flask looks for templates/home.html
    return render_template('home.html', stats=stats)

In the template (templates/home.html), access data using Jinja2 syntax:

HTML - Home Dashboard Template


<!-- templates/home.html -->
<h1>Music Dashboard</h1>
<p>Total Tracks: {{ stats.total_tracks }}</p>
<p>Listening Time: {{ stats.listening_hours }} hours</p>
<p>Active Days: {{ stats.active_days }}</p>

Returning JSON with jsonify(): For API endpoints that provide data to JavaScript or external clients. Common in AJAX interactions:

Python - JSON API Endpoint
from flask import jsonify

@app.route('/api/stats')
def api_stats():
    stats = {
        'total_tracks': 1247,
        'listening_hours': 68.5,
        'active_days': 142
    }
    
    # Return JSON response
    # Sets Content-Type: application/json header automatically
    return jsonify(stats)

JavaScript code can fetch this endpoint and use the data:

JavaScript - Fetching JSON Data
// JavaScript fetches JSON data
fetch('/api/stats')
    .then(response => response.json())
    .then(data => {
        console.log('Total tracks:', data.total_tracks);
        // Update page without reload
    });

Redirecting with redirect(): Send users to a different URL. Common after form submissions or authentication:

Python - Redirecting Users
from flask import redirect, url_for

@app.route('/login')
def login():
    # Start OAuth flow (Chapter 15 logic)
    auth_url = spotify_client.get_authorization_url()
    return redirect(auth_url)

@app.route('/callback')
def callback():
    # OAuth callback (Chapter 15 logic)
    code = request.args.get('code')
    spotify_client.get_access_token(code)
    
    # After successful login, redirect to home
    return redirect(url_for('home'))

The url_for() function generates URLs based on function names. Instead of hardcoding redirect('/'), use redirect(url_for('home')). If you later change the home route from / to /dashboard, url_for('home') still works. Hard-coded URLs break.

HTTP Methods: GET vs POST

By default, Flask routes accept only GET requests (retrieving data). To handle form submissions or data modifications, specify allowed methods:

Python - Handling GET and POST
@app.route('/generate-playlist', methods=['GET', 'POST'])
def generate_playlist():
    if request.method == 'POST':
        # Handle form submission
        time_range = request.form.get('time_range')
        playlist = create_forgotten_gems(time_range)
        return render_template('playlist.html', playlist=playlist)
    else:
        # GET request - show form
        return render_template('generate_form.html')

GET requests should never modify data. They're for reading. POST requests modify data (create playlists, update settings). This distinction prevents accidental changes from browser prefetching or link sharing.

These three patterns. HTML rendering, JSON responses, and redirects, handle 95% of web application needs. The Music Dashboard uses all three: HTML for pages, JSON for chart data, and redirects for OAuth flows.

Handling Errors Gracefully: Custom Error Pages

When users navigate to /nonexistent-page, Flask shows a generic error message. When your database connection fails, users see an ugly stack trace. These default error pages work for development, but they're unprofessional in production. They leak technical details, confuse users, and make your application feel unfinished.

Flask provides error handlers that let you customize these pages. You can show friendly messages, maintain your site's design, and provide helpful navigation options. More importantly, you can log errors for debugging while showing users clean, reassuring interfaces.

1.

The Default 404 Experience

Without custom error handling, Flask shows this when users visit invalid URLs:

Default Flask 404 Page

Not Found
The requested URL was not found on the server. If you entered the URL manually please check your spelling and try again.

This message is accurate but unhelpful. It doesn't match your dashboard's design. It doesn't offer navigation back to working pages. It feels like your application broke, even though everything's working fine. The user just typed the wrong URL.

2.

Creating a Custom 404 Handler

Error handlers use the @app.errorhandler() decorator. Here's how to create a friendly 404 page:

Python - app.py
from flask import Flask, render_template

app = Flask(__name__)

@app.errorhandler(404)
def page_not_found(error):
    """Handle 404 errors with a custom page."""
    return render_template('404.html'), 404

@app.route('/')
def home():
    return render_template('home.html')

@app.route('/analytics')
def analytics():
    return render_template('analytics.html')

The error handler function receives the error object as a parameter (though you often don't need it). It returns two values: the template to render and the HTTP status code (404). Always include the status code, browsers and search engines use it to understand what happened.

HTML - templates/404.html


{% extends "base.html" %}

{% block content %}
<div class="error-container">
  <h1>Page Not Found</h1>
  <p>The page you're looking for doesn't exist.</p>
  
  <div class="error-actions">
    <a href="{{ url_for('home') }}" class="btn btn-primary">
      Go to Dashboard
    </a>
    <a href="{{ url_for('analytics') }}" class="btn btn-secondary">
      View Analytics
    </a>
  </div>
</div>
{% endblock %}

Notice the error template extends base.html, just like your regular pages. Users see the same navigation bar, the same styling, the same branding. The only difference is the message and the helpful action buttons. This maintains consistency and reduces confusion.

3.

When Error Handlers Run

Flask automatically calls error handlers when specific conditions occur:

  • 404 (Not Found): User requests a URL with no matching route
  • 403 (Forbidden): User tries to access a protected resource
  • 500 (Internal Server Error): Your code raises an unhandled exception
  • 400 (Bad Request): Request data is malformed or invalid

You don't explicitly call these handlers in your code. They trigger automatically when Flask encounters the corresponding HTTP status code. This means any route can trigger the 404 handler by raising a NotFound exception, or the 500 handler by letting an exception propagate.

Why Return Status Codes?

When you return render_template('404.html'), 404, the template and status code serve different purposes:

The template (first value): What users see in their browser: the HTML page with your custom message.

The status code (second value): What browsers and search engines use to understand what happened. A 404 tells search engines "don't index this page." A 200 (success) would tell them "this is valid content," which is wrong for error pages.

Always include the correct status code. Without it, Flask defaults to 200, which confuses search engines and breaks caching strategies.

This basic error handling improves user experience immediately. When you visit /wrong-url in your Music Time Machine, you see a helpful page with navigation options instead of a generic error message. This is the foundation. Later in this chapter, you'll expand error handling to cover database failures and API errors when building the Home Dashboard.

For now, understanding that Flask has an error handling system is enough. You've seen how to customize the 404 page, which is the most common error users encounter. The pattern for other error codes (403, 500) is identical, just change the decorator and template. We'll revisit this when we need to handle more complex error scenarios.

3. The CSS Starter Kit & Template System

Why We're Using a Starter Kit

Writing CSS from scratch for a dashboard project can consume 5-10 hours easily. You'll spend time debugging flexbox layouts, troubleshooting mobile breakpoints, and tweaking color schemes. That's time not spent on Flask routing, database queries, or API integration, the actual learning objectives of this chapter.

Professional developers use CSS frameworks (Bootstrap, Tailwind, Bulma) or component libraries for exactly this reason. They focus on business logic and user experience, not reinventing responsive grid systems. This chapter follows the same philosophy.

The provided dashboard.css starter kit includes:

  • Responsive grid system using CSS Grid and Flexbox that adapts to mobile, tablet, and desktop without media query debugging
  • Pre-styled components including cards, buttons, navigation bars, and form elements with consistent spacing and colors
  • Chart containers specifically designed for Chart.js visualizations with proper aspect ratios and responsive behavior
  • Typography scale with readable font sizes, line heights, and hierarchy that works across device sizes
  • Color variables using CSS custom properties that let you rebrand the entire dashboard by changing 5-6 values
  • Mobile-first design that looks professional on phones without extra effort, then progressively enhances for larger screens

You'll import this stylesheet in your base template and immediately have professional-looking pages. Want to customize colors? Change a few CSS variables. Need different spacing? Adjust the grid gap. But you won't spend days debugging why a navigation bar won't center on mobile.

Time-to-Value Calculation

Building this dashboard with custom CSS: ~12-15 hours (Flask learning + CSS debugging + responsive testing).
Building this dashboard with the starter kit: ~4-6 hours (Flask learning, skip CSS debugging).
Time saved: ~8-9 hours. Time better spent: practicing Flask patterns, adding features, or working on other portfolio projects.

In professional environments, "borrowing" established CSS patterns isn't cheating. It's smart resource allocation. Your job is to deliver working software, not reinvent every component from scratch. This chapter teaches you to work like a professional: use existing tools where they make sense, build custom solutions where they don't.

The Provided Stylesheet: dashboard.css

The starter kit stylesheet provides everything you need for the Music Dashboard. Download it and save it as static/css/dashboard.css in your project directory. Here's what it contains:

CSS
/* dashboard.css - Music Time Machine Starter Kit */

/* CSS Variables for easy customization */
:root {
    --primary-color: #1DB954;      /* Spotify green */
    --secondary-color: #191414;     /* Dark background */
    --text-color: #FFFFFF;
    --text-muted: #B3B3B3;
    --card-background: #282828;
    --border-color: #404040;
    --success-color: #1ed760;
    --error-color: #e22134;
    --spacing-unit: 1rem;
}

/* Base Reset */
* {
    margin: 0;
    padding: 0;
    box-sizing: border-box;
}

body {
    font-family: -apple-system, BlinkMacSystemFont, 'Segoe UI', Roboto, Oxygen, Ubuntu, Cantarell, sans-serif;
    background-color: var(--secondary-color);
    color: var(--text-color);
    line-height: 1.6;
    min-height: 100vh;
}

/* Container and Layout */
.container {
    max-width: 1200px;
    margin: 0 auto;
    padding: calc(var(--spacing-unit) * 2);
}

/* Navigation Bar */
.navbar {
    background-color: var(--card-background);
    border-bottom: 1px solid var(--border-color);
    padding: var(--spacing-unit);
}

.navbar-content {
    max-width: 1200px;
    margin: 0 auto;
    display: flex;
    justify-content: space-between;
    align-items: center;
}

.navbar-brand {
    font-size: 1.5rem;
    font-weight: bold;
    color: var(--primary-color);
    text-decoration: none;
}

.navbar-menu {
    display: flex;
    gap: calc(var(--spacing-unit) * 1.5);
    list-style: none;
}

.navbar-link {
    color: var(--text-muted);
    text-decoration: none;
    transition: color 0.2s;
}

.navbar-link:hover,
.navbar-link.active {
    color: var(--text-color);
}

/* Cards */
.card {
    background-color: var(--card-background);
    border: 1px solid var(--border-color);
    border-radius: 8px;
    padding: calc(var(--spacing-unit) * 1.5);
    margin-bottom: calc(var(--spacing-unit) * 1.5);
}

.card-header {
    font-size: 1.25rem;
    font-weight: 600;
    margin-bottom: var(--spacing-unit);
    color: var(--text-color);
}

.card-content {
    color: var(--text-muted);
}

/* Stats Grid */
.stats-grid {
    display: grid;
    grid-template-columns: repeat(auto-fit, minmax(250px, 1fr));
    gap: calc(var(--spacing-unit) * 1.5);
    margin-bottom: calc(var(--spacing-unit) * 2);
}

.stat-card {
    background-color: var(--card-background);
    border: 1px solid var(--border-color);
    border-radius: 8px;
    padding: calc(var(--spacing-unit) * 1.5);
    text-align: center;
}

.stat-value {
    font-size: 2.5rem;
    font-weight: bold;
    color: var(--primary-color);
    margin-bottom: 0.5rem;
}

.stat-label {
    font-size: 0.875rem;
    color: var(--text-muted);
    text-transform: uppercase;
    letter-spacing: 0.05em;
}

/* Chart Container */
.chart-container {
    background-color: var(--card-background);
    border: 1px solid var(--border-color);
    border-radius: 8px;
    padding: calc(var(--spacing-unit) * 1.5);
    margin-bottom: calc(var(--spacing-unit) * 2);
}

.chart-container canvas {
    width: 100% !important;
    height: auto !important;
}

/* Buttons */
.btn {
    display: inline-block;
    padding: 0.75rem 1.5rem;
    font-size: 1rem;
    font-weight: 500;
    text-decoration: none;
    text-align: center;
    border-radius: 500px;
    border: none;
    cursor: pointer;
    transition: all 0.2s;
}

.btn-primary {
    background-color: var(--primary-color);
    color: var(--secondary-color);
}

.btn-primary:hover {
    background-color: #1ed760;
    transform: scale(1.05);
}

.btn-secondary {
    background-color: transparent;
    color: var(--text-color);
    border: 1px solid var(--border-color);
}

.btn-secondary:hover {
    border-color: var(--text-color);
}

/* Form Elements */
input[type="text"],
input[type="number"],
select,
textarea {
    width: 100%;
    padding: 0.75rem;
    background-color: var(--card-background);
    border: 1px solid var(--border-color);
    border-radius: 4px;
    color: var(--text-color);
    font-size: 1rem;
    margin-bottom: var(--spacing-unit);
}

input:focus,
select:focus,
textarea:focus {
    outline: none;
    border-color: var(--primary-color);
}

/* Responsive Design */
@media (max-width: 768px) {
    .navbar-menu {
        flex-direction: column;
        gap: var(--spacing-unit);
    }
    
    .stats-grid {
        grid-template-columns: 1fr;
    }
    
    .container {
        padding: var(--spacing-unit);
    }
}

This stylesheet provides professional styling with minimal configuration. Save it to static/css/dashboard.css and link it in your HTML templates. You'll immediately get Spotify-themed colors, responsive cards, and properly formatted charts.

Customizing Colors and Fonts

Want different colors? Change the CSS variables at the top. For example, to switch from Spotify green to blue:

CSS - Customizing Color Scheme
:root {
    --primary-color: #0066FF;  /* Change this line */
    /* Keep everything else the same */
}

The entire dashboard updates automatically because all colors reference var(--primary-color). This is the power of CSS custom properties, global theme changes with one edit.

Similarly, want a different font? Change the font-family in the body selector. Or add custom fonts by including Google Fonts in your base template.

Organizing Static Files & Solving Cache Problems

Static files (CSS, JavaScript, images, are the assets that don't change dynamically. Flask serves them from the /static directory, but as your project grows, organization matters. A flat directory with 50 files becomes unmaintainable. You can't find the CSS you need, image names clash, and JavaScript files pile up without structure.

Worse, browsers cache static files aggressively. This creates a frustrating problem: you update your CSS, deploy to production, and users still see the old styles. Their browsers serve cached versions instead of fetching your updates. You've fixed the bug, but users still report it. This section shows you how to organize static files properly and defeat browser caching.

1.

Directory Structure for Static Files

Organize static files by type using subdirectories:

Directory Structure
music-dashboard/
├── app.py
├── templates/
│   ├── base.html
│   ├── home.html
│   └── analytics.html
└── static/
    ├── css/
    │   ├── dashboard.css      # Main stylesheet
    │   └── charts.css         # Chart-specific styles
    ├── js/
    │   ├── charts.js          # Chart.js initialization
    │   └── interactions.js    # Button handlers, AJAX calls
    └── images/
        ├── logo.png
        └── icons/
            ├── playlist.svg
            └── analytics.svg

This structure scales well. Add more CSS files to /css, more scripts to /js, more images to /images. Each category stays organized. You'll never wonder "which directory has the dashboard styles?" because there's only one logical place.

HTML - Referencing Organized Static Files


<!-- CSS -->
<link rel="stylesheet" href="{{ url_for('static', filename='css/dashboard.css') }}">
<link rel="stylesheet" href="{{ url_for('static', filename='css/charts.css') }}">

<!-- JavaScript -->
<script src="{{ url_for('static', filename='js/charts.js') }}"></script>
<script src="{{ url_for('static', filename='js/interactions.js') }}"></script>

<!-- Images -->
<img src="{{ url_for('static', filename='images/logo.png') }}" alt="Logo">
<img src="{{ url_for('static', filename='images/icons/playlist.svg') }}" alt="Playlist">

Notice how subdirectories appear in the filename parameter: 'css/dashboard.css', not just 'dashboard.css'. Flask looks relative to the /static directory, so 'css/dashboard.css' maps to /static/css/dashboard.css.

2.

The Browser Caching Problem

Browsers cache static files to load pages faster. When you visit a site, the browser saves CSS and JavaScript locally. Next visit, it uses the cached version instead of downloading files again. This is efficient until you need to update those files.

The frustrating scenario:

  1. You write dashboard.css with a bug (buttons are the wrong color)
  2. Users visit your site. Their browsers cache the buggy CSS.
  3. You fix the CSS and redeploy.
  4. Users refresh the page. They still see buggy buttons because their browser serves the cached CSS.
  5. Users report the bug. You say "it's fixed!" They say "no it isn't!" You both get frustrated.

This happens constantly in web development. CSS updates, JavaScript changes, images get replaced, but users keep seeing old versions. You need a way to force browsers to fetch new versions when files change.

3.

Cache Busting with Query Parameters

The solution is cache busting: add a version number to your file URLs. When the version changes, browsers treat it as a completely new file and fetch it fresh. The simplest approach uses query parameters:

HTML - Manual Versioning


<!-- Version 1.0 -->
<link rel="stylesheet" href="{{ url_for('static', filename='css/dashboard.css') }}?v=1.0">

<!-- After updating CSS, change to version 1.1 -->
<link rel="stylesheet" href="{{ url_for('static', filename='css/dashboard.css') }}?v=1.1">

When the URL changes from ?v=1.0 to ?v=1.1, browsers see a different URL and fetch the file again. The query parameter doesn't change what file Flask serves. Files like dashboard.css?v=1.0 and dashboard.css?v=1.1 both serve the same file. But browsers treat them as separate resources.

The problem with manual versioning: You must remember to update version numbers after every change. Forget once, and users get stale CSS. This is tedious and error-prone.

4.

Automatic Cache Busting with Jinja Filters

A better approach uses the file's modification time as the version. When you update a file, its modification timestamp changes automatically. Create a custom Jinja filter that appends this timestamp:

Python - Auto-Versioning Filter
import os
from flask import Flask

app = Flask(__name__)

@app.template_filter('autoversion')
def autoversion_filter(filename):
    """Add file modification time as version parameter."""
    # Build full path to the file
    fullpath = os.path.join(app.root_path, 'static', filename)
    
    try:
        # Get modification timestamp
        timestamp = str(os.path.getmtime(fullpath))
    except OSError:
        # File doesn't exist, use 0 as version
        timestamp = '0'
    
    return f"{filename}?v={timestamp}"
HTML - Using the Autoversion Filter


<link rel="stylesheet" 
      href="{{ url_for('static', filename='css/dashboard.css'|autoversion) }}">

<!-- Generates: /static/css/dashboard.css?v=1733315123.456 -->
<!-- Version updates automatically when file changes -->

The pipe syntax |autoversion applies the filter to the filename. Now when you modify dashboard.css, its timestamp changes, the version parameter changes, and browsers fetch the new version. You never manually update version numbers.

What's a Jinja filter? Filters transform values in templates. Jinja includes built-in filters like |upper (uppercase text) and |length (count items). The @app.template_filter() decorator lets you create custom filters for project-specific needs.

Cache Busting Trade-offs

File hashing (production approach): Some build tools generate filenames with content hashes: dashboard.a3f8b2c.css. The hash changes only when content changes, producing optimal caching. This requires build tools (webpack, Vite) which add complexity.

Timestamp versioning (our approach): Simple to implement, no build tools needed. Works perfectly for development and small-to-medium projects. The timestamp changes on every file save, even if content is identical (minor inefficiency).

Manual versioning: Full control but requires discipline. Best when you release versioned updates (v1.0, v2.0) rather than continuous deployment.

For the Music Time Machine, timestamp versioning is ideal. It's automatic, requires no build tools, and handles the small number of static files without overhead.

Static File Best Practices
  • ✅ Organize by type: css/, js/, images/
  • ✅ Use url_for('static', ...) for all references
  • ✅ Use CDNs for common libraries (Chart.js, Bootstrap)
  • ✅ Host custom code locally (your dashboard.css, your charts.js)
  • ✅ Implement cache busting for files that change frequently
  • ✅ Compress images before deploying (use tools like ImageOptim)
  • ✅ Minify CSS/JS in production (reduces file size)
  • ❌ Don't hardcode /static/ paths in templates
  • ❌ Don't store secrets or config files in /static (publicly accessible!)
  • ❌ Don't commit node_modules or large files to git

For the Music Time Machine, place the CSS starter kit in /static/css/, Chart.js initialization code in /static/js/, and any custom images in /static/images/. Apply the autoversion filter to CSS and JavaScript files to prevent cache issues during development and deployment. This organization keeps the project clean as you add features in Chapter 18.

Good static file management is invisible when done right. Users get the latest styles, scripts load correctly, images display properly. It only becomes visible when done wrong. Then you're debugging "phantom bugs" that exist only in user caches, wondering why your fixes don't work. Learn these patterns now, and you'll never chase cache-related bugs.

Jinja2 Template Basics

Flask uses Jinja2 for templating. Jinja2 lets you write HTML with embedded Python-like expressions. Flask processes these templates server-side, replacing variables and control structures with actual data, then sends pure HTML to the browser.

Jinja2 has three core syntax elements:

1.

Variable Interpolation: {{ variable }}

Double curly braces output variables. Flask replaces {{ username }} with the actual username value you passed to render_template().

HTML - Template Variables


<!-- In Python: render_template('home.html', username='Alex', track_count=1247) -->

<h1>Welcome, {{ username }}!</h1>
<p>You have {{ track_count }} tracks in your library.</p>

<!-- Browser sees: -->
<!-- <h1>Welcome, Alex!</h1> -->
<!-- <p>You have 1247 tracks in your library.</p> -->

2.

Control Structures: {% if %}, {% for %}

Curly brace-percent syntax executes Python-like logic. Conditionals, loops, and other control flow happens at template rendering time.

HTML - Template Control Flow


<!-- Conditional rendering -->
{% if track_count > 1000 %}
    <p>You're a power listener!</p>
{% else %}
    <p>Keep discovering new music!</p>
{% endif %}

<!-- Loop through data -->
<ul>
{% for track in top_tracks %}
    <li>{{ track.name }} by {{ track.artist }}</li>
{% endfor %}
</ul>

3.

Comments:

Curly brace-hash syntax creates comments that don't appear in the final HTML sent to browsers.

HTML - Template Comments

<p>Visible content</p>

<!-- This HTML comment WILL appear in browser HTML -->
<p>More visible content</p>

Jinja2 also supports filters to transform data inline. Common filters include |tojson (convert Python dict to JSON), |safe (render HTML without escaping), |default (provide fallback values), and |length (get list length):

HTML - Accessing Nested Data


<!-- Convert Python dict to JSON for JavaScript -->
<script>
    const chartData = {{ chart_data|tojson|safe }};
</script>

<!-- Provide default value if variable is None -->
<p>Genre: {{ track.genre|default('Unknown') }}</p>

<!-- Get length of list -->
<p>You have {{ playlists|length }} playlists</p>

Security: Automatic Escaping

Jinja2 automatically escapes HTML in variables to prevent XSS (Cross-Site Scripting) attacks. If a variable contains <script>alert('hack')</script>, Jinja2 converts it to harmless text: &lt;script&gt;alert('hack')&lt;/script&gt;.

Only use the |safe filter when you absolutely trust the data source. Never use |safe on user input. That's how XSS vulnerabilities happen.

Template Inheritance: base.html

Every page in your dashboard shares common elements: the <head> section with CSS links, the navigation bar, the footer. Copying this HTML across five templates violates the DRY (Don't Repeat Yourself) principle. When you want to change the navigation, you'd need to edit five files. That's error-prone and tedious.

Template inheritance solves this. Create a base.html template with the common structure and "blocks" where child templates insert unique content. Child templates extend the base and fill in the blocks.

Diagram titled 'Jinja2 Template Inheritance'. A dark blue base.html box at the top labelled 'navbar, footer, CSS links' with a dotted arrow from includes/navbar.html labelled 'include'. Three arrows point down to home.html, analytics.html, and settings.html — each labelled 'extends base.html' with a 'block content' section highlighted inside.
Define your layout once in base.html. Every page inherits it automatically — change one file, update every page.

Create templates/base.html:

HTML - Base Template Structure


<!-- templates/base.html -->
<!DOCTYPE html>
<html lang="en">
<head>
    <meta charset="UTF-8">
    <meta name="viewport" content="width=device-width, initial-scale=1.0">
    <title>{% block title %}Music Time Machine{% endblock %}</title>
    
    <!-- CSS Starter Kit -->
    <link rel="stylesheet" href="{{ url_for('static', filename='css/dashboard.css') }}">
    
    <!-- Chart.js from CDN -->
    <script src="https://cdn.jsdelivr.net/npm/alice@example.com/dist/chart.umd.min.js"></script>
    
    {% block extra_head %}{% endblock %}
</head>
<body>
    <!-- Navigation Bar (will be included from separate file) -->
    {% include 'includes/navbar.html' %}
    
    <!-- Main Content Area -->
    <main class="container">
        <!-- Flash messages for user feedback -->
        {% with messages = get_flashed_messages(with_categories=true) %}
            {% if messages %}
                <div class="messages">
                {% for category, message in messages %}
                    <div class="alert alert-{{ category }}">{{ message }}</div>
                {% endfor %}
                </div>
            {% endif %}
        {% endwith %}
        
        <!-- Child templates insert content here -->
        {% block content %}{% endblock %}
    </main>
    
    <!-- Footer -->
    <footer class="footer">
        <div class="container">
            <p>© 2024 Music Time Machine. Built with Flask and Spotify API.</p>
        </div>
    </footer>
    
    {% block scripts %}{% endblock %}
</body>
</html>

This base template defines the overall page structure and four blocks where child templates customize content:

  • {% block title %} : Page title in browser tab (defaults to "Music Time Machine")
  • {% block extra_head %} : Additional CSS or meta tags specific to certain pages
  • {% block content %} : Main page content (home dashboard, analytics, playlists)
  • {% block scripts %} : Page-specific JavaScript at the bottom

The {{ url_for('static', filename='css/dashboard.css') }} syntax generates URLs for static files. Flask converts this to /static/css/dashboard.css in production, handling different deployment configurations automatically. Never hardcode static file paths.

Now create a child template that extends this base. Create templates/home.html:

HTML - Home Dashboard Template


<!-- templates/home.html -->
{% extends 'base.html' %}

{% block title %}Home - Music Time Machine{% endblock %}

{% block content %}
    <h1>Music Dashboard</h1>
    
    <!-- Stats cards will go here -->
    <div class="stats-grid">
        <div class="stat-card">
            <div class="stat-value">{{ stats.total_tracks }}</div>
            <div class="stat-label">Total Tracks</div>
        </div>
        <div class="stat-card">
            <div class="stat-value">{{ stats.listening_hours }}</div>
            <div class="stat-label">Listening Hours</div>
        </div>
        <div class="stat-card">
            <div class="stat-value">{{ stats.active_days }}</div>
            <div class="stat-label">Active Days</div>
        </div>
    </div>
    
    <!-- Chart will go here -->
    <div class="chart-container">
        <canvas id="timelineChart"></canvas>
    </div>
{% endblock %}

{% block scripts %}
    <!-- Chart configuration JavaScript will go here -->
    <script src="{{ url_for('static', filename='js/charts.js') }}"></script>
{% endblock %}

The {% extends 'base.html' %} line tells Jinja2 to use base.html as the parent template. The child template only defines blocks it wants to customize. Everything else (HTML structure, navigation, footer) comes from the base.

When Flask renders home.html, it combines base and child: the base provides the overall structure, the child provides the specific content. The result is a complete HTML page with no duplicated code.

The Power of Template Inheritance

You'll create three more dashboard pages in Chapter 18: Analytics, Playlist Manager, and Settings. Each extends base.html and only defines its {% block content %} . That's it. The navigation, CSS links, Chart.js script, and footer come from the base automatically.

Want to add a new link to the navigation bar? Edit one file (includes/navbar.html), and all pages update instantly. Want to switch from Chart.js to Plotly? Change one <script> tag in base.html. This is professional template management, minimal duplication, maximum maintainability.

Modular Components: includes/navbar.html

Template inheritance handles overall page structure. For smaller, reusable components like navigation bars, sidebars, or footers, use the {% include %} directive. This inserts content from another template file directly into the current template.

Create templates/includes/navbar.html:

HTML - Navigation Component


<!-- templates/includes/navbar.html -->
<nav class="navbar">
    <div class="navbar-content">
        <a href="{{ url_for('home') }}" class="navbar-brand">
            🎵 Music Time Machine
        </a>
        
        <ul class="navbar-menu">
            <li>
                <a href="{{ url_for('home') }}" 
                   class="navbar-link {% if request.endpoint == 'home' %}active{% endif %}">
                    Home
                </a>
            </li>
            <li>
                <a href="{{ url_for('analytics') }}" 
                   class="navbar-link {% if request.endpoint == 'analytics' %}active{% endif %}">
                    Analytics
                </a>
            </li>
            <li>
                <a href="{{ url_for('playlists') }}" 
                   class="navbar-link {% if request.endpoint == 'playlists' %}active{% endif %}">
                    Playlists
                </a>
            </li>
            <li>
                <a href="{{ url_for('settings') }}" 
                   class="navbar-link {% if request.endpoint == 'settings' %}active{% endif %}">
                    Settings
                </a>
            </li>
        </ul>
    </div>
</nav>

This navigation bar uses url_for() to generate links and request.endpoint to highlight the current page. Flask's request object is available in all templates automatically.

The {% if request.endpoint == 'home' %}active{% endif %} logic adds the active CSS class to the current page's link. The CSS starter kit styles .navbar-link.active differently (brighter color), providing visual feedback about the current page.

In base.html, you already included this navbar with {% include 'includes/navbar.html' %} . Every page that extends base.html automatically gets this navigation bar. Change the navbar once, update every page.

Mobile Navigation Collapse

The CSS starter kit includes media queries that stack the navbar menu vertically on mobile devices. On phones, the .navbar-menu flexbox changes from flex-direction: row to flex-direction: column. No JavaScript required. CSS handles responsive behavior automatically.

If you wanted a hamburger menu (three-line icon that expands on click), you'd add JavaScript to toggle a .show class. But for the dashboard, a simple vertical stack works perfectly on mobile. Keep it simple until you need complexity.

Giving Users Feedback with Flash Messages

When a user clicks "Sync Data" and the page reloads, nothing visible happens. Did the sync work? Did it fail? Should they click again? Without feedback, users feel uncertain. They click repeatedly, refresh obsessively, or assume your application is broken. This is especially frustrating for actions that take several seconds, like syncing Spotify data or creating playlists.

Flask provides flash messages to solve this. Flash messages are one-time notifications that appear after redirects. You set the message in your route, redirect to another page, and Flask displays the message on the destination page. After the message displays once, Flask automatically removes it. This pattern works perfectly for form submissions, data synchronization, and any action that needs confirmation.

1.

How Flash Messages Work

Flash messages follow a simple three-step pattern:

Python - Setting a Flash Message
from flask import Flask, redirect, url_for, flash, render_template

app = Flask(__name__)
app.secret_key = 'your-secret-key-here'  # Required for flash messages

@app.route('/sync-data')
def sync_data():
    """Sync Spotify listening history."""
    try:
        # Call your sync function from Chapter 16
        tracks_synced = sync_spotify_data()
        
        # Step 1: Set the flash message
        flash(f'Successfully synced {tracks_synced} tracks!', 'success')
        
    except Exception as e:
        flash(f'Sync failed: {str(e)}', 'error')
    
    # Step 2: Redirect to another page
    return redirect(url_for('home'))

The flash() function takes two arguments: the message text and a category. Categories let you style messages differently, success messages in green, errors in red, warnings in yellow. Flask stores the message in the session (which requires secret_key) and delivers it on the next request.

HTML - Displaying Flash Messages in base.html


<!DOCTYPE html>
<html>
<head>
  <title>Music Time Machine</title>
  <link rel="stylesheet" href="{{ url_for('static', filename='css/dashboard.css') }}">
</head>
<body>
  <nav>
    <!-- Navigation links -->
  </nav>

  <!-- Step 3: Display flash messages -->
  {% with messages = get_flashed_messages(with_categories=true) %}
    {% if messages %}
      <div class="flash-messages">
        {% for category, message in messages %}
          <div class="flash flash-{{ category }}">
            {{ message }}
          </div>
        {% endfor %}
      </div>
    {% endif %}
  {% endwith %}

  <main>
    {% block content %}{% endblock %}
  </main>
</body>
</html>

Place this flash message block in base.html so every page can display messages. The get_flashed_messages(with_categories=true) function retrieves all pending messages and their categories. Flask automatically clears them after display, so refreshing the page won't show the message again.

2.

Styling Flash Messages

Flash messages need visual distinction, users should immediately recognize success versus error. Here's CSS for the four standard message types:

CSS - Flash Message Styles
/* Flash message container */
.flash-messages {
  position: fixed;
  top: 20px;
  right: 20px;
  z-index: 1000;
  max-width: 400px;
}

/* Base flash message styles */
.flash {
  padding: 1rem 1.5rem;
  margin-bottom: 0.5rem;
  border-radius: 4px;
  border-left: 4px solid;
  background: white;
  box-shadow: 0 2px 8px rgba(0,0,0,0.1);
  animation: slideIn 0.3s ease-out;
}

/* Success messages (green) */
.flash-success {
  border-left-color: #10b981;
  background-color: #d1fae5;
  color: #065f46;
}

/* Error messages (red) */
.flash-error {
  border-left-color: #ef4444;
  background-color: #fee2e2;
  color: #991b1b;
}

/* Warning messages (yellow) */
.flash-warning {
  border-left-color: #f59e0b;
  background-color: #fef3c7;
  color: #92400e;
}

/* Info messages (blue) */
.flash-info {
  border-left-color: #3b82f6;
  background-color: #dbeafe;
  color: #1e40af;
}

/* Slide-in animation */
@keyframes slideIn {
  from {
    transform: translateX(100%);
    opacity: 0;
  }
  to {
    transform: translateX(0);
    opacity: 1;
  }
}

These styles create messages that slide in from the right, appear above page content (z-index: 1000), and use color-coding to convey meaning. The fixed positioning keeps messages visible even if users scroll down the page.

3.

Common Flash Message Scenarios

Flash messages work well for any action that requires user confirmation:

Python - Various Flash Message Examples
# After creating a playlist
@app.route('/create-playlist', methods=['POST'])
def create_playlist():
    playlist_name = request.form['name']
    create_forgotten_gems_playlist(playlist_name)
    flash(f'Created playlist: {playlist_name}', 'success')
    return redirect(url_for('playlists'))

# After deleting data
@app.route('/delete-data', methods=['POST'])
def delete_data():
    confirm = request.form.get('confirm')
    if confirm != 'DELETE':
        flash('Data deletion cancelled.', 'info')
        return redirect(url_for('settings'))
    
    delete_all_listening_history()
    flash('All listening history deleted.', 'warning')
    return redirect(url_for('home'))

# When an operation fails
@app.route('/export-data')
def export_data():
    try:
        export_database_to_csv()
        flash('Database exported successfully!', 'success')
    except IOError as e:
        flash(f'Export failed: {str(e)}', 'error')
    
    return redirect(url_for('settings'))

Each scenario follows the same pattern: perform the action, set an appropriate flash message with a category, then redirect. The message appears on the destination page, providing immediate feedback about what happened.

4.

Auto-Dismissing Messages with JavaScript

Flash messages that stay on screen forever become clutter. Add automatic dismissal after a few seconds:

JavaScript - Auto-Dismiss Flash Messages
// Auto-dismiss flash messages after 5 seconds
document.addEventListener('DOMContentLoaded', function() {
  const flashMessages = document.querySelectorAll('.flash');
  
  flashMessages.forEach(function(message) {
    // Keep error messages longer (8 seconds)
    const duration = message.classList.contains('flash-error') ? 8000 : 5000;
    
    setTimeout(function() {
      message.style.animation = 'slideOut 0.3s ease-in';
      
      setTimeout(function() {
        message.remove();
      }, 300);
    }, duration);
  });
});

// Add CSS for slide-out animation
const style = document.createElement('style');
style.textContent = `
  @keyframes slideOut {
    from { transform: translateX(0); opacity: 1; }
    to { transform: translateX(100%); opacity: 0; }
  }
`;
document.head.appendChild(style);

This script removes messages after 5 seconds (8 seconds for errors, giving users more time to read them). The slide-out animation matches the slide-in, creating smooth transitions. Users can still read messages quickly if needed, they're not dismissed too fast.

Flash Message Best Practices
  • ✅ Use specific messages: "Synced 47 tracks" beats "Sync complete"
  • ✅ Choose appropriate categories: success for confirmations, error for failures, warning for destructive actions, info for neutral updates
  • ✅ Always redirect after setting a flash, they don't work with render_template()
  • ✅ Include next steps in error messages: "Database locked. Try again in a moment."
  • ❌ Don't flash messages for every page load (it's annoying)
  • ❌ Don't use flash for real-time updates (use WebSockets or AJAX polling instead)
  • ❌ Don't forget app.secret_key or flash won't work

Flash messages transform your dashboard's user experience. Actions feel complete instead of uncertain. Users understand what succeeded and what failed. The feedback loop, click button, see confirmation, makes the interface feel responsive and professional. This is especially important for the Music Time Machine, where data syncing can take several seconds and users need reassurance that their request is processing.

Chapter 18 uses flash messages extensively when building the Playlist Manager and Settings pages. You'll flash confirmations after creating playlists, warnings before deleting data, and errors when API calls fail. The pattern you've learned here (flash() + redirect()) becomes second nature as you build more features.

4. Building the Home Dashboard (Complete Implementation)

Planning the Home Dashboard

Before writing code, understand what the Home Dashboard needs to accomplish: provide an instant overview of the user's musical activity. A good dashboard answers questions in five seconds without scrolling or clicking. The Home Dashboard shows three key metrics and one visualization.

The three metrics:

  • Total Tracks: How many unique songs exist in the database. Shows the size of the user's musical catalog.
  • Listening Hours: Total time spent listening to music. Calculated from track durations in the database.
  • Active Days: Number of days with at least one listening event. Measures engagement consistency.

The visualization: A line chart showing monthly listening activity over the past year. X-axis: months (Jan, Feb, Mar...), Y-axis: track count. This reveals patterns, summer listening dips, holiday spikes, growing engagement trends.

These four elements fit on one screen without scrolling. Users open the dashboard and immediately understand their music situation. Want details? Click through to Analytics. Want to create playlists? Navigate to Playlist Manager. The Home Dashboard is the entry point, not the entire application.

Dashboard Design Philosophy

Google Analytics follows this pattern: the home page shows visitors, bounce rate, session duration, and a traffic graph. You can spend hours drilling into details, but the overview tells you if things are working or broken.

Your Music Dashboard follows the same philosophy. Home gives the big picture in seconds. Other pages provide detailed analysis for users who want to explore deeper. This tiered information architecture prevents overwhelm while still providing depth when needed.

Creating the Route: app.py

The home route queries the database, calculates statistics, prepares chart data, and renders the template. This involves connecting to the SQLite database you built in Chapter 16 and extracting listening history.

Update app.py with the complete home route:

Python - Database Integration in Flask
# app.py
from flask import Flask, render_template, session, redirect, url_for
import sqlite3
from datetime import datetime, timedelta
import os

app = Flask(__name__)
app.secret_key = os.environ.get('SECRET_KEY', 'dev-secret-key-change-in-production')

# Database path (same database from Chapter 16)
DATABASE_PATH = 'music_time_machine.db'

def get_db_connection():
    """
    Create a database connection with proper error handling.
    Returns None if connection fails.
    """
    try:
        conn = sqlite3.connect(DATABASE_PATH)
        conn.row_factory = sqlite3.Row  # Access columns by name
        return conn
    except sqlite3.Error as e:
        print(f"Database connection error: {e}")
        return None

def calculate_listening_stats():
    """
    Calculate dashboard statistics from the database.
    Returns dict with total_tracks, listening_hours, and active_days.
    """
    conn = get_db_connection()
    if not conn:
        # Return default values if database unavailable
        return {
            'total_tracks': 0,
            'listening_hours': 0,
            'active_days': 0
        }
    
    try:
        cursor = conn.cursor()
        
        # Total unique tracks in database
        cursor.execute("SELECT COUNT(DISTINCT track_id) FROM listening_history")
        total_tracks = cursor.fetchone()[0]
        
        # Total listening time (sum of track durations)
        # Assuming duration_ms column in listening_history table
        cursor.execute("SELECT SUM(duration_ms) FROM listening_history")
        total_ms = cursor.fetchone()[0] or 0
        listening_hours = round(total_ms / (1000 * 60 * 60), 1)  # Convert ms to hours
        
        # Active days (days with at least one listening event)
        # Assuming played_at column with timestamps
        cursor.execute("""
            SELECT COUNT(DISTINCT DATE(played_at)) 
            FROM listening_history
        """)
        active_days = cursor.fetchone()[0]
        
        return {
            'total_tracks': total_tracks,
            'listening_hours': listening_hours,
            'active_days': active_days
        }
    
    except sqlite3.Error as e:
        print(f"Database query error: {e}")
        return {
            'total_tracks': 0,
            'listening_hours': 0,
            'active_days': 0
        }
    finally:
        conn.close()

def get_monthly_chart_data():
    """
    Prepare data for the monthly listening chart.
    Returns dict with 'labels' (month names) and 'data' (track counts).
    """
    conn = get_db_connection()
    if not conn:
        return {'labels': [], 'data': []}
    
    try:
        cursor = conn.cursor()
        
        # Get last 12 months of data
        cursor.execute("""
            SELECT 
                strftime('%Y-%m', played_at) as month,
                COUNT(*) as track_count
            FROM listening_history
            WHERE played_at >= date('now', '-12 months')
            GROUP BY month
            ORDER BY month
        """)
        
        results = cursor.fetchall()
        
        # Convert to format Chart.js expects
        labels = []
        data = []
        
        for row in results:
            # Convert 2024-03 to "Mar 2024"
            date_obj = datetime.strptime(row['month'], '%Y-%m')
            labels.append(date_obj.strftime('%b %Y'))
            data.append(row['track_count'])
        
        return {
            'labels': labels,
            'data': data
        }
    
    except sqlite3.Error as e:
        print(f"Chart data query error: {e}")
        return {'labels': [], 'data': []}
    finally:
        conn.close()

@app.route('/')
def home():
    """
    Home dashboard route.
    Displays statistics and monthly listening chart.
    """
    # Check if user is authenticated (from Chapter 15 OAuth)
    if 'spotify_token' not in session:
        return redirect(url_for('login'))
    
    # Get dashboard statistics
    stats = calculate_listening_stats()
    
    # Get chart data
    chart_data = get_monthly_chart_data()
    
    # Render template with data
    return render_template(
        'home.html',
        stats=stats,
        chart_data=chart_data
    )

if __name__ == '__main__':
    app.run(debug=True)

This route demonstrates several production patterns:

  • Defensive database connections: get_db_connection() returns None on failure instead of crashing. Functions check for None and return safe defaults.
  • Row factory configuration: conn.row_factory = sqlite3.Row lets you access columns by name (row['month']) instead of index (row[0]), improving readability.
  • Separation of concerns: Route function (home()) handles HTTP logic. Helper functions (calculate_listening_stats(), get_monthly_chart_data()) handle business logic. This separation makes testing easier.
  • Authentication check: if 'spotify_token' not in session redirects unauthenticated users to login. Every protected route needs this check (or use a decorator, covered in Section 5).
  • Data transformation: SQL returns dates as strings ('2024-03'). Python converts them to readable labels ('Mar 2024') before sending to the template.
Secret Key Security

app.secret_key encrypts Flask session data. The example uses an environment variable with a fallback for development: os.environ.get('SECRET_KEY', 'dev-secret-key-change-in-production').

In production, set a strong random secret key. Never use 'dev-secret-key' in production, it's equivalent to leaving your front door unlocked. Generate a random key:

Terminal - Generate Secret Key
python -c "import secrets; print(secrets.token_hex(32))"

Store the generated key in an environment variable (.env file) and never commit it to version control.

Building the Template: home.html

The home template displays the statistics and sets up the chart canvas. The CSS starter kit handles all styling, you just need to use the correct CSS classes.

Update templates/home.html to its final form:

HTML - Home Dashboard Template


<!-- templates/home.html -->
{% extends 'base.html' %}

{% block title %}Home - Music Time Machine{% endblock %}

{% block content %}
    <h1>Music Dashboard</h1>
    <p style="color: var(--text-muted); margin-bottom: 2rem;">
        Welcome back! Here's your listening activity at a glance.
    </p>
    
    <!-- Statistics Grid -->
    <div class="stats-grid">
        <div class="stat-card">
            <div class="stat-value">{{ stats.total_tracks }}</div>
            <div class="stat-label">Total Tracks</div>
        </div>
        <div class="stat-card">
            <div class="stat-value">{{ stats.listening_hours }}</div>
            <div class="stat-label">Listening Hours</div>
        </div>
        <div class="stat-card">
            <div class="stat-value">{{ stats.active_days }}</div>
            <div class="stat-label">Active Days</div>
        </div>
    </div>
    
    <!-- Monthly Listening Chart -->
    <div class="chart-container">
        <h2 style="margin-bottom: 1.5rem;">Monthly Listening Activity</h2>
        <canvas id="monthlyChart"></canvas>
    </div>
    
    <!-- Quick Actions -->
    <div class="card">
        <div class="card-header">Quick Actions</div>
        <div class="card-content">
            <a href="{{ url_for('analytics') }}" class="btn btn-primary" style="margin-right: 1rem;">
                View Detailed Analytics
            </a>
            <a href="{{ url_for('playlists') }}" class="btn btn-secondary">
                Generate Playlists
            </a>
        </div>
    </div>
{% endblock %}

{% block scripts %}
    <script>
        // Pass Python data to JavaScript
        const chartData = {{ chart_data|tojson|safe }};
        
        // Create the chart
        const ctx = document.getElementById('monthlyChart').getContext('2d');
        const monthlyChart = new Chart(ctx, {
            type: 'line',
            data: {
                labels: chartData.labels,
                datasets: [{
                    label: 'Tracks Played',
                    data: chartData.data,
                    borderColor: '#1DB954',
                    backgroundColor: 'rgba(29, 185, 84, 0.1)',
                    borderWidth: 2,
                    fill: true,
                    tension: 0.4  // Smooth curves
                }]
            },
            options: {
                responsive: true,
                maintainAspectRatio: true,
                plugins: {
                    legend: {
                        display: false  // Hide legend for single dataset
                    },
                    tooltip: {
                        backgroundColor: '#282828',
                        titleColor: '#FFFFFF',
                        bodyColor: '#B3B3B3',
                        borderColor: '#404040',
                        borderWidth: 1
                    }
                },
                scales: {
                    y: {
                        beginAtZero: true,
                        ticks: {
                            color: '#B3B3B3',
                            precision: 0  // No decimal places
                        },
                        grid: {
                            color: '#404040'
                        }
                    },
                    x: {
                        ticks: {
                            color: '#B3B3B3'
                        },
                        grid: {
                            color: '#404040'
                        }
                    }
                }
            }
        });
    </script>
{% endblock %}

The template uses several key techniques:

  • CSS Grid for stats: .stats-grid automatically arranges stat cards responsively. On desktop: three columns. On tablet: two columns. On mobile: one column. No media queries in your HTML, the CSS starter kit handles it.
  • Chart.js canvas element: <canvas id="monthlyChart"></canvas> provides the drawing surface. Chart.js finds this element by ID and renders the chart.
  • Quick action buttons: Links styled as buttons using .btn classes. Users can navigate to other pages with one click.
  • Inline styles for spacing: Small adjustments (margin-bottom: 2rem) applied inline. For major styling, use CSS classes. For minor tweaks, inline is fine.
The Python-to-JavaScript Handoff

The line const chartData = {{ chart_data|tojson|safe }}; is crucial. Here's what happens:

  1. Python prepares data: chart_data is a Python dictionary: {'labels': ['Jan 2024', 'Feb 2024'], 'data': [245, 312]}
  2. Jinja2 converts to JSON: |tojson filter converts Python dict to JSON string: {"labels": ["Jan 2024", "Feb 2024"], "data": [245, 312]}
  3. |safe marks as trusted: By default, Jinja2 escapes HTML characters. |safe tells Jinja2 "this JSON is safe, don't escape quotes."
  4. JavaScript parses it: The browser's JavaScript engine converts the JSON string to a JavaScript object automatically.

Without |tojson, Python might output None instead of null, or use single quotes instead of double quotes, breaking JavaScript syntax. The filter ensures correct type conversion.

This Python-to-JavaScript handoff pattern appears in every web application that combines server-side and client-side logic. Master this pattern and you can build any interactive dashboard.

Understanding the Chart.js Configuration

The Chart.js code in the {% block scripts %} section creates an interactive line chart. Chart.js is powerful but has many configuration options. Understanding the essential options helps you customize charts for different data visualizations.

The chart structure:

JavaScript
new Chart(ctx, {
    type: 'line',        // Chart type: line, bar, pie, doughnut
    data: {              // The actual data to display
        labels: [...],   // X-axis labels
        datasets: [...]  // One or more data series
    },
    options: {           // Configuration and styling
        responsive: true,
        plugins: {...},
        scales: {...}
    }
});

Chart types: Change type: 'line' to 'bar', 'pie', or 'doughnut' for different visualizations. The data structure remains the same, only the rendering changes. Line charts work well for time-series data (monthly listening). Bar charts work well for comparisons (top artists). Pie charts work well for distributions (genre breakdown).

Datasets configuration: Each dataset represents one line (or bar set, or pie slice). The Home Dashboard has one dataset (monthly track counts). The Analytics page (Chapter 18) will have multiple datasets (energy, valence, danceability on the same chart).

JavaScript
datasets: [{
    label: 'Tracks Played',              // Legend label
    data: chartData.data,                 // Y-axis values
    borderColor: '#1DB954',               // Line color (Spotify green)
    backgroundColor: 'rgba(29, 185, 84, 0.1)',  // Fill color (transparent green)
    borderWidth: 2,                       // Line thickness
    fill: true,                           // Fill area under line
    tension: 0.4                          // Curve smoothness (0 = straight, 1 = very curved)
}]

Responsive behavior: responsive: true makes the chart resize automatically when the browser window changes size. Combined with the CSS starter kit's .chart-container styles, charts work perfectly on mobile, tablet, and desktop without extra configuration.

Color theming: The chart uses colors from the CSS starter kit variables: #1DB954 (primary green), #282828 (card background), #404040 (border/grid lines). This ensures visual consistency between HTML elements and chart visualizations.

Why Chart.js vs D3.js

D3.js offers more control and flexibility for complex, custom visualizations. Chart.js provides pre-built chart types with sensible defaults. For dashboards displaying standard charts (line, bar, pie), Chart.js is faster to implement and easier to maintain.

Chart.js configuration might look verbose, but 80% of options use the same values across different charts. You'll copy-paste most of this configuration, changing only type, data, and colors. D3.js requires custom code for every chart type, powerful, but time-consuming.

The Music Dashboard uses Chart.js because it balances professional results with reasonable implementation time. If you later need custom visualizations, you can switch to D3.js for specific charts while keeping Chart.js for standard ones.

Making It Responsive

The Home Dashboard should work beautifully on phones, tablets, and desktops. The CSS starter kit handles most responsive behavior automatically, but you should understand how and test it works correctly.

CSS Grid responsive behavior: The .stats-grid class uses CSS Grid with grid-template-columns: repeat(auto-fit, minmax(250px, 1fr)). This magic formula means:

  • auto-fit: Automatically determine how many columns fit in available space
  • minmax(250px, 1fr): Each column is at least 250px wide, but can grow to fill space
  • Result: On wide screens (desktop), three columns. On medium screens (tablet), two columns. On narrow screens (mobile), one column. No media queries needed.

Chart.js responsive behavior: Chart.js's responsive: true option makes charts resize when the window changes. The chart redraws at the new size automatically, maintaining readability on all devices.

Testing responsive behavior: Don't deploy without testing on multiple device sizes. Use browser DevTools device mode:

  1. Open your dashboard in a browser (Chrome, Firefox, Edge)
  2. Press F12 to open DevTools
  3. Click the device icon (looks like a phone and tablet) or press Ctrl+Shift+M
  4. Select different devices from the dropdown: iPhone SE (375px), iPad (768px), Desktop (1920px)
  5. Verify stats cards reflow correctly, navigation stacks on mobile, chart remains readable

Common responsive issues and fixes:

  • Text too small on mobile: Use relative font sizes (rem, em) instead of pixels. The CSS starter kit uses rem throughout.
  • Charts overflow container: Make sure the canvas is inside a .chart-container div. The CSS sets width: 100% on canvases.
  • Navigation menu overlaps content: Check that .navbar-menu uses flex-direction: column on mobile (the CSS starter kit includes this).
  • Buttons too close together: Add margin between buttons or stack them vertically on mobile with a media query.
Mobile-First vs Desktop-First

The CSS starter kit uses a mobile-first approach: base styles work on mobile, media queries enhance for larger screens. This is opposite to desktop-first (base styles for desktop, media queries scale down for mobile).

Mobile-first is preferable because: (1) More users access web apps on mobile than desktop, (2) It's easier to progressively enhance than progressively degrade, (3) Mobile styles are simpler (single column) while desktop styles are complex (multi-column grids).

The CSS starter kit's media queries use @media (max-width: 768px) to apply mobile-specific styles. On screens wider than 768px, the desktop styles apply automatically. You don't need to write media queries, the starter kit handles it.

5. Connecting to Your Chapter 16 Modules

Importing Your Existing Code

The business logic you wrote in Chapters 15 and 16. OAuth authentication, database operations, playlist generation, doesn't need rewrites. Flask sits on top of these modules, providing a web interface to existing functionality.

Your project directory already contains:

  • spotify_client.py: OAuth flow and Spotify API interactions (Chapter 15)
  • database.py: SQLite operations for listening history (Chapter 16)
  • playlist_generator.py: Forgotten Gems and mood playlist logic (Chapter 16)

Flask routes import these modules and call their functions. In app.py, add imports at the top:

Python - Importing Your Modules
# app.py
from flask import Flask, render_template, session, redirect, url_for, request
import sqlite3
from datetime import datetime, timedelta
import os

# Import your existing modules
from spotify_client import SpotifyClient
from database import (
    get_listening_stats,
    get_monthly_listening_data,
    get_track_turnover_rate,
    get_genre_distribution
)
from playlist_generator import (
    generate_forgotten_gems,
    generate_mood_playlist,
    create_monthly_snapshot
)

app = Flask(__name__)
app.secret_key = os.environ.get('SECRET_KEY', 'dev-secret-key-change-in-production')

Now your routes can call these functions directly. For example, if database.py has a get_listening_stats() function that returns a dictionary with statistics, use it:

Python - Using Imported Functions in Routes
@app.route('/')
def home():
    if 'spotify_token' not in session:
        return redirect(url_for('login'))
    
    # Use existing database function instead of writing SQL in route
    stats = get_listening_stats()
    chart_data = get_monthly_listening_data()
    
    return render_template('home.html', stats=stats, chart_data=chart_data)

This separation keeps routes clean. Routes handle HTTP logic (authentication checks, rendering templates, handling form submissions). Business logic functions handle data operations (database queries, API calls, calculations). If you later want to change the database schema or switch from SQLite to PostgreSQL, you only update database.py, routes remain unchanged.

Refactoring Opportunity

If your Chapter 16 code lives inside a main script (if __name__ == '__main__': blocks), extract functions into separate modules now. For example, if main.py has inline database queries, move them to database.py as functions that return data.

This refactoring isn't wasted effort, it's good software engineering. Functions you can import are functions you can test. Functions you can test are functions you trust in production. The Music Dashboard's quality depends on reliable business logic, which means well-structured, testable code.

Session Management for OAuth

Chapter 15 implemented OAuth authentication for command-line use. Web applications need persistent authentication, users shouldn't re-authenticate on every page load. Flask sessions provide this persistence.

Flask sessions store data in encrypted cookies. The browser sends the cookie with every request, letting Flask identify authenticated users without database lookups. The session behaves like a dictionary: session['key'] = value stores data, session.get('key') retrieves it.

Create an authentication decorator that checks for valid sessions:

Python - Authentication Decorator
from functools import wraps

def require_auth(f):
    """
    Decorator to require authentication for routes.
    Redirects to login if user isn't authenticated.
    """
    @wraps(f)
    def decorated_function(*args, **kwargs):
        if 'spotify_token' not in session:
            # Store the URL they were trying to access
            session['next_url'] = request.url
            return redirect(url_for('login'))
        return f(*args, **kwargs)
    return decorated_function

@app.route('/')
@require_auth
def home():
    """Home dashboard - requires authentication"""
    stats = get_listening_stats()
    chart_data = get_monthly_listening_data()
    return render_template('home.html', stats=stats, chart_data=chart_data)

The @require_auth decorator wraps route functions. If session['spotify_token'] exists, the route executes normally. If not, Flask redirects to login and stores the original URL in session['next_url']. After authentication, redirect users to their intended destination.

This pattern prevents the frustrating experience where users log in, then land on the home page instead of the analytics page they were trying to view. Store the original URL, complete authentication, redirect to stored URL.

Session Security

Flask sessions use signed cookies, not encrypted cookies by default. Session data is visible to users (they can decode the base64 cookie), but they can't modify it without knowing app.secret_key. Never store sensitive information like passwords or credit card numbers in sessions.

The secret_key must be:

  • Random: Use secrets.token_hex(32) to generate
  • Secret: Store in environment variables, never commit to Git
  • Stable: Changing the secret invalidates all existing sessions (logs everyone out)

The OAuth Web Flow

OAuth in web applications differs from command-line OAuth (Chapter 15). Instead of opening a browser and waiting for manual code entry, web OAuth redirects users automatically. The flow involves three routes: login (initiation), callback (completion), and logout (cleanup).

The login route redirects users to Spotify's authorization page:

Python - OAuth Login Route
@app.route('/login')
def login():
    """
    Initiate OAuth flow by redirecting to Spotify authorization.
    """
    spotify = SpotifyClient()
    auth_url = spotify.get_authorization_url(
        redirect_uri='http://localhost:5000/callback',
        scope='user-read-recently-played playlist-modify-public'
    )
    return redirect(auth_url)

This route constructs the Spotify authorization URL with your app's credentials and required scopes, then redirects the user's browser to Spotify. They see Spotify's authorization page asking for permission to access their data.

The callback route receives the authorization code and exchanges it for an access token:

Python - OAuth Callback Route
@app.route('/callback')
def callback():
    """
    Handle OAuth callback from Spotify.
    Exchange authorization code for access token.
    """
    try:
        code = request.args.get('code')
        if not code:
            return render_template('error.html', message='Authorization failed')
        
        spotify = SpotifyClient()
        token_data = spotify.exchange_code_for_token(
            code=code,
            redirect_uri='http://localhost:5000/callback'
        )
        
        # Store tokens in session
        session['spotify_token'] = token_data['access_token']
        session['refresh_token'] = token_data['refresh_token']
        session['token_expires_at'] = datetime.now().timestamp() + token_data['expires_in']
        
        # Redirect to original destination or home
        next_url = session.pop('next_url', url_for('home'))
        return redirect(next_url)
    
    except Exception as e:
        print(f"OAuth error: {e}")
        return render_template('error.html', message='Authentication failed')

@app.route('/logout')
def logout():
    """
    Clear session and log out user.
    """
    session.clear()
    return redirect(url_for('home'))

The OAuth flow sequence:

  1. User visits protected route (e.g., /)
  2. @require_auth decorator checks session, finds no token
  3. Decorator redirects to /login
  4. /login route redirects to Spotify authorization page
  5. User authorizes on Spotify's website
  6. Spotify redirects to /callback?code=...
  7. /callback route exchanges code for access token
  8. Route stores token in Flask session
  9. Route redirects to home dashboard
  10. Future requests include session cookie, authentication persists
Token Refresh Logic

Spotify access tokens expire after one hour. Your application should refresh tokens automatically before they expire. Add token refresh logic to your @require_auth decorator or create a before_request handler:

Python - Token Refresh Check
@app.before_request
def refresh_token_if_needed():
    """Check if token is expired and refresh if necessary"""
    if 'spotify_token' in session:
        expires_at = session.get('token_expires_at', 0)
        if datetime.now().timestamp() > expires_at - 300:  # Refresh 5 min before expiry
            # Refresh token logic here
            pass

Chapter 15 covered token refresh implementation. Adapt that logic for Flask sessions, updating session['spotify_token'] and session['token_expires_at'] with new values.

Defensive Error Handling in Routes

You learned how to handle 404 errors earlier with @app.errorhandler(404). Those handlers catch errors that Flask itself generates, missing routes, forbidden resources. But what about errors your code generates? Database connection failures, API timeouts, missing files, these raise Python exceptions that Flask doesn't automatically handle gracefully.

Without explicit handling, these exceptions crash your route and show users the "Internal Server Error" page (or worse, a full stack trace in development mode). Professional applications catch predictable exceptions, log them for debugging, and show users actionable error messages. This section teaches defensive programming patterns for route functions.

1.

Common Database Exceptions

SQLite raises specific exceptions for predictable failure modes. The most common is the dreaded "database is locked" error:

Python - Unprotected Database Query
@app.route('/')
def home():
    """Home dashboard - FRAGILE VERSION."""
    # Query database without error handling
    conn = sqlite3.connect('music_data.db')
    cursor = conn.cursor()
    
    cursor.execute('SELECT COUNT(*) FROM listening_history')
    total_tracks = cursor.fetchone()[0]
    
    cursor.execute('SELECT SUM(duration_ms) FROM listening_history')
    total_time = cursor.fetchone()[0]
    
    conn.close()
    
    return render_template('home.html', 
                          total_tracks=total_tracks,
                          total_time=total_time)

What breaks this:

  • Database locked: Another process (backup script, sync operation) has the database open for writing. SQLite allows multiple readers but only one writer. Your query hits sqlite3.OperationalError: database is locked.
  • Missing database: The database file doesn't exist yet (first run before syncing data). Raises sqlite3.OperationalError: no such table.
  • Corrupted database: File system error, incomplete write, power loss during transaction. Raises sqlite3.DatabaseError.

All of these crash the route, showing users an error page with no explanation or recovery options.

2.

Wrapping Database Calls in try/except

Protect database operations with try/except blocks that handle specific exceptions:

Python - Protected Database Query
import sqlite3
from flask import Flask, render_template, flash, redirect, url_for

@app.route('/')
def home():
    """Home dashboard - DEFENSIVE VERSION."""
    try:
        conn = sqlite3.connect('music_data.db', timeout=10)
        cursor = conn.cursor()
        
        cursor.execute('SELECT COUNT(*) FROM listening_history')
        total_tracks = cursor.fetchone()[0]
        
        cursor.execute('SELECT SUM(duration_ms) FROM listening_history')
        total_time = cursor.fetchone()[0] or 0
        
        conn.close()
        
    except sqlite3.OperationalError as e:
        # Database locked or table doesn't exist
        if 'locked' in str(e):
            flash('Database is temporarily locked. Try again in a moment.', 'warning')
        elif 'no such table' in str(e):
            flash('No listening data yet. Sync your Spotify history to get started.', 'info')
        else:
            flash(f'Database error: {str(e)}', 'error')
        
        # Return safe defaults
        total_tracks = 0
        total_time = 0
        
    except sqlite3.DatabaseError as e:
        # Corrupted database or serious error
        flash('Database error. Please contact support.', 'error')
        total_tracks = 0
        total_time = 0
        
    except Exception as e:
        # Unexpected error - log it and show generic message
        print(f"Unexpected error in home route: {e}")
        flash('Something went wrong. Please try again.', 'error')
        total_tracks = 0
        total_time = 0
    
    return render_template('home.html',
                          total_tracks=total_tracks,
                          total_time=total_time)

Key defensive patterns:

  • Specific exception handling: Catch sqlite3.OperationalError separately from sqlite3.DatabaseError. Different exceptions need different user messages.
  • Actionable messages: "Database is temporarily locked. Try again in a moment." tells users what to do. "Error 5" tells them nothing.
  • Safe defaults: Return 0 values instead of crashing. The page renders, just without data. Users can still navigate, try syncing, or contact support.
  • Timeout parameter: sqlite3.connect('...', timeout=10) waits up to 10 seconds for the lock to release instead of failing immediately.
  • Flash messages: Explain what happened and guide next steps.
3.

Handling Missing or Null Data

Database queries don't always return what you expect. Empty tables, NULL values, and None results break templates if you don't handle them:

Python - Defensive NULL Handling
@app.route('/analytics')
def analytics():
    """Analytics page with defensive NULL handling."""
    try:
        conn = sqlite3.connect('music_data.db', timeout=10)
        cursor = conn.cursor()
        
        # Query might return NULL if no data exists
        cursor.execute('SELECT AVG(energy) FROM listening_history')
        result = cursor.fetchone()
        avg_energy = result[0] if result and result[0] is not None else 0.0
        
        # Query might return empty list
        cursor.execute('''
            SELECT artist_name, COUNT(*) as play_count
            FROM listening_history
            GROUP BY artist_name
            ORDER BY play_count DESC
            LIMIT 10
        ''')
        top_artists = cursor.fetchall()
        
        # Provide empty list as fallback
        if not top_artists:
            top_artists = []
        
        conn.close()
        
    except sqlite3.Error as e:
        flash(f'Could not load analytics: {str(e)}', 'error')
        avg_energy = 0.0
        top_artists = []
    
    return render_template('analytics.html',
                          avg_energy=avg_energy,
                          top_artists=top_artists)

NULL handling patterns:

  • Check for None: result[0] if result and result[0] is not None else 0.0 handles both empty results and NULL values.
  • Provide fallbacks: Empty lists [] for queries that return no rows, zero for numeric aggregations.
  • Default values in templates: Jinja can also handle missing data with {{ value|default(0) }} , but Python-side handling is more reliable.
4.

Creating a Custom 500 Error Handler

Despite defensive coding, unexpected errors still happen. Create a custom 500 handler for unhandled exceptions:

Python - 500 Error Handler
@app.errorhandler(500)
def internal_error(error):
    """Handle internal server errors."""
    # Log the error for debugging (in production, use proper logging)
    print(f"Internal error: {error}")
    
    # Return clean error page
    return render_template('500.html'), 500
HTML - templates/500.html


{% extends "base.html" %}

{% block content %}
<div class="error-container">
  <h1>Something Went Wrong</h1>
  <p>We encountered an unexpected error. Our team has been notified.</p>
  
  <div class="error-actions">
    <a href="{{ url_for('home') }}" class="btn btn-primary">
      Go to Dashboard
    </a>
    <a href="mailto:alice@example.com" class="btn btn-secondary">
      Contact Support
    </a>
  </div>
</div>
{% endblock %}

The 500 handler catches any exception that escapes your route's try/except blocks. It logs the error for debugging (you'd use proper logging in production, not print()), and shows users a clean error page with contact options.

Defensive Programming Philosophy

Professional applications assume everything can fail: databases go offline, APIs timeout, files disappear, users send malformed data. Defensive programming means:

  • Catch specific exceptions: Handle expected failures (database locks) differently from unexpected failures (corrupted data)
  • Provide actionable feedback: "Database locked, try again" > "Error 5"
  • Degrade gracefully: Show empty charts instead of crashing the page
  • Log for debugging: Errors you can't fix immediately need logging for post-mortem analysis
  • Test failure modes: Temporarily rename the database file, run the app, verify error handling works

This approach takes more code upfront but saves hours of debugging production issues. Users forgive temporary errors if you handle them well. They don't forgive applications that crash without explanation.

Error Handling Best Practices
  • ✅ Catch specific exceptions first (sqlite3.OperationalError), then general ones (Exception)
  • ✅ Always provide default values (total_tracks = 0) when errors occur
  • ✅ Use flash messages to explain what happened and suggest next steps
  • ✅ Set database timeout: sqlite3.connect('...', timeout=10)
  • ✅ Check for NULL/None before using query results
  • ✅ Create custom 404 and 500 error pages that match your site design
  • ❌ Don't show stack traces to users in production (leak implementation details)
  • ❌ Don't silently swallow errors without logging them
  • ❌ Don't use bare except: clauses (catches everything, even KeyboardInterrupt)

Every route in the Music Time Machine that touches the database now follows these defensive patterns. The Home Dashboard handles database locks gracefully. The Analytics page deals with missing data elegantly. The Playlist Manager catches API failures and informs users clearly. This extra error handling code feels tedious to write, but it's the difference between a portfolio project that impresses and one that crashes during demonstrations.

When you deploy the Music Time Machine and show it to recruiters, they won't see your try/except blocks, but they'll notice your application never crashes, always provides feedback, and handles edge cases professionally. That's what separates production code from tutorial code.

6. Testing Your Dashboard Locally

Running the Development Server

With all components in place, start Flask's development server and access your dashboard. Make sure your virtual environment is activated and you're in the project directory:

Terminal
# Method 1: Run with Python (if app.py has if __name__ == '__main__')
python app.py

# Method 2: Use Flask's built-in runner
export FLASK_APP=app.py  # or set FLASK_APP=app.py on Windows
flask run

# Method 3: Enable debug mode (auto-reload on code changes)
export FLASK_DEBUG=1
flask run

Flask starts a development server on http://127.0.0.1:5000. Open this URL in your browser. You should see either the home dashboard (if you're already authenticated) or a redirect to the login route.

Development mode features:

  • Auto-reload: Save any Python file, Flask restarts automatically. No need to manually stop and restart the server after each change.
  • Detailed error pages: When something breaks, Flask shows the full stack trace with highlighted code lines and local variables. Never use this in production, it exposes internal code.
  • Static file caching disabled: CSS and JavaScript changes appear immediately without hard-refreshing the browser.
Port Conflicts and Solutions

If you see "Address already in use" or "port 5000 already in use," another program is using that port. Common causes:

  • Another Flask app already running (check for open terminals)
  • macOS AirPlay Receiver uses port 5000 (disable in System Preferences → Sharing)
  • Previous Flask process didn't shut down cleanly

Solutions: Kill the process using port 5000, or run Flask on a different port:

Terminal - Change Flask Port
flask run --port 5001
# Or in app.py:
app.run(debug=True, port=5001)

Browser Console: Your Frontend Debugger

When building web applications, you work with two execution environments: Python (backend) and JavaScript (frontend). Python errors appear in your terminal. JavaScript errors appear in the browser console. Learning to use the browser console is essential for debugging frontend issues.

Opening DevTools:

  • Windows/Linux: Press F12 or Ctrl+Shift+I
  • Mac: Press Cmd+Option+I
  • Alternative: Right-click anywhere on the page and select "Inspect"

The Console tab: Shows JavaScript errors, console.log() output, and lets you execute JavaScript commands interactively. If your chart doesn't render, check the Console first. You'll see errors like "chartData is undefined" or "Chart is not a constructor" that explain exactly what's wrong.

The Network tab: Shows all HTTP requests the page makes, loading CSS files, fetching JavaScript libraries from CDNs, making AJAX calls. If your CSS doesn't load, check Network for failed requests (red entries). Click a request to see details: status code, response headers, actual content returned.

The Elements tab: Lets you inspect and modify HTML/CSS live. Hover over elements to see their dimensions and margins. Edit CSS properties to test styling changes before updating your actual files. Find which CSS rules are overriding your styles.

Common debugging workflows:

1.

Chart doesn't render

Check Console for errors. Common issues: Chart.js not loaded (404 in Network tab), chartData undefined (Python didn't pass data correctly), syntax error in chart configuration. The error message tells you exactly which line failed.

2.

CSS not applying

Check Network tab, did dashboard.css load? If yes, inspect the element in Elements tab, see which CSS rules are active. Maybe another rule with higher specificity is overriding yours.

3.

Route returns wrong data

Add console.log(chartData) in your JavaScript. The Console shows exactly what data Python sent. If it's empty or malformed, the problem is in your Python route, not JavaScript.

The Two-Environment Mental Model

When debugging, always ask: "Is this a backend problem (Python) or a frontend problem (JavaScript)?" Backend problems show errors in the terminal. Frontend problems show errors in the browser console.

If you're not seeing errors in either place, the issue might be logical (code runs but does the wrong thing). Add print statements in Python and console.log statements in JavaScript to trace data flow.

Common Flask Errors and Solutions

Flask provides helpful error messages, but they're not always immediately clear to beginners. Here are the most common errors and their solutions:

TemplateNotFound: home.html

Flask can't find the template file. Check: (1) Is the file in the templates/ directory? (2) Is the filename spelled exactly as used in render_template()? (3) Did you restart Flask after creating the file?

Common mistake: Creating template/home.html (singular) instead of templates/home.html (plural).

404 Not Found - The requested URL was not found

Flask doesn't have a route matching the requested URL. Check: (1) Is the @app.route() decorator present? (2) Does the URL in your browser exactly match the route path? (3) Did you forget a trailing slash or add an extra one?

Flask treats /home and /home/ as different URLs by default. Use @app.route('/home', strict_slashes=False) to accept both.

500 Internal Server Error

Your Python code has an error. Check the terminal where Flask is running, you'll see the full stack trace there. Common causes: undefined variable, None object accessed, database connection failed, wrong number of function arguments.

Enable debug mode (app.run(debug=True)) to see detailed error pages in the browser instead of generic 500 messages.

Chart shows empty canvas (no errors)

Data reached JavaScript but isn't valid for Chart.js. Add console.log(chartData) before creating the chart. Check: (1) Are labels and data arrays? (2) Do they have the same length? (3) Are data values numbers, not strings? (4) Did |tojson convert the data correctly?

Static files return 404 (CSS/JS not loading)

Check: (1) Are static files in the static/ directory with correct subdirectories (static/css/, static/js/)? (2) Are you using url_for('static', filename='css/dashboard.css') instead of hardcoded paths? (3) Did you refresh after adding new static files?

Check the Network tab in DevTools to see the exact URL Flask is trying to load.

Session data disappears after restart

Flask stores sessions in cookies by default. Sessions persist across page loads but not server restarts in development. This is normal. In production, use server-side session storage (Flask-Session extension) if you need sessions to survive restarts.

The Debug Workflow

When something breaks: (1) Read the error message completely, don't just scan it. (2) Check the terminal for Python errors. (3) Check the browser console for JavaScript errors. (4) Check the Network tab for failed requests. (5) Add print() statements or console.log() to trace data flow. (6) Test one change at a time.

Most bugs are simple mistakes: typos, wrong indentation, forgotten imports. The error messages tell you exactly what's wrong if you read them carefully. Develop the habit of reading errors instead of immediately Googling them, you'll learn faster.

The Home Dashboard Checklist

Before proceeding to Chapter 18, verify your Home Dashboard works completely. Use this checklist to confirm every component functions correctly:

Home Dashboard Verification

Work through each item to confirm every component functions correctly:

  1. Flask server starts without errors, runs on port 5000
  2. Navigation bar displays with all links (Home, Analytics, Playlists, Settings)
  3. Stats cards show correct numbers (Total Tracks, Listening Hours, Active Days)
  4. Monthly listening chart renders with actual data (not empty canvas)
  5. Chart is interactive (hover shows tooltips with exact values)
  6. Quick action buttons navigate correctly (Analytics, Playlists pages)
  7. Page looks clean on mobile (test with DevTools device mode, 375px width)
  8. Stats cards reflow to single column on mobile
  9. No JavaScript errors in browser console (F12 → Console tab)
  10. OAuth login/logout flow works (can authenticate with Spotify)
  11. Dashboard shows real data from your SQLite database (Chapter 16)
  12. CSS styling loads correctly (Spotify green theme, proper spacing)

If every item passes, your Home Dashboard is complete and production-ready. You've successfully transformed a command-line application into a professional web interface. The patterns you've learned, routes, templates, static files, session management, Chart.js integration, apply to every other page you'll build.

7. From Command Line to Dashboard: Your Flask Journey

You've built a complete, working dashboard page using Flask. The Home Dashboard demonstrates every fundamental concept you need: routing, template inheritance, static file serving, database integration, session management, and interactive data visualization. That's significant progress.

More importantly, you've established a solid foundation. The patterns you used to build the Home Dashboard apply to every other page. In Chapter 18, you'll build three more pages. Analytics, Playlist Manager, and Settings, using the exact same techniques. Route → Query Data → Render Template → Add Interactivity. That's the entire workflow.

Chapter Review Quiz

Test your understanding of Flask web development concepts:

Select question to reveal the answer:
Why should you always use url_for() instead of hardcoded URL paths in Flask templates and redirects?

url_for() generates URLs dynamically based on function names, not hardcoded paths. This provides three critical benefits that separate professional Flask applications from fragile ones.

First, it enables refactoring without breaking links. If you change @app.route('/dashboard') to @app.route('/home'), every url_for('home') call automatically generates the new URL. With hardcoded paths, you'd need to find and replace every href="/dashboard" across all templates, missing some and creating broken links.

Second, it handles dynamic parameters safely. For routes like /playlist/<playlist_id>, url_for('view_playlist', playlist_id='abc123') properly builds /playlist/abc123 and URL-encodes special characters. Manual string concatenation like f"/playlist/{id}" breaks with IDs containing slashes or other URL-unsafe characters.

Third, it adapts to deployment environments. Some hosting platforms add path prefixes (/myapp/home) or use subdomains. url_for() respects Flask's configuration and generates correct URLs for any environment. Hardcoded /home paths break when deployed to these platforms.

Professional Flask developers use url_for() universally for internal links. It costs nothing to implement, prevents entire categories of bugs, and demonstrates understanding of framework best practices.

Explain Flask's request/response cycle: what happens when a user visits yoursite.com/analytics in their browser?

The request/response cycle follows five distinct steps, each with specific responsibilities.

Step 1: Browser sends HTTP request. User types yoursite.com/analytics or clicks a link. The browser constructs an HTTP GET request for the /analytics path and sends it to your server. The request includes headers (browser type, accepted content types, cookies) and arrives at Flask's web server listening on port 5000 (development) or 80/443 (production).

Step 2: Flask routes the request. Flask examines the request path (/analytics) and searches through all @app.route() decorators to find a matching function. It finds @app.route('/analytics') decorating the analytics() function. Flask calls this function, passing any URL parameters as arguments.

Step 3: Function processes the request. Your analytics() function executes Python code: querying the database for track statistics, calculating trends, aggregating audio features, preparing chart data. This is regular Python. Flask doesn't interfere. The function uses existing modules (database.py, spotify_client.py) to fetch and transform data.

Step 4: Function returns a response. The function calls render_template('analytics.html', data=analytics_data), which loads the Jinja2 template, injects Python variables into HTML placeholders, and returns the rendered HTML string. Flask wraps this string in an HTTP response object with status code 200 and content-type text/html.

Step 5: Flask sends response to browser. Flask transmits the HTTP response over the network. The browser receives HTML, parses it, requests referenced assets (dashboard.css, charts.js, Chart.js library), renders the page visually, and executes JavaScript to create interactive charts. Each asset request repeats steps 1-5 (browser requests /static/css/dashboard.css, Flask serves it from the static folder).

This cycle happens for every request. Click a button that submits a form? Same five steps, but with POST instead of GET. Request JSON for an AJAX update? Same five steps, but return JSON instead of HTML. The pattern is universal.

What is the Python-to-JavaScript handoff pattern with |tojson|safe, and why can't you just pass Python dictionaries directly to JavaScript?

Python dictionaries and JavaScript objects look similar but exist in different execution environments. Python runs on the server, JavaScript runs in the browser. You need a serialization bridge that converts Python data structures into JavaScript-compatible format safely.

The handoff pattern has three steps. First, your Flask route queries data and stores it in Python dictionaries: chart_data = {'labels': ['Jan', 'Feb'], 'values': [42, 38]}. Second, you pass this dictionary to render_template('home.html', chart_data=chart_data). Third, in the template, you embed it in a <script> tag using the |tojson|safe filter: const data = {{ chart_data|tojson|safe }};.

The |tojson filter converts Python data structures to JSON format. Python dictionaries become JavaScript objects, Python lists become JavaScript arrays, Python strings become JavaScript strings with proper escaping. Without |tojson, Jinja2 would render {'labels': ['Jan', 'Feb']} as the literal string "{'labels': ['Jan', 'Feb']}", which is invalid JavaScript syntax.

The |safe filter tells Jinja2 "this JSON is trusted, don't HTML-escape it." Without |safe, Jinja2 would convert {'key': 'value'} to {'key': 'value'} (escaping quotes), which breaks JSON parsing in JavaScript. You only use |safe on data you control, never on user input, which could contain malicious JavaScript.

This pattern separates concerns cleanly. Python code stays focused on data fetching and transformation. JavaScript code stays focused on visualization and interactivity. The handoff happens once per page load in the template layer. If you need dynamic updates after page load, you'd use AJAX to fetch JSON from API endpoints instead of embedding data in templates.

When should you use template inheritance ({% extends %}) versus template includes ({% include %}) in Flask/Jinja2?

Template inheritance and includes solve different problems. Choosing correctly affects maintainability and code organization.

Use {% extends %} for page layouts. Template inheritance establishes parent-child relationships where child templates fill in specific sections of a parent layout. Your base.html defines the overall structure: <html>, <head>, navigation, footer, and a {% block content %} placeholder. Child templates like home.html extend base.html and provide content for that block. This ensures every page shares consistent structure (same navigation, same footer, same CSS) while varying the main content area.

Use {% include %} for reusable components. Includes insert entire template files into specific locations without establishing parent-child relationships. Your navbar.html contains just the navigation HTML. You {% include 'includes/navbar.html' %} in base.html, and that navigation appears exactly where you placed the include statement. If you change navbar.html, every page automatically updates because they all include the same file.

The key difference is purpose. Inheritance is for layouts, one child template per page, extending one parent. Includes are for components, small reusable pieces included multiple times across different templates. A page can only extend one parent template (single inheritance), but can include many component files.

Practical guideline: if it defines the skeleton of a page (DOCTYPE, HTML structure, content placeholders), use {% extends %} . If it's a piece of UI you want to reuse (navigation bar, footer, flash messages, card component), use {% include %} . Your Music Time Machine uses inheritance for base.html (every page extends it) and includes for navbar.html (base template includes it once, appears on all pages).

Why does Flask session management require a secret_key, and what security problems occur if you don't set it properly?

Flask sessions store user data (login state, preferences, shopping cart items) across multiple requests. Unlike cookies, which store data in the browser, Flask sessions store data on the server and send only a session ID to the browser. The secret_key cryptographically signs this session ID to prevent tampering.

Here's how it works. When you call session['user_id'] = 12345, Flask creates a session dictionary on the server, generates a unique session ID, signs that ID with secret_key using HMAC, and sends the signed ID to the browser as a cookie. On subsequent requests, the browser sends the cookie back. Flask verifies the signature using secret_key. If the signature matches, Flask trusts the session ID and loads the associated data. If someone modifies the cookie, the signature verification fails and Flask rejects the session.

Without a secret_key, Flask cannot sign sessions. Your application crashes with RuntimeError: The session is unavailable because no secret key was set whenever you access session. This forces you to set one, but many developers make critical mistakes.

Security mistake 1: Hardcoding weak keys. Using app.secret_key = 'dev' or 'secret123' makes your sessions trivially forgeable. Attackers can sign their own session IDs and impersonate any user. Always generate cryptographically random keys: python -c "import secrets; print(secrets.token_hex(32))" produces a 64-character hex string suitable for production.

Security mistake 2: Committing keys to Git. If your secret_key lives in app.py and you push to GitHub, anyone can read your repository, extract the key, and forge sessions. Store keys in environment variables or .env files (which you exclude from Git). Load them with app.secret_key = os.environ.get('SECRET_KEY').

Security mistake 3: Reusing the same key everywhere. If you use one secret_key for development, testing, and production, compromising development exposes production. Use different keys per environment. If an attacker compromises your local machine, they can't forge production sessions.

For the Music Time Machine, you need a secret_key to store OAuth tokens in sessions during the authorization flow. Without signed sessions, attackers could inject malicious tokens and compromise your Spotify account. This is why Flask makes secret_key mandatory for session access, it forces you to think about security.

The Backend-First strategy uses a provided CSS starter kit instead of teaching CSS from scratch. What are the trade-offs of this approach for learning web development?

The Backend-First strategy prioritizes Flask, database integration, and API skills over frontend expertise. This creates both benefits and limitations you should understand.

Benefits: Faster time to working dashboard. Building professional CSS from scratch requires 10-15 hours of work: learning flexbox and grid, understanding responsive breakpoints, debugging cross-browser issues, implementing mobile navigation, styling forms and buttons. The starter kit provides all of this instantly, letting you focus on Python code and data connections. You go from zero to portfolio-worthy dashboard in a few hours instead of days.

Benefits: Mirrors real development workflows. Professional teams use component libraries (Bootstrap, Tailwind, Material UI) rather than writing CSS from scratch. Backend engineers receive designed mockups or component libraries from designers and implement business logic. Learning to integrate existing CSS effectively is more valuable than learning to write CSS yourself when your goal is backend development.

Benefits: Reduces decision paralysis. Frontend development offers infinite choices: CSS frameworks, preprocessors, methodologies (BEM, utility-first). These decisions are orthogonal to Flask learning. Providing a starter kit eliminates analysis paralysis and keeps focus on Flask concepts. You can always learn CSS later if frontend work interests you.

Limitation: You don't understand the CSS. If the dashboard breaks visually, you can't debug it effectively without CSS knowledge. If you want to customize colors or layouts significantly, you're stuck. The starter kit works well for standard dashboard patterns but constrains creative freedom.

Limitation: Dependency on provided assets. You're relying on the book's starter kit rather than developing portable skills. If you want to build a different type of application (e-commerce site, blog, admin panel), you'd need a different starter kit or would need to learn CSS properly.

The appropriate mindset: The Backend-First strategy is a deliberate trade-off optimizing for Flask learning and portfolio completion. It's not claiming CSS doesn't matter, it's acknowledging you have limited time and should focus on backend skills first. Once you've mastered Flask, deployed your dashboard, and completed your portfolio, then decide if frontend skills are worth developing. Many successful backend engineers never become CSS experts and instead collaborate with frontend specialists. That's a valid career path.

Why does Chart.js configuration happen in JavaScript inside templates rather than being generated server-side in Python and passed as JSON?

You could generate complete Chart.js configuration in Python, serialize it to JSON, and pass it to templates. But this approach creates maintenance problems and couples your backend to frontend implementation details.

Separation of concerns: Python code should handle data fetching and transformation, querying databases, calling APIs, aggregating statistics, calculating trends. JavaScript code should handle presentation and interactivity, chart rendering, animations, user interactions, responsive behavior. Mixing presentation logic (chart colors, legend positioning, tooltip formatters) into Python violates this separation.

Flexibility for frontend changes: If you want to change chart colors, add tooltips, or adjust legend position, you modify JavaScript in the template. No Python code changes, no server restart required. But if Python generates complete chart config, you'd need to modify Python, understand the Chart.js configuration structure in a different language, and redeploy the application for simple visual tweaks.

JavaScript callbacks and functions: Chart.js configuration includes callback functions for tooltips, legend formatting, and click handlers. These are JavaScript functions that cannot be serialized to JSON. You can't pass a Python lambda function to Chart.js, it needs actual JavaScript code. Keeping configuration in JavaScript lets you use these powerful features naturally.

The handoff pattern balance: Python provides the data: {'labels': [...], 'values': [...]}. JavaScript provides the visualization configuration: colors, chart type, responsive options, interactivity. This division is clean and maintainable. You use |tojson|safe to pass data across the boundary, then JavaScript constructs the chart object with that data.

Could you generate chart config in Python? Yes. Should you? No, unless you're building an abstract charting system that generates many similar charts with minimal variation. For a dashboard with a few custom charts, the handoff pattern is cleaner and more maintainable.

When debugging a Flask application, how do you determine whether a problem is in the backend (Python/Flask) or frontend (JavaScript/HTML), and what tools do you use for each?

Web applications have two execution environments: server-side Python and client-side JavaScript. Effective debugging requires understanding where problems originate and using appropriate tools for each environment.

Backend problems manifest in these ways: HTTP 500 errors (server crashes), incorrect data in rendered HTML (wrong SQL query results), authentication failures, missing routes (404 errors), slow response times, database connection errors. You debug these using Python tools: Flask's development server output shows stack traces and print statements, Python debugger (pdb) lets you step through route functions, Flask's debug mode provides detailed error pages with code context.

Frontend problems manifest differently: Charts don't render, buttons don't respond to clicks, forms don't submit, animations don't work, console shows JavaScript errors like "Uncaught TypeError" or "Chart is not defined." You debug these using browser DevTools: JavaScript Console (F12) shows errors and console.log() output, Network tab reveals failed asset loading or AJAX requests, Elements tab inspects rendered HTML and CSS, Sources tab allows JavaScript debugging with breakpoints.

Systematic debugging workflow: When something breaks, first check Flask's terminal output for Python errors. If you see a stack trace, it's a backend problem, fix the Python code. If Flask shows no errors and returns HTTP 200, the problem is frontend. Open Browser DevTools Console (F12) and look for JavaScript errors. Red errors indicate failed JavaScript execution, yellow warnings indicate deprecations or non-critical issues.

The handoff boundary: Many bugs occur at the Python-to-JavaScript boundary. If chart data looks wrong, add console.log(chartData) in JavaScript to verify what JavaScript received. Compare this to what Python sent using print(chart_data) in the route function. If they differ, your |tojson|safe filter might be missing or applied incorrectly. If they match but the chart still breaks, the problem is JavaScript configuration, not data.

Common mistake: Only using one debugging environment. Backend developers often ignore Browser DevTools and try to debug JavaScript problems by examining Python code. Frontend developers sometimes avoid Flask's terminal output and miss backend errors. Effective Flask development requires fluency with both tool sets. When a chart doesn't render, check Flask terminal first (did the route execute?), then check Browser Console (did JavaScript load? did data pass correctly?), then check Network tab (did Chart.js library load?). Systematic elimination identifies the failure point quickly.

Strengthen Your Skills

Practice Exercises

Before moving to Chapter 18, strengthen your Flask fundamentals with these exercises:

  • Add a new stat card: Create a fourth stat card on the Home Dashboard showing "Average Tracks per Month" by querying your snapshots table and calculating the mean. This practices database queries and template modification.
  • Build a debug route: Create @app.route('/debug') that displays all data you're passing to the home template in formatted JSON. Use this to understand exactly what Python is sending to Jinja2.
  • Customize Chart.js styling: Change the Home Dashboard timeline chart to use your favorite colors, adjust the line thickness, add grid lines, and modify the legend position. This practices reading Chart.js documentation.
  • Add flash message dismissal: Implement JavaScript that lets users close flash messages by clicking an X button, practicing DOM manipulation and event handlers.
  • Create a footer component: Build includes/footer.html with copyright info and social links, include it in base.html, demonstrating the {% include %} pattern.
  • Implement error handling: Create a custom 404 error page by defining @app.errorhandler(404) that renders 404.html with a friendly message and navigation back home.
  • Add session persistence: Store the user's selected time range (6 months, 1 year, all time) in session so their preference persists across page loads.
  • Refactor database queries: Move all database queries from app.py into database.py as functions, then import and call them from routes. This practices clean code organization.

The more you practice these patterns, the more natural Flask development becomes. When you reach Chapter 18, you'll build three new pages quickly because the workflow feels familiar. Professional developers practice fundamentals repeatedly until they become instinctive.

Looking Forward

What you've mastered in this chapter:

  • Flask's request/response cycle and how URLs map to Python functions
  • Template inheritance with base templates and child templates that extend them
  • Modular components using {% include %} for reusable elements like navigation bars
  • The Python-to-JavaScript handoff pattern with |tojson|safe filters
  • Chart.js configuration for interactive line charts with responsive behavior
  • Session-based authentication with decorators for protecting routes
  • OAuth web flow adaptation from command-line to browser-based authentication
  • Defensive programming with error handling, safe defaults, and graceful degradation
  • Responsive design using CSS Grid and mobile-first development approach
  • Browser DevTools for debugging frontend issues separate from backend problems

The Backend-First strategy worked. You didn't spend days fighting CSS. You didn't get lost in template syntax. You focused on Flask logic and data connections, leveraging the CSS starter kit for professional styling. This is how real development teams work, use existing tools effectively, build custom logic where it matters.

The Pattern Holds

Chapter 18 will feel familiar because you're not learning new concepts, you're applying established patterns. Analytics page? Route + chart data + template + Chart.js. Playlist Manager? Route + form handling + template + AJAX. Settings page? Route + destructive operations + confirmations + template.

Each new page adds one or two new techniques (multiple chart types, form submissions, AJAX calls) while reusing everything you've already learned. This is deliberate pedagogical design: master fundamentals deeply, then apply them with minor variations. Confidence comes from pattern recognition, not memorizing 50 different ways to solve problems.

What Chapter 18 will cover:

  • Evolution Analytics page: Multiple Chart.js chart types (line, pie, bar) on one page, date filtering, advanced data queries
  • Playlist Manager page: HTML form handling, progressive enhancement with AJAX, POST request processing
  • Settings page: Destructive operations with confirmation flows, database export, OAuth disconnect
  • Polish and best practices: Loading states, error boundaries, accessibility basics, deployment preparation

You'll build all three pages in Chapter 18, completing the Music Dashboard. By the end of that chapter, you'll have a portfolio-ready web application that demonstrates Flask proficiency, frontend integration, data visualization skills, and professional development practices.

Before moving to Chapter 18, take a moment to appreciate what you've accomplished. You started this chapter with a command-line tool. You're ending it with a web dashboard that looks professional, works on mobile, handles authentication, displays interactive charts, and connects to a real database. That's a significant technical achievement.

For Portfolio Presentations

The Home Dashboard you built is already interview-worthy. You can walk a recruiter through: (1) Flask routing and how URLs map to functions, (2) Template inheritance and the DRY principle, (3) Database queries and defensive error handling, (4) OAuth authentication flow for web applications, (5) Chart.js integration and responsive design, (6) The Python-to-JavaScript handoff pattern.

Each of these topics demonstrates different technical competencies. The Home Dashboard isn't just one feature, it's a showcase of multiple skills that prove you can build production web applications.

When you're ready, proceed to Chapter 18: Building Complete Dashboard Features. You'll apply everything you've learned here to build the remaining pages, completing your Music Time Machine web dashboard.

Preview: Organizing Larger Applications with Blueprints

The Music Time Machine currently fits in one app.py file. With four pages (Home, Analytics, Playlists, Settings) and maybe 300-400 lines of code, this works fine. But what happens when your application grows to 10 pages? 20 routes? Different feature areas with separate concerns?

A single file becomes unmaintainable. You scroll hundreds of lines to find the route you need. Functions for authentication, analytics, and playlist management all mix together. Changes in one feature risk breaking another. Flask provides Blueprints to solve this, they let you organize routes into logical modules that stay independent but work together.

This is a preview, not a tutorial. You won't refactor the Music Time Machine into Blueprints (it's too small to benefit). Instead, you'll learn when and why Blueprints matter so you can apply them to larger projects in the future.

1.

The Single-File Approach (What You've Built)

Your current structure keeps everything in one place:

Python - Current app.py Structure
from flask import Flask, render_template, redirect, url_for

app = Flask(__name__)
app.secret_key = 'your-secret-key'

# Home routes
@app.route('/')
def home():
    return render_template('home.html')

# Analytics routes
@app.route('/analytics')
def analytics():
    return render_template('analytics.html')

# Playlist routes
@app.route('/playlists')
def playlists():
    return render_template('playlists.html')

@app.route('/create-playlist', methods=['POST'])
def create_playlist():
    # Playlist creation logic
    return redirect(url_for('playlists'))

# Settings routes
@app.route('/settings')
def settings():
    return render_template('settings.html')

@app.route('/sync-data')
def sync_data():
    # Data syncing logic
    return redirect(url_for('home'))

# Error handlers
@app.errorhandler(404)
def page_not_found(error):
    return render_template('404.html'), 404

if __name__ == '__main__':
    app.run(debug=True)

This works beautifully for small applications. Everything's visible in one file. You can quickly see all routes, understand the full application structure, and make changes without switching files. There's no complexity overhead.

When this approach breaks down:

  • 10+ routes: Scrolling through hundreds of lines to find specific routes
  • Multiple developers: Git merge conflicts when everyone edits the same file
  • Feature areas: User management, admin panel, API endpoints, all mixed together
  • Code reuse: Want to use the same route patterns in another project? Can't extract cleanly.
2.

How Blueprints Organize Code

Blueprints let you group related routes into separate Python modules. Here's how the Music Time Machine might look with Blueprints:

Directory Structure with Blueprints
music-dashboard/
├── app.py                    # Main application setup
├── blueprints/
│   ├── __init__.py
│   ├── home.py              # Home dashboard routes
│   ├── analytics.py         # Analytics routes
│   ├── playlists.py         # Playlist management routes
│   └── settings.py          # Settings routes
├── templates/
└── static/
Python - blueprints/playlists.py
from flask import Blueprint, render_template, redirect, url_for, flash

# Create a Blueprint for playlist-related routes
playlists_bp = Blueprint('playlists', __name__)

@playlists_bp.route('/playlists')
def view_playlists():
    """Display all playlists."""
    return render_template('playlists.html')

@playlists_bp.route('/playlists/create', methods=['POST'])
def create_playlist():
    """Create a new playlist."""
    # Playlist creation logic
    flash('Playlist created successfully!', 'success')
    return redirect(url_for('playlists.view_playlists'))
Python - app.py (Main Application)
from flask import Flask
from blueprints.home import home_bp
from blueprints.analytics import analytics_bp
from blueprints.playlists import playlists_bp
from blueprints.settings import settings_bp

app = Flask(__name__)
app.secret_key = 'your-secret-key'

# Register all blueprints
app.register_blueprint(home_bp)
app.register_blueprint(analytics_bp)
app.register_blueprint(playlists_bp)
app.register_blueprint(settings_bp)

if __name__ == '__main__':
    app.run(debug=True)

What changed:

  • Separation: Playlist routes live in playlists.py, analytics routes in analytics.py. Each file focuses on one feature area.
  • Registration: The main app.py imports and registers blueprints. It becomes a configuration file, not a giant route collection.
  • url_for() syntax: When referencing routes from other blueprints, use url_for('playlists.view_playlists') (blueprint name + function name).
3.

When to Use Blueprints

Blueprints aren't always necessary. Use them when you face these scenarios:

  • Feature complexity: 8+ routes per feature area (user management, admin panel, API endpoints)
  • Team development: Multiple developers working on different features simultaneously
  • Code reuse: Want to extract authentication or admin functionality for use in other projects
  • URL prefixes: Need /admin/users, /admin/settings, /api/v1/tracks groupings
  • Testing isolation: Want to test the playlist feature without loading the entire application

Don't use Blueprints when:

  • Small projects: Under 10 routes fit comfortably in one file
  • Solo development: No merge conflicts, no collaboration overhead
  • Learning basics: Blueprints add complexity before you understand Flask fundamentals
  • Prototyping: Single-file apps iterate faster during early development
4.

The Circular Import Problem

Blueprints introduce one significant challenge: circular imports. When app.py imports blueprints and blueprints need the app object (for app.config or extensions), you create import cycles:

Circular Import Problem
# app.py imports playlists blueprint
from blueprints.playlists import playlists_bp

# playlists.py needs to access app.config
from app import app  # CIRCULAR IMPORT!

# Python can't resolve this, which file loads first?

The solution: Application factories or late imports. These patterns delay imports until after the app initializes, breaking the cycle. But they add architectural complexity that beginners often struggle with.

This is why the Music Time Machine stays in one file, you avoid circular import headaches while learning Flask fundamentals. When you build larger projects and need Blueprints, you'll tackle this challenge with more experience and context.

Application Factories (Advanced Pattern)

Professional Flask applications often use the Application Factory pattern to avoid circular imports:

Python - Factory Pattern Example
def create_app():
    """Application factory function."""
    app = Flask(__name__)
    app.config['SECRET_KEY'] = 'your-secret-key'
    
    # Register blueprints AFTER app creation
    from blueprints.playlists import playlists_bp
    app.register_blueprint(playlists_bp)
    
    return app

# Create app instance when needed
app = create_app()

The factory function creates and configures the app in one place, then registers blueprints. This prevents circular imports because blueprints import from the app only after it exists. You don't need this pattern yet, but knowing it exists prepares you for larger projects.

Blueprint Resources for Future Learning

When you're ready to explore Blueprints in depth:

  • Flask documentation: flask.palletsprojects.com/blueprints covers Blueprint patterns comprehensively
  • Flask Mega-Tutorial: Miguel Grinberg's tutorial includes Blueprint refactoring chapters
  • Real Python: "Flask Blueprints" guide shows practical organization patterns
  • Practice: Build a project with 15+ routes, then refactor into Blueprints, you'll feel when they're needed

Blueprints represent Flask's scalability. They prove the framework grows with your needs, from simple single-file apps to complex multi-module applications. The Music Time Machine doesn't need them because it's deliberately scoped to teach Flask fundamentals without architectural overhead.

But when you build your next project, maybe an e-commerce site with user accounts, product catalogs, admin panels, and API endpoints, you'll recognize the moment when one file becomes unwieldy. That's when you reach for Blueprints, apply the patterns you've previewed here, and organize your growing codebase into maintainable modules.

For now, the single-file approach you've learned serves you perfectly. It's simpler, more transparent, and lets you focus on Flask's core concepts without architectural distractions. Master these fundamentals first, then scale up to Blueprints when project complexity demands it.