At some point in your development career, you will build an application that needs to access someone else's private data through an API. When that happens, you face a fundamental challenge: how can your application obtain access to user data without requiring users to share their account credentials with you?
Chapter Roadmap
This chapter takes you from understanding why OAuth exists to building a fully working GitHub OAuth tool in Python. You'll progress through theory, security concepts, token management, and hands-on implementation.
The Problem and the Protocol
Understand why password sharing was broken, how OAuth 2.0 emerged as the solution, and learn the four roles and the Authorization Code flow that powers modern API access.
Security and Permissions
Master the security mechanisms that protect OAuth flows — scopes for limiting access, state parameters for CSRF protection, redirect URI validation, token storage best practices, and PKCE for public clients.
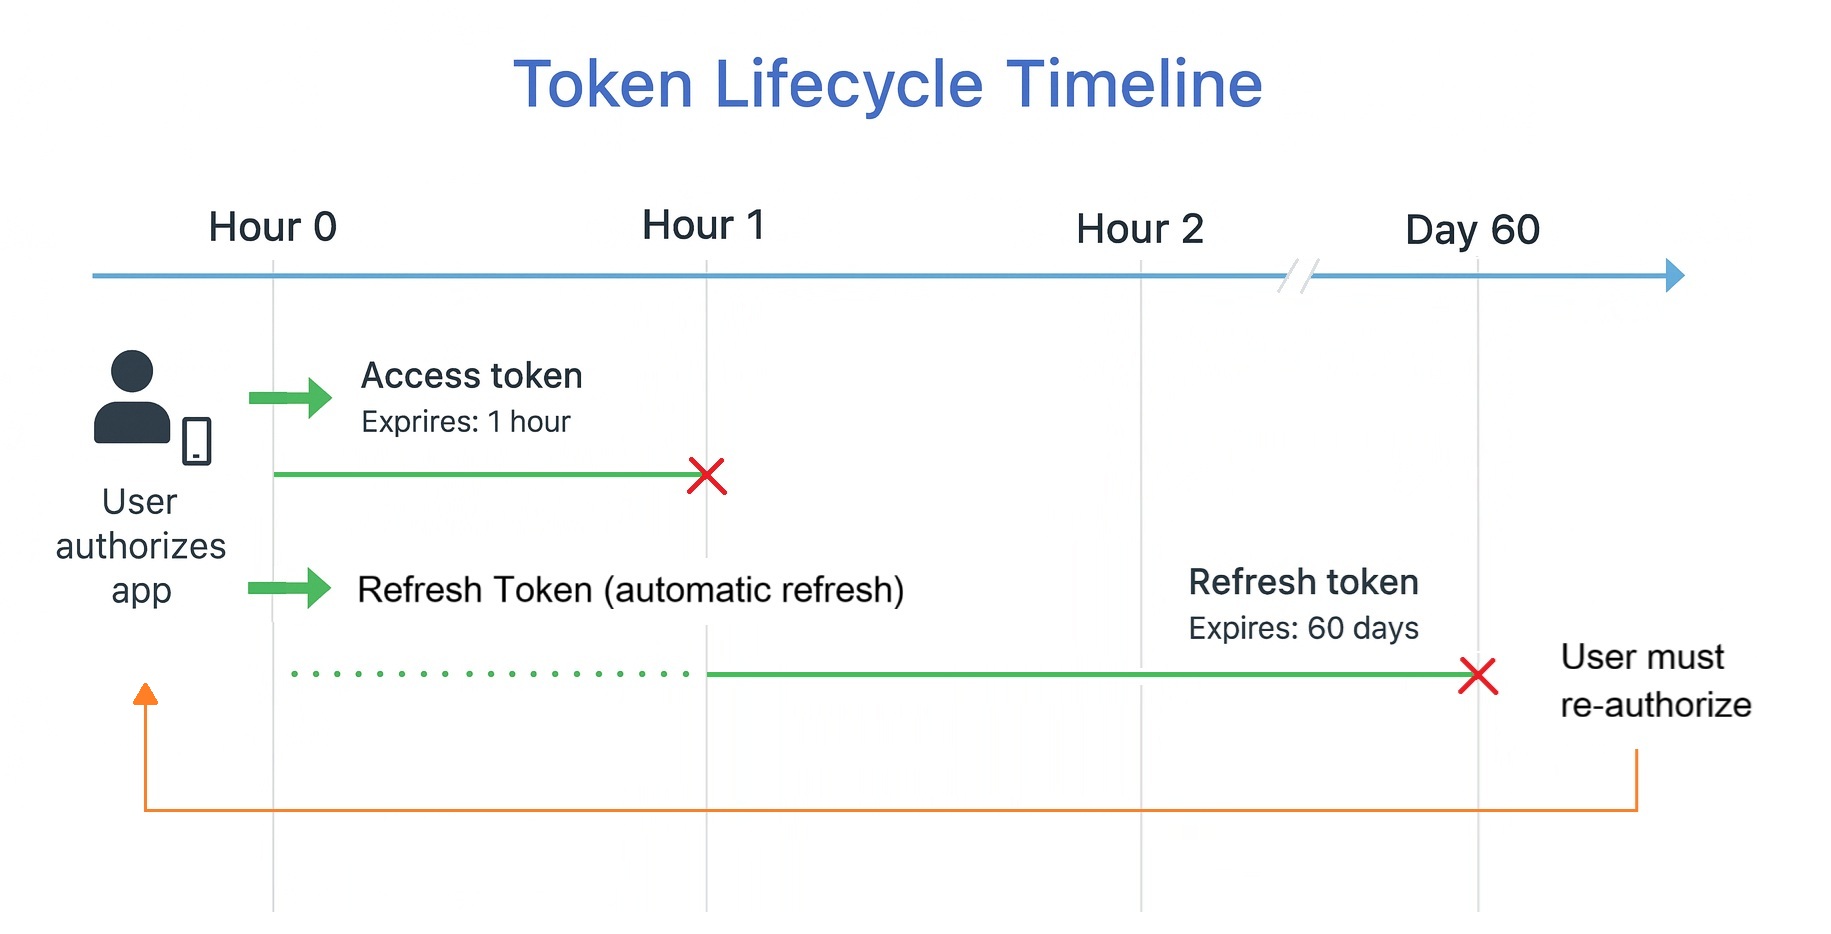
Token Lifecycles and Management
Learn how access tokens and refresh tokens work together, build a TokenManager class that handles expiration and automatic renewal, and implement token revocation for clean disconnects.
Hands-On with GitHub OAuth
Register an OAuth app with GitHub, implement the full authorization flow step by step, and build the complete Dev GitHub Tool — a CLI that lists repositories, checks issues, and displays pull requests using OAuth tokens.
Review and Next Steps
Consolidate your understanding with a summary of key concepts, test yourself with a checkpoint quiz, and preview how OAuth foundations connect to the Spotify integration project in the next chapter.
Learning Objectives
What You'll Master in This Chapter
By the end of this chapter, you'll be able to:
- Explain the OAuth 2.0 Authorization Code flow in plain language and understand why each step exists
- Register OAuth applications with API providers to obtain Client IDs and Secrets
- Implement the complete OAuth flow to exchange authorization codes for access tokens
- Apply OAuth security best practices including state parameters, scope minimization, and redirect URI validation
- Build token managers that handle expiration and automatic refresh
- Debug common OAuth errors like redirect URI mismatches, invalid scopes, and expired tokens
- Distinguish between Authentication and Authorization to understand who you are versus what you can do
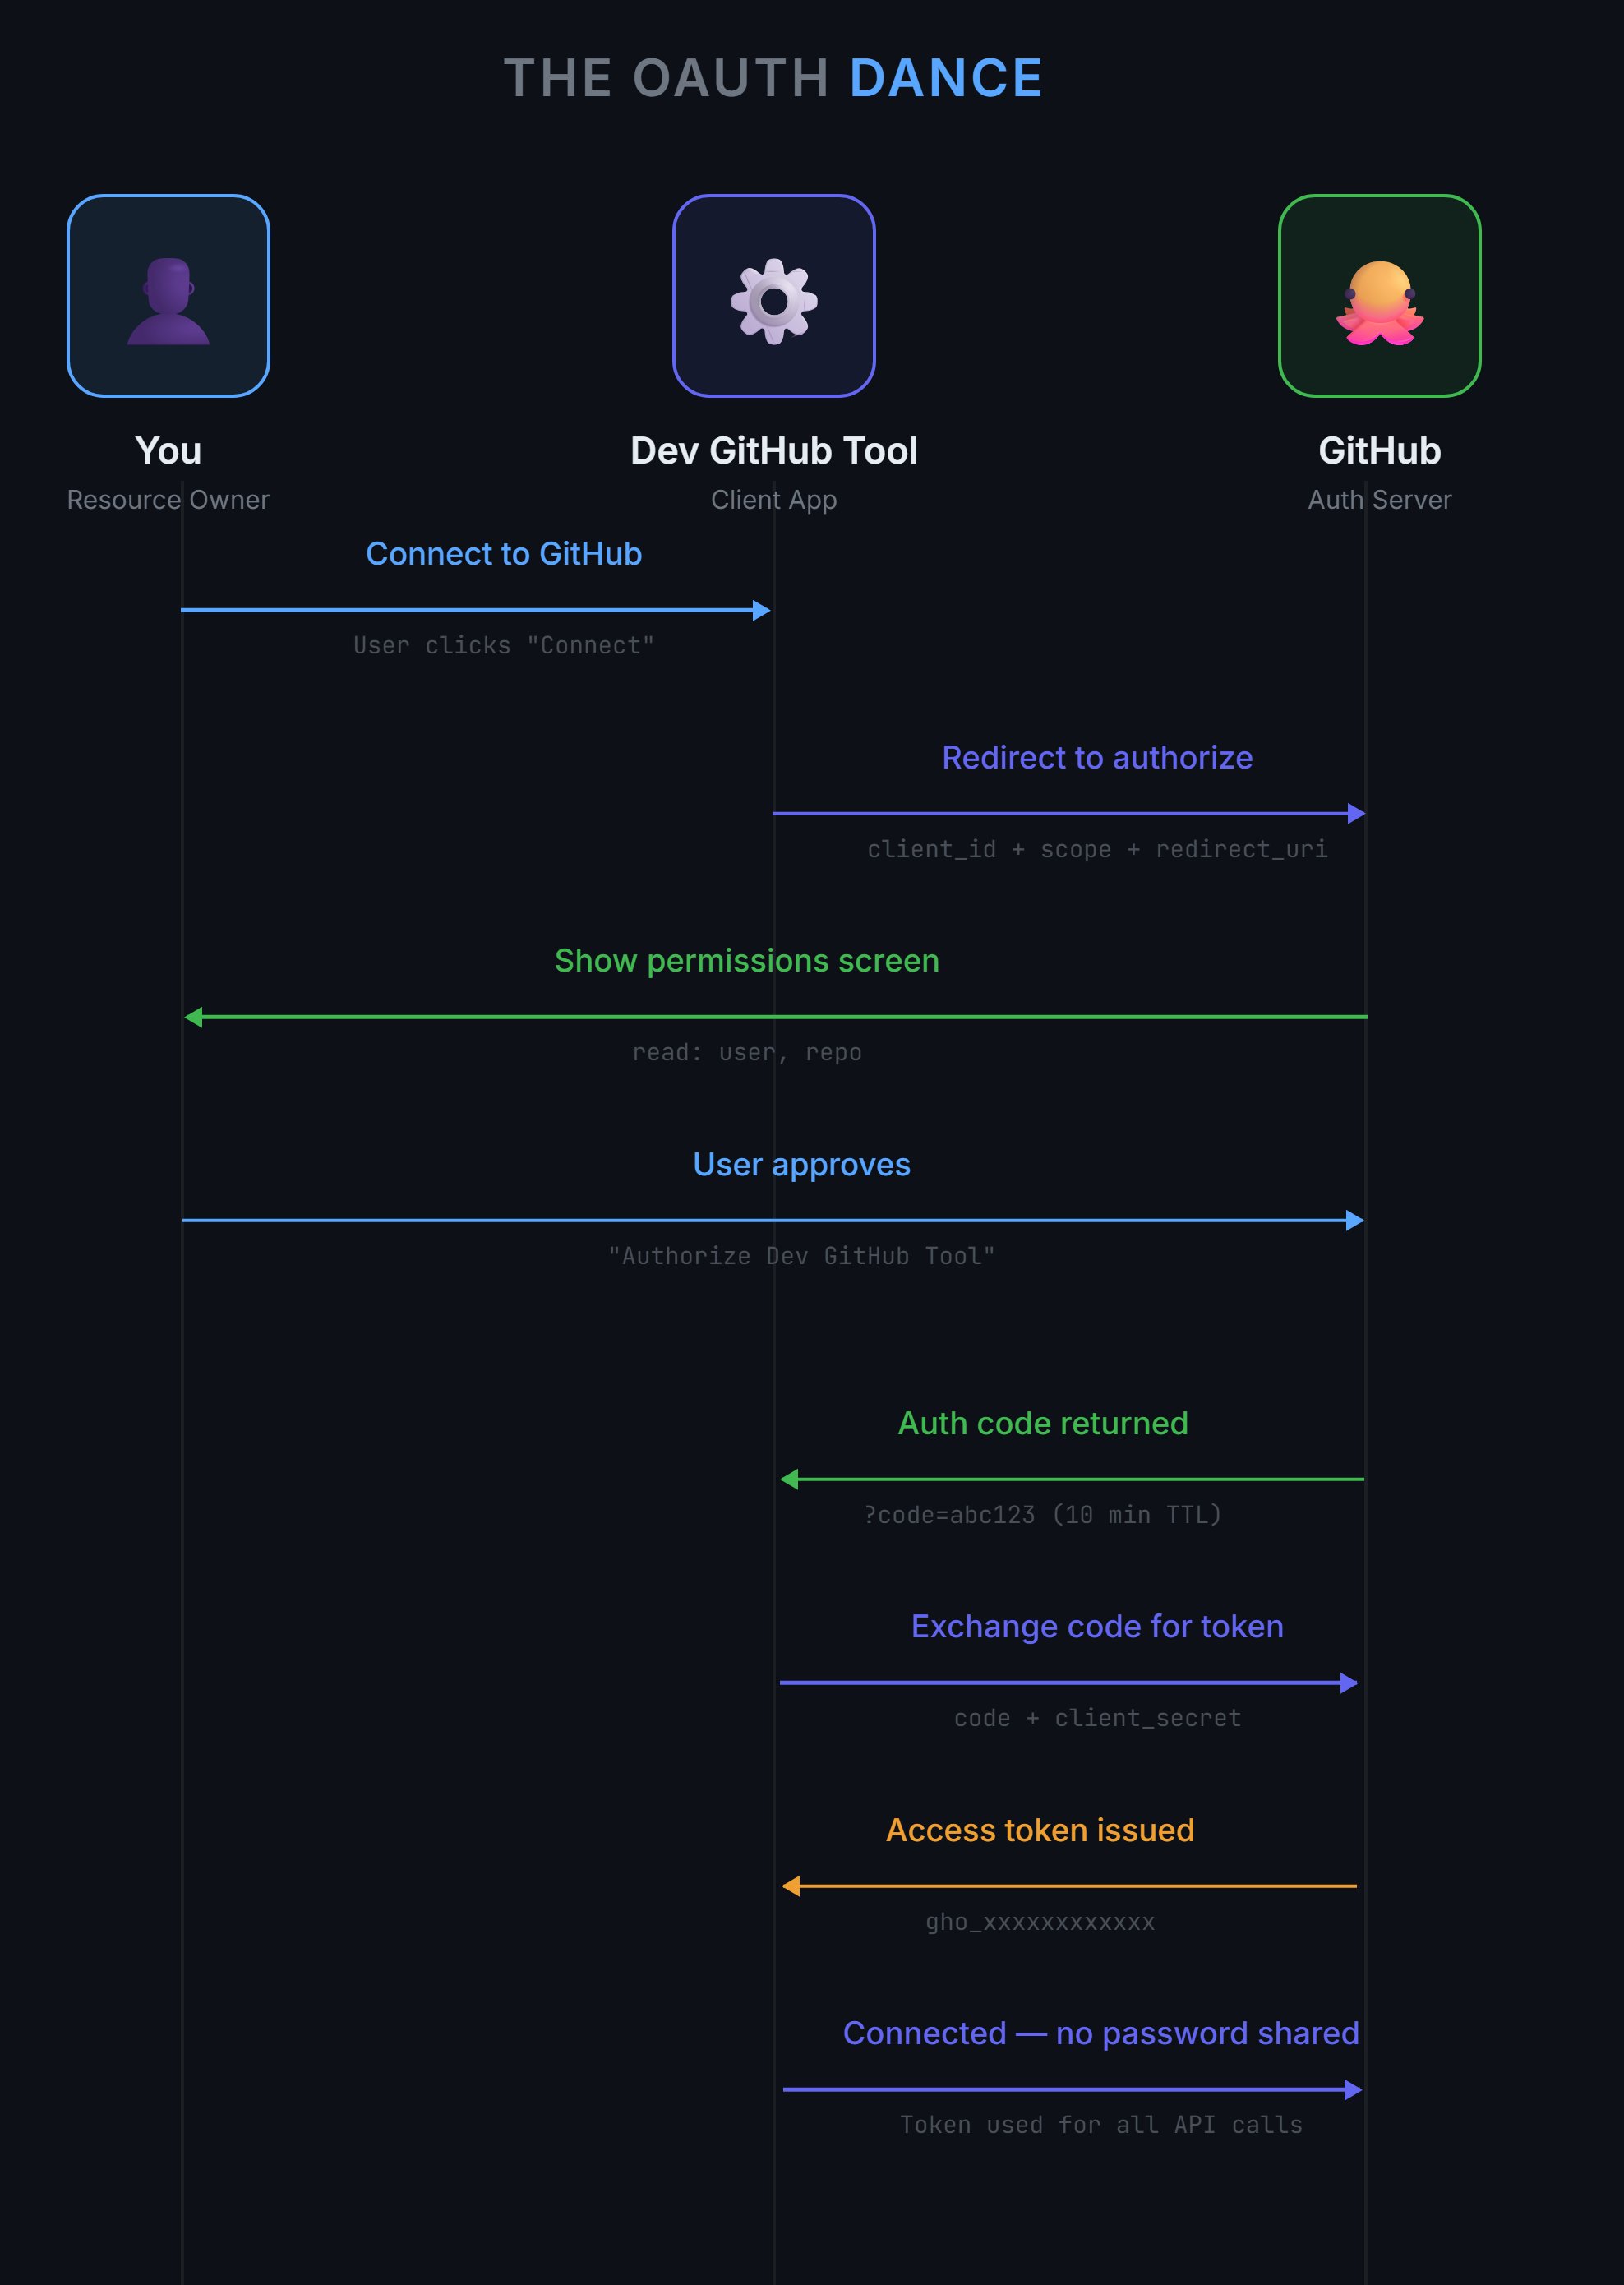
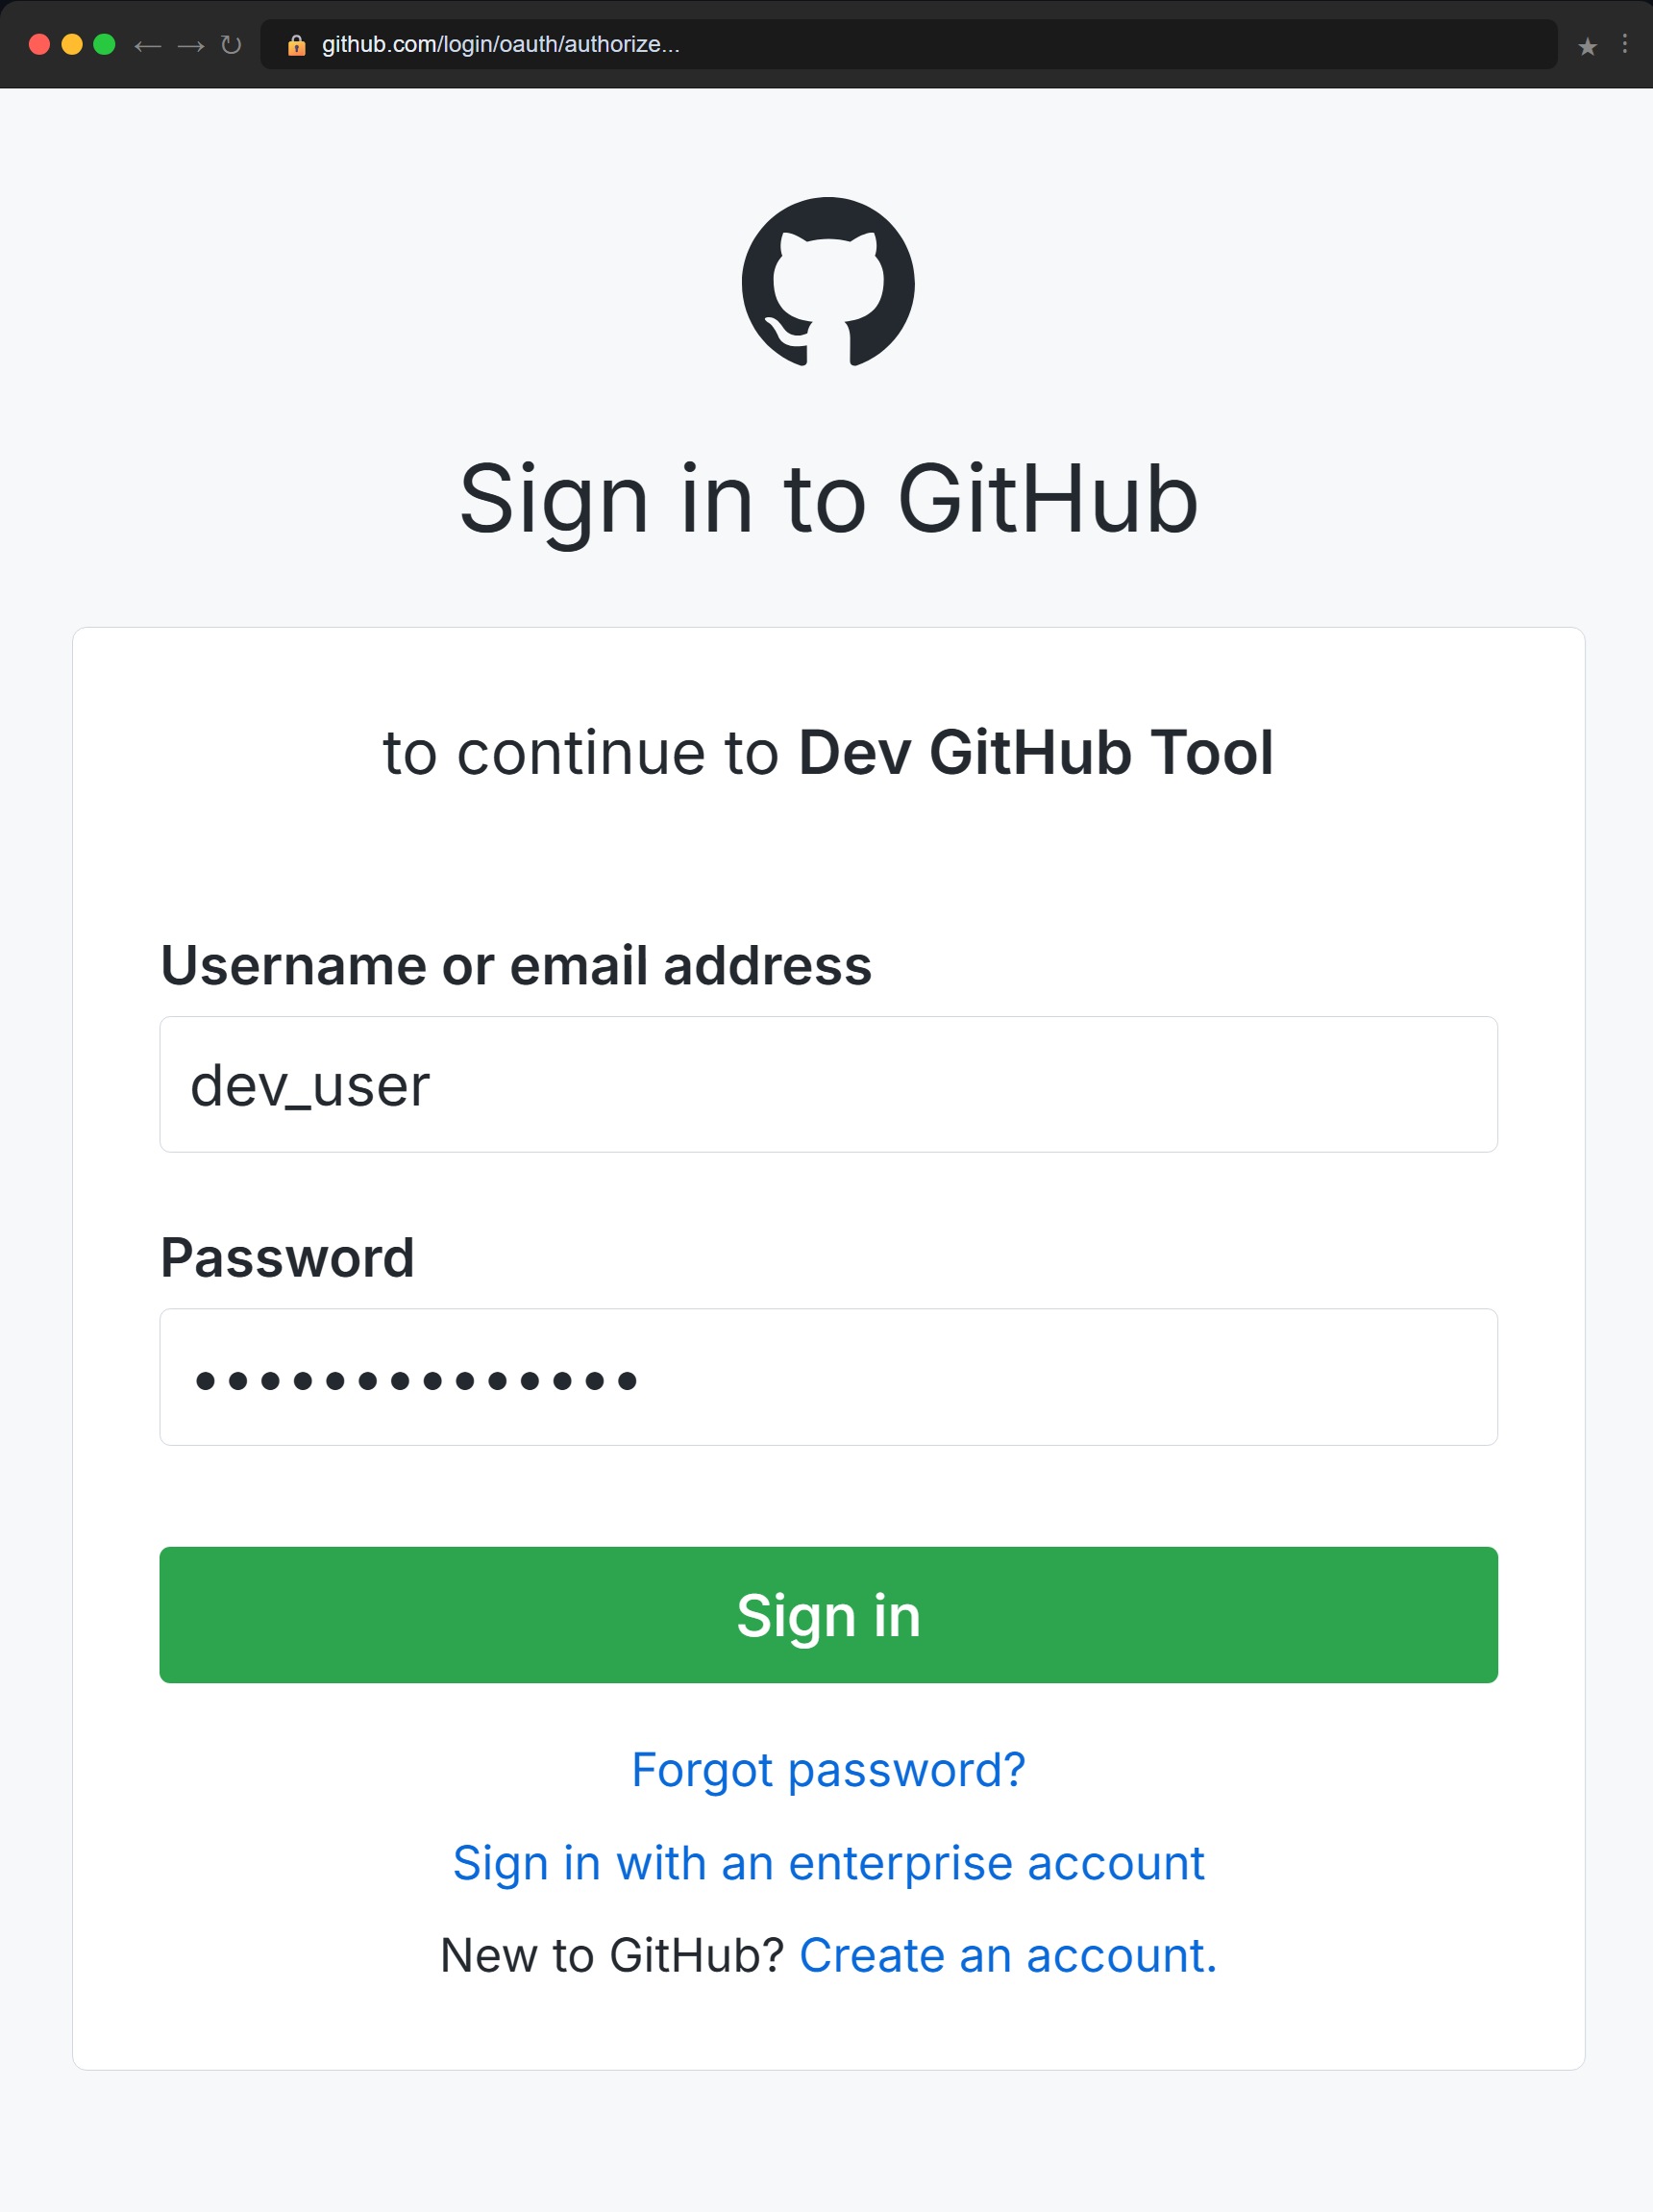
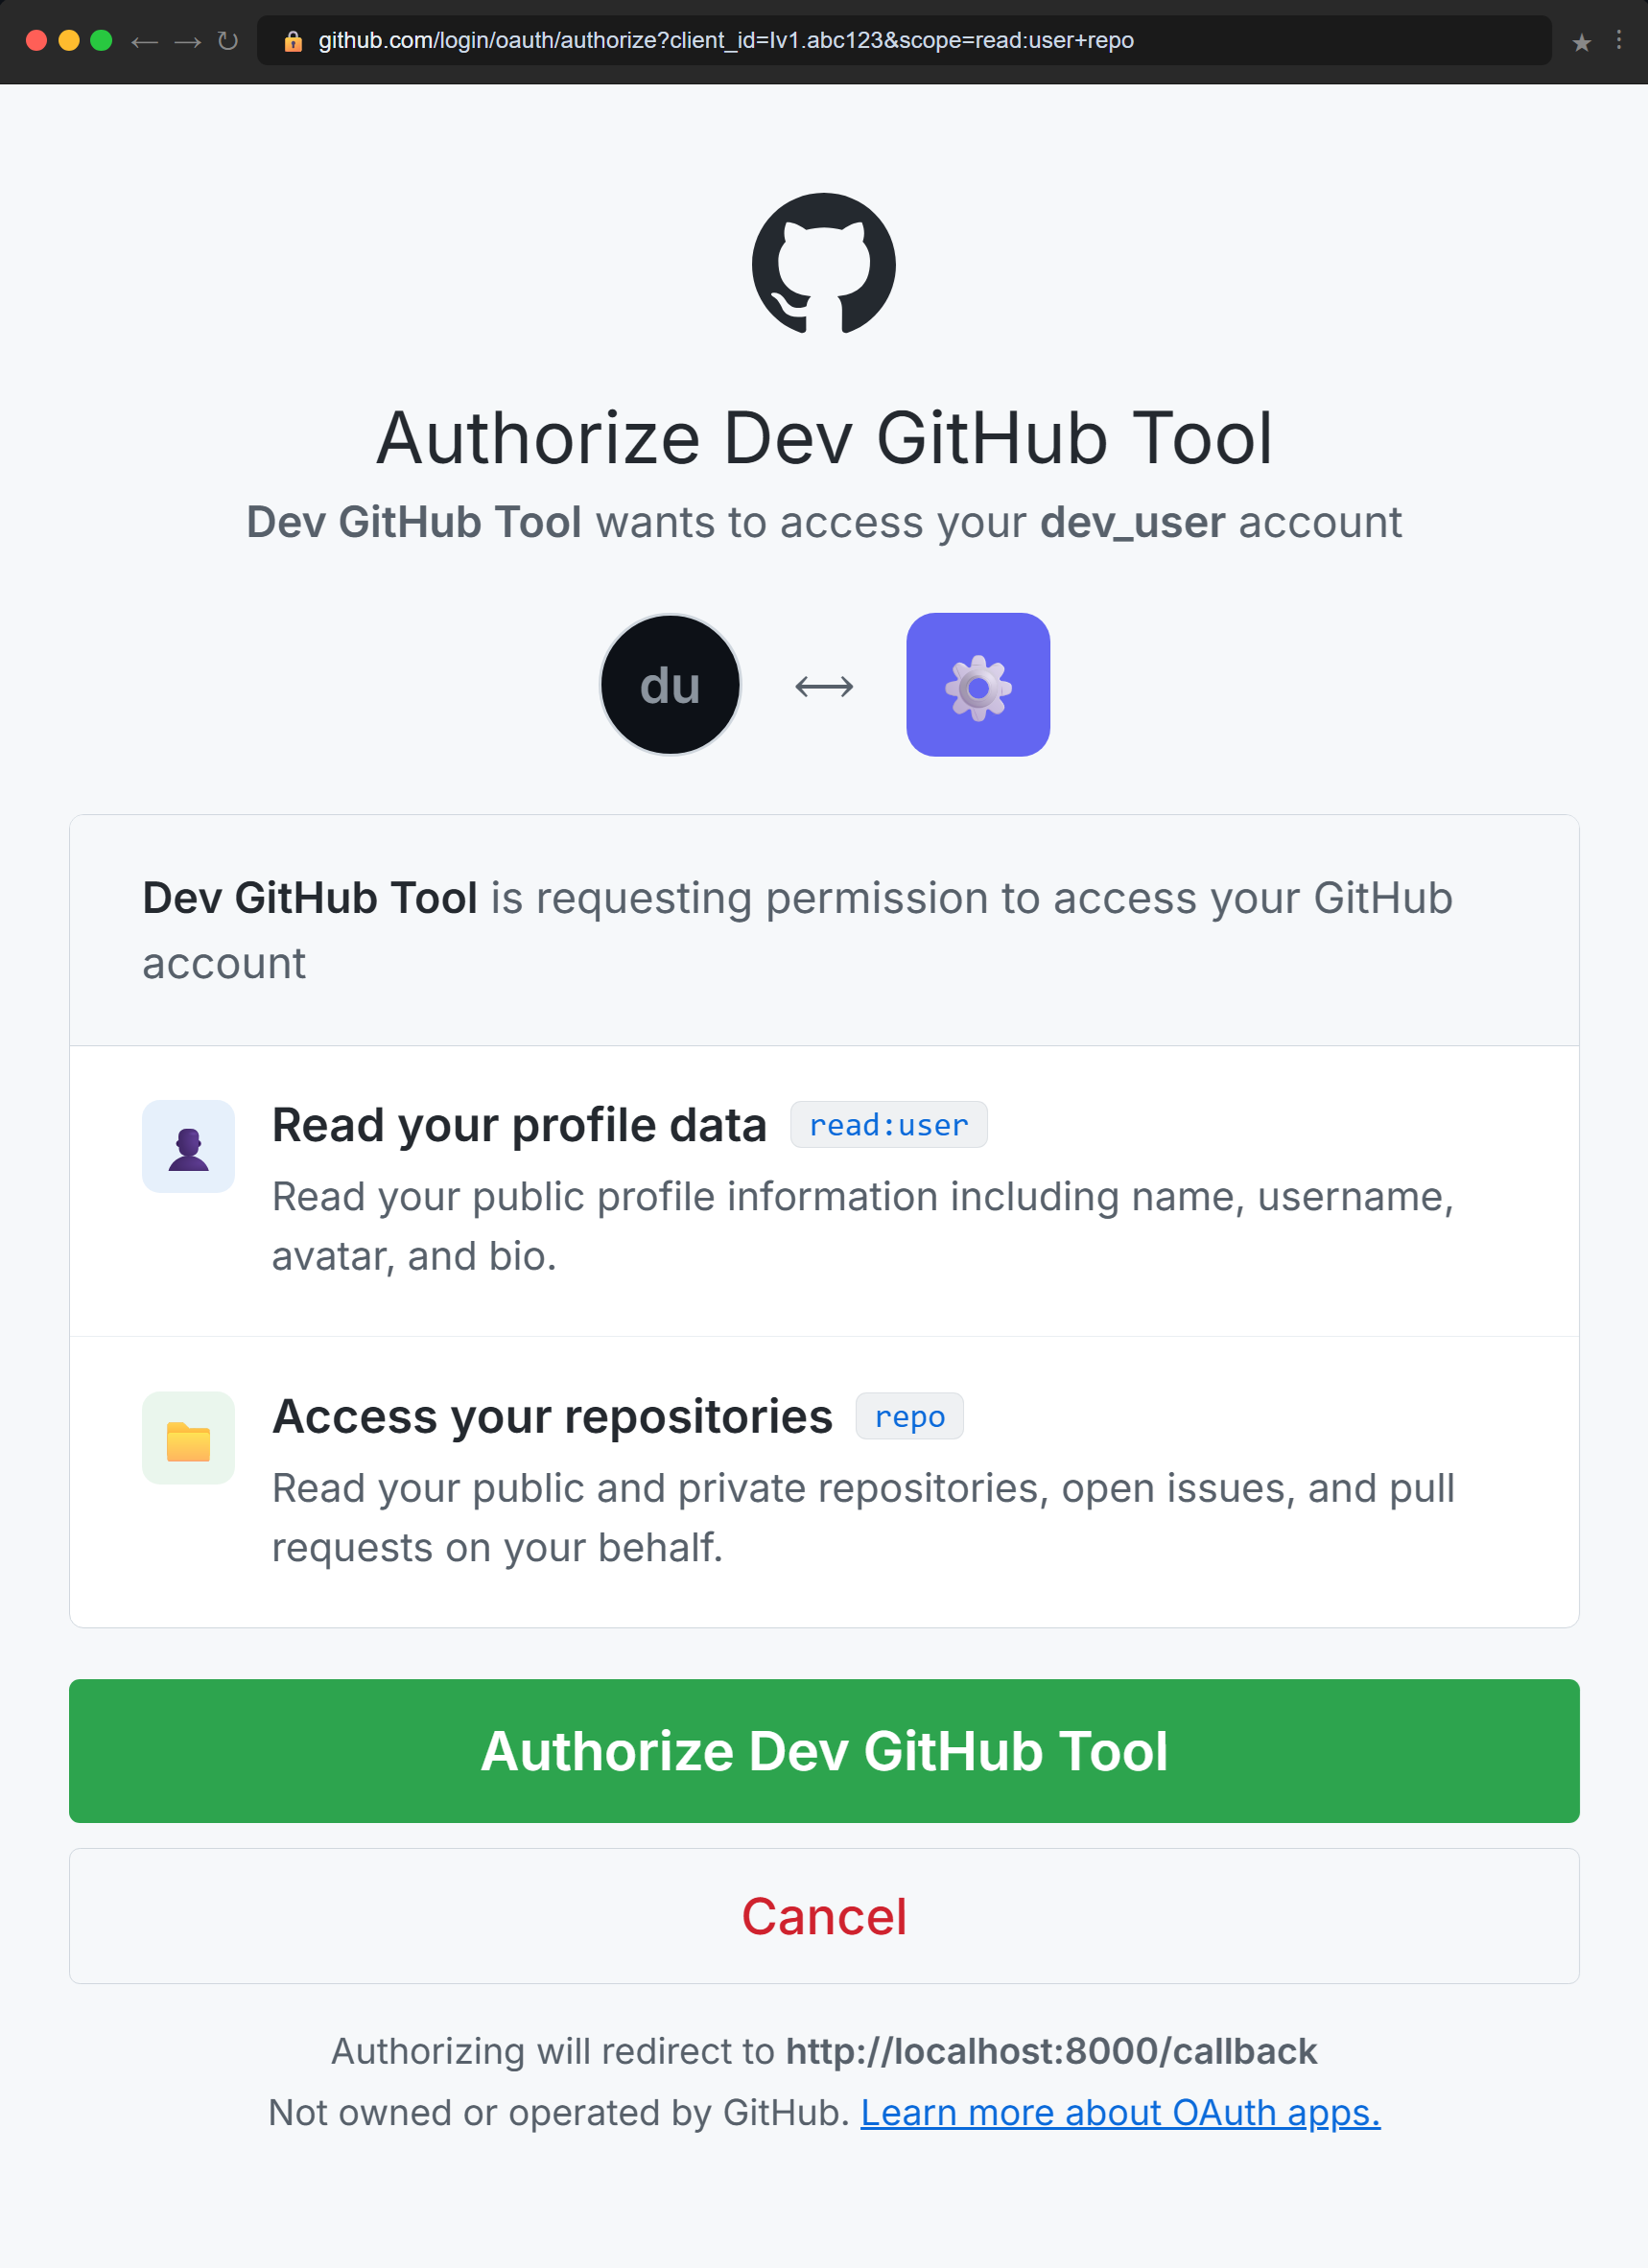
The Dev GitHub Tool
Consider a practical example you will build in this chapter: a Python command-line tool (Dev GitHub Tool) that helps developers manage their GitHub accounts. The tool lists repositories, checks open issues, and displays recent pull requests. To provide this functionality, it needs permission to read the developer's GitHub profile and repository data.
The Dev GitHub Tool needs permission to read your repositories — but it should never ask for your password.
The tool must access private data on behalf of the user, but it should never ask for or store the user's GitHub password. This is the core problem that OAuth 2.0 solves: enabling secure, limited, revocable access to user resources without credential sharing.
Before OAuth: The Password Sharing Era
To appreciate OAuth 2.0, you need to understand what came before it. In the mid-2000s, third-party applications had no choice but to ask users for their actual passwords.
If you wanted to use TweetDeck to manage multiple Twitter accounts, Hootsuite to schedule tweets, or analytics tools to track engagement, every single application required the same thing: your Twitter username and password. You handed over your credentials, and the application logged in as you with full account access.
This approach created severe security and usability problems. Users had to trust third-party applications with credentials that granted full account access. Revoking access required changing your password, which broke every application using it. Applications stored passwords in their databases, creating security vulnerabilities. Users had no way to limit what an application could do or audit which applications had access.
Every major platform faced the same challenge. Twitter, Facebook, Google, Flickr, and LinkedIn all needed a way to let third-party applications access user data without requiring password sharing. The solution that emerged was OAuth (Open Authorization), an open standard that allows users to grant third-party applications limited, revocable access to their data without sharing passwords.
OAuth 1.0 launched in 2007. By 2012, OAuth 2.0 replaced it as the industry standard, simplifying implementation while maintaining security. Today, when you click "Sign in with GitHub" or "Connect to Google," you are using OAuth 2.0. It has become the dominant authorization framework for modern APIs.
Start with the problem, then the solution. The next section explains what OAuth 2.0 is and precisely how it works.